Monday, March 11, 2024

World War Supply Canvas M3 Tanker Holster

Last year I posted about the virtues of the M3 Tanker Holster. I have copies of those made for the M1911 and the S&W Victory Model, and a really nice version from El Paso Saddlery for my S&W Model 28 N-Frame. Today I received a canvas version of the Victory Model holster by World War Supply. I bought it from Amazon to take advantage of points I have, but it's also available directly from WWS.

Aside from 4" K-Frames, it fits a variety of other guns:

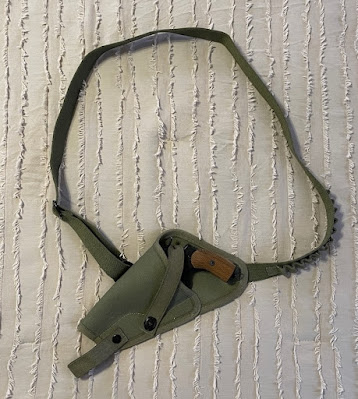
Russian M-1895 Nagant:


High Standard Sentinel .22:


Ruger Speed Six:


And even the Beretta Model 81 .32 ACP autoloader fits comfortably:


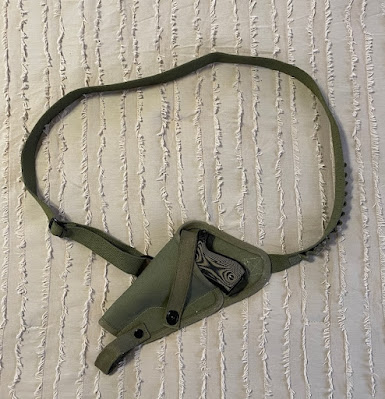
Note that I have the Beretta in there cocked and locked with the retention strap between the hammer and firing pin, just in case the safety gets nudged off by accident.

The Beretta Model 84 in .380 is externally identical to the Model 81 so it'll work as well.

During WW2 the Victory Model holsters were also used for Colt Commando revolvers, so it should work for an Army Special or Official Police with a 4" or shorter barrel.

I didn't try it in this one but my leather Victory Model holster works well with a Webley Mk.IV in .38/200. 

The 12 cartridge loops on the strap are intended for .38 Special rounds but appear snug enough for .32 S&W Long. They should be fine for 7.62x38R Nagant ammo or .32-20.

World War Supply also has a canvas version of the holster for the M-1911.

The canvas fabric appears to be of good quality and the stitching is done well. These holsters cost $34.99 and at this price point appear to be a great deal with a lot of versatility. As a southpaw I appreciate it that WWS sells left handed versions of this design at the same price as the right handed holsters.

If you prefer leather those versions are only a few dollars more.

Monday, February 26, 2024

Check the Thumb Piece Nut on Your Revolvers

If you rely on a double action revolver something that's easily overlooked is whether the thumbpiece nut or screw is tight. If it loosens and falls off it could lead to losing the thumb piece, thus making the gun a lot harder to load and unload.

The thumb piece nut is part number 20 in this diagram of the Smith & Wesson Model 10, with the thumb piece itself being number 21.


(Schematic borrowed from Numrich.)

Taurus revolvers use a similar design. At least on the two sample I own an actual screw is used, that screws into the cylinder latch. On the S&Ws there's a threaded stud that protrudes through the frame onto which the nut threads.

I recommend removing the nut or screw, cleaning the threads with rubbing alcohol, and then reinstalling after putting some blue Loctite on the threads.

It wouldn't be a bad idea to pick up a couple extras along with other spare parts. Something else I recommend for older Smith & Wessons is a spare hammer nose and rivet (parts 48 and 51 in the diagram). Numrich is a great source for a vast amount of gun parts.

When working on guns always make sure that you use properly fitting, hollow ground screwdrivers. I mostly use the screwdriver bits found in this set from Weaver, which includes a good mallet, pin punches, and bench block, all of which are very useful.

Sunday, January 21, 2024

A Few Nice Pieces of Cold Weather Clothing

I've recently picked up a couple nice pieces of  clothing that I can recommend for layering in cold weather.

First, is a French quarter-zip fleece top in CCE camo. I got it from Varusteleka but it's available at many surplus suppliers. As with any military surplus clothing, size choices are limited. It's a very simple light fleece shirt but it's surprisingly warm especially for its weight, which is only about 270 grams. If you can find one in your size grab it while they are available.

Second, is a Rothco copy of the old USGI 5-button or "Jeep" sweater (eBay link). I've had the real deal in the past but I put on weight so I gave them away. Genuine GI sweaters are still available but mostly in small sizes. They were made in wool knit or acrylic knit variants. Wool is warmer but the acrylic sweaters are still pretty warm. (The above is an eBay link. Here's an Amazon affiliate link.)

Note that by design these are snug-fitting and were often worn over a base layer but underneath a shirt, especially the old M-1951 wool field shirt or a BDU shirt.

Third is a Sarma TST L1 merino wool balaclava, also from Varusteleka. This appears to be made from the same material as their L1 merino wool t-shirt. In other words, it's really thin and packs up very small, to about the size of a pack of cigarettes. I got the L/XL size. For reference my hat size is 7-3/8 or 58/58cm.

Yesterday I took a half hour walk in 20*F weather. On top I wore a long sleeve Hill People Gear synthetic t-shirt, the Rothco sweater, my Arc'Teryx Atom SV jacket, topped with a German surplus flecktarn parka to provide a windproof outer layer that covered the top half of my thighs, and the Sarma balaclava. About halfway through the walk I started overheating and had to drop the hood and unzip a little.

I was very impressed by the Sarma balaclava. Despite its thickness (or lack thereof) it made a noticeable difference. It can also be rolled down for use as a neck tube/gaiter, or rolled up for use as a beanie. It's stretchy enough to pull down and expose your mouth. I'll be interested to see how it does in warmer weather. 


Friday, January 19, 2024

An Ultralight 5' x 7' Survival Shelter

 This video from WayPoint Survival came up in my YouTube feed today:


This is pretty darn clever, IMO. One thing I'd change would be to put a bowline knot on one end of the ridgeline and then use a marlin spike hitch to fasten that end around a tree, instead of using a carabiner. I.e., run the end of the ridge line around the tree, pull a bight (loop) through the bowline's loop, and then put a stick into the loop to secure it in place.

Thursday, January 18, 2024

Corporal's Corner: The DIY Water Machine

Here's an excellent demonstration from Shawn Kelly of how to melt snow and ice for water during the Winter:


Friday, January 12, 2024

Got a Spider for my Minilathe

A couple weeks ago I ordered a spider for my 7x14 minilathe, something I should have bought years ago. Little Machine Shop had it as their weekly special so I finally pulled the trigger on it.

Link to minilathe spider: https://littlemachineshop.com/products/product_view.php?ProductID=1136

The spider threads onto the end of the spindle and provides additional support to long workpieces, to prevent them from whipping around.


To install the spider you remove the gear cover on the end of the headstock and simply thread it onto the end of the spindle.


I used it today while drilling and tapping the flared end of the factory ramrod that came with my Investarm Gemmer Hawken. Even though I bought an unbreakable Delrin rod for it from Track of the Wolf, which is threaded on both ends, I want to keep the OEM wood rod as a spare.

This shows the ramrod mounted through the spindle bore.


And here I was using the lathe as a tapping guide to keep the 10-32 tap straight. I did not do this under power. Instead, I used the chuck key as a handle and rotated the chuck manually. Power to the lathe was off when I did this.


Aside from drilling and tapping the end of the OEM ramrod to accept 10-32 accessories like cleaning jags, worms, and bullet pullers, both ends of both rods got drilled and cross-pinned. To drill the holes I used my minimill.

Always cross-pin your ramrod tips! Failing to do so can result in the ends pulling off the rod if you get a jag stuck or need to pull a ball. It's simple to do so:

  1. Drill a hole through the rod crossways. I used a #40 drill because for my pin I used some brass rod 0.098" in diameter.
  2. Chamfer both ends of the hole.
  3. Drive the rod through the hole and cut it off. I used side cutters.
  4. Using a hammer, peen over both ends on a metal surface. I used the anvil on my bench vise.
  5. File the ends of the pin smooth.
One end of the Delrin rod from Track is tapped 10-32 and the other is 8-32. I will use 10-32 jags, etc. and have an aluminum T-handle with an 8-32 stud on the end. I have qualms about using it for cleaning or ball pulling.

Just another example of how my small, tabletop machines help me out with gunsmithing tasks.

Monday, January 01, 2024

Making Pemmican Part 3 - Taste Test

Last week a friend and I went to his camp in Tioga County for Pennsylvania's late flintlock deer season. While we did not get any deer, we did get a chance to try the pemmican I made earlier in the week, as described previously on this blog.

To prepare the pemmican for a meal, we made a rubaboo, AKA stew with it. Along with three of the pemmican pucks, we used dried, mixed vegetables from Turkey Foot Trading and Forge, a can of diced tomatoes, garlic, salt, and black pepper.

Cooking it up on the wood stove:


And ready to eat:


(Styrofoam bowls reduce the dishes we need to wash in a completely off-grid, no-running water camp site.)

The verdict: As a meal for someone who has been out in the cold all day it's pretty good. It was very filling and although we each had three bowls about half was leftover, which I brought home in a Ziploc back and reheated for dinner last night.

I may try making pemmican again but I'll try to get the jerky ground more finely.

There's a package with two pucks left in my freezer so I'll have to come up with another way to try it, maybe a rechaud.