Showing posts with label yaesu ft-817nd. Show all posts

Sunday, August 25, 2024

Hard Case for my Yaesu FT-187ND

Last week I took advantage of the most recent Harbor Freight Parking Lot Sale and picked up an Apache 3800 hard case to use with my Yaesu FT-817ND. The Apache case is a Pelican knock-off at around 1/3 the price. It's plenty good for my needs.

The label on the bottom of the case:


The pressure relief valve:


The case has two layers of pluck-to-fit foam. I have the radio and LDG tuner in the bottom:


I then created a tray using a thing piece of nylon, the top layer of foam, and some Gorilla tape, to hold various cables, some 550 cord and bank line, and a power cable.


This is not a self-contained go-box, since it doesn't include an antenna, power supply other than the small FT-817ND battery pack, and a tablet or laptop for digital modes. However, I can combine this with another box that will contain the other items. It's designed for vehicle-mobile operations, not manpack ops.

Sunday, September 17, 2017

First Use of the Emtech ZM-2 Antenna Tuner

HF propagation conditions currently suck, but I wanted to try out the Emtech ZM-2 anyway. My first use would be with a random length antenna.

Earlier today I stopped at Harbor Freight and picked up a one pound spool of aluminum welding wire for ten bucks before the 20% off coupon. We've used such welding wire on our camping trips upstate with good results. In fact, my friend who owns the property we camp on built an 80M dipole with it and strung it about 5 feet off the ground, supporting it with fence insulators. Reception on that antenna is excellent and he's made some contacts as well. It's been there over a year and is still usable.


To support my random wire antenna today I used my 31 foot Jackite kite pole with about 50 feet of the welding wire. I also ran a ground line about 25 to 30 feet and held it down with a big screwdriver as a stake.


The wire was so light that the tip of the mast didn't noticeably droop. The antenna was running approximately East-West, and the ground ran out towards the NE.


Aluminum welding wire is light and easy to work with. As seen with my friend's 80M dipole, it'll last long if its not under much strain. It's cheap enough that if you needed to abandon a random wire antenna made from it, that wouldn't cause concern.

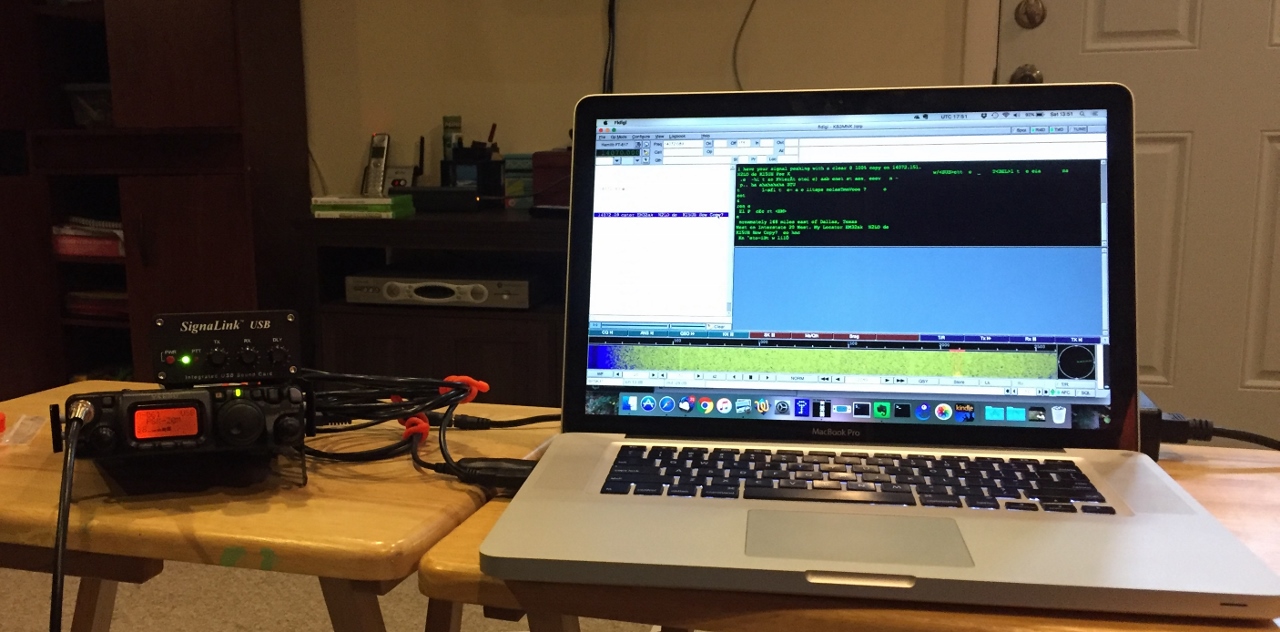
My back patio station today was my 2013 MacBook Pro running FLDIGI and WSJT-X, the ZM-2, Yaesu FT-817ND, and Signalink USB digital interface. I also had a CAT cable for rig control.

I followed the instructions in this video to work the tuner. I found it difficult to see the red LED even though it was overcast, so I need to verify that it's in fact working. Maybe it was luck, but by tuning for maximum noise I really didn't have to tweak anything. When I hit transmit, the rig didn't complain about high SWR.

I briefly tried 40M but had issues getting the antenna to tune on that band. It might be the length of the wire, but again I had issues seeing the LED SWR indicator light up.

As I mentioned, HF propagation is really in the crapper. Before setting up out back, I'd done some work inside using my Icom 7200 and the Ultimax 100 end fed on my roof. The random wire seemed more sensitive, based on the number of PSK31 stations that I saw. However, 20M was mostly dead.

After spotting a number of other stations on 20M PSK31 I closed out FLDIGI and fired up WSJT-X to do some WSPR. On 5 watts, I was in fact getting out.


The screenshot is from WSPR Watch running on my iPhone

This table shows the WSPR stations I received in about 10 minutes of listening.


Timestamp Call MHz SNR Drift Grid Pwr Reporter RGrid km az
 2017-09-17 19:28   8P9HA   14.097165   -17   0   GK03fb   0.1   KB3MNK   FN20ic   3378   336 
 2017-09-17 19:28   K7POF   14.097124   -8   0   DM34sr   10   KB3MNK   FN20ic   3312   68 
 2017-09-17 19:28   W6WGF   14.097119   -7   1   EM12rw   5   KB3MNK   FN20ic   2053   61 
 2017-09-17 19:28   VE4WSC   14.097103   -12   3   EN19ku   5   KB3MNK   FN20ic   2019   114 
 2017-09-17 19:26   WA5IWB   14.097094   -14   0   EM10qh   1   KB3MNK   FN20ic   2215   55 
 2017-09-17 19:26   K7RE   14.097146   -10   0   DN84am   1   KB3MNK   FN20ic   2395   92 
 2017-09-17 19:26   K5FRT   14.097012   -21   0   EM10td   0.2   KB3MNK   FN20ic   2206   54 
 2017-09-17 19:24   8P9HA   14.097137   -19   0   GK03fb   0.1   KB3MNK   FN20ic   3378   336 
 2017-09-17 19:24   K6KWI   14.097060   -21   0   DM13cu   20   KB3MNK   FN20ic   3802   67 
 2017-09-17 19:24   N0IJK   14.097052   -19   0   EL19ao   5   KB3MNK   FN20ic   2365   54

I am cautiously optimistic about the Emtech ZM-2 tuner but I need to figure out why I'm not seeing the LED SWR indicator light. My next experiment with it will be with a dipole to be constructed using some 450 Ohm window line that I bought yesterday at Ham Radio Outlet.

Sunday, August 21, 2016

Digital QRP with a Mac and SignaLink USB

Operating QRP PSK31 using a Mac, Fldigi, and a SignaLink USB interface. In the video I provide details on my antenna, physical connections between the radio and rig, and about configuring Fldigi.


More info on the antenna can be found in this older post.

Saturday, August 20, 2016

WSPR on a Mac

I did some WSPR work out back today using my MacBook Pro, WSJT-X, Yaesu FT-817ND, SignalinkUSB, and my 20M vertical antenna.


Hopefully you find this useful.

Sunday, May 22, 2016

Camping Trip AAR

This weekend a couple friends and I went on a camping trip to Tioga County, PA. The main activity this time was ham radio. We went up on Friday and came home today.

I had to work on Friday but was able to cut out a little early. By the time I got on the road it was rush hour, so it took me a full four hours to get to my friend's land. By the time I arrived it was 9:30 PM. Before I got there, he'd put up an 80M dipole antenna made from aluminum welding wire, electric fence insulators, and some electric fence posts from Tractor Supply. The feed line was the welding wire, formed into an open ladder line held apart with pink duct tape.


This dipole worked well and pulling in signals on 20M, 40M, and 80M. A number of the calls we logged were from within Pennsylvania, demonstrating the viability of NVIS communications.

We're fans of the digital modes. He has an Icom 718 with which he uses a Donner Digital Interface at home. Since he's not going to schlepp a desktop PC with him, he used PSKdroid running on an LG Android tablet, using audio coupling. I also setup my Apple iPad Mini 2 running PSKer to try and pull some signals from the aether.


We were able to copy quite a few transmissions even without a digital interface between the tablets and the rig. We probably would've copied some more, but for the bourbon. ;)

On Saturday I setup my portable vertical antenna, Yaesu FT-817ND, and iPad.


As you can see, we setup inside his 16' x 24' pavilion, which was a godsend this weekend due to the weather. It rained on and off all weekend. There was little to no wind, so the open ends weren't a problem. We even setup my tent underneath the roof so it stayed mostly dry.


As you can see, I have my antenna feedline connected via the FT-817ND's front, BNC connector. As I understand it, using this instead of the SO-239 on the back reduces power consumption.  Also note that the feedline is connected straight to the rig, with no tuner. The vertical is resonant on 20M. Using a resonant antenna instead of one connected through a tuner increases your effective radiated power, and when operating QRP, every little bit helps.

The iPad is connected to the rig with one of KF5INZ's Easy Digi interfaces.

Pic of my vertical antenna:


The objects to the right of the antenna are steel gong targets set out at about 25 yards.

I mostly operated PSK31 and using the antenna above was able to reach the west coast.


I grabbed the above from pskreporter.info using my iPhone. Later, my signal was also reported in Washington state, but I forgot to get a screen shot.

After doing PSK31 for awhile I changed over to WSPR, using iWSPR. This was my first time trying this digital mode and it's amazing. The signal reports below are after transmitting for awhile on 5 watts.


Numerous hits in Great Britain, Western Europe, and Germany. WSPR basically acts like a beacon, transmitting your callsign so that other hams with Internet-connected rigs can upload signal reports. With some creativity I think it could have other applications.

We took time off from the radio to have a nice lunch of venison sausage and onions, sauteed in a red wine reduction. Yeah, we eat good when we go camping.


Saturday night's dinner was venison chili washed down with Yuengling Lager or Guiness Stout.

I also took a break from radio in the afternoon to do a little shooting. I first shot my Cowboy Pimp Gun, AKA a Ruger Single Six in .32 H&R Magnum which has a color case hardened frame and faux ivory grips. It's a fun little blaster but needs a trigger job. I put a bunch of Prvi Partizan .32 S&W Longs through it, which made a nice little tink when they hit our steel gongs.

I also put 70 rounds of .44-40 through my Cimarron 1873 Sporting Rifle.


Fifty of those were black powder loads with 35 grains of Goex 3Fg under a bullet cast in my Accurate Molds 43-215C bullet mold, and they really smacked the gongs around. If you click on the picture to view the full sized version, you can see some smoke coming out of the rifle's ejection port. I was doing an 1870s-style mag dump. Off to the left, you can also see the gong that I just shot swinging from the impact.

After I finished shooting my other friend put up about 500 feet of aluminum welding wire in a loop, all around our campsite. We got back to radio after nightfall and the loop turned out to work well for receiving 80M and 160M, and they both wound up getting 160M phone QSOs. Because the antenna height ranged from only a couple feet to a max of 5 feet, they were NVIS to other hams in northern PA and southern NY.

Finally, I took this picture of my iPad which looked like it was detecting Space Invaders on the waterfall.


Even though the weather this weekend was crappy we had a great trip. We got some good field radio practice in, plus a bit of fun shooting.

Saturday, April 09, 2016

SignalLink USB

This morning a friend and I drove down to the Newcastle, DE Ham Radio Outlet, where I bought a Signalink USB, the jumper module to configure it for my Yaesu FT-817ND, a Diamond RH-707 folding HT antenna, a BNC-to-SO-239 jumper cable, and an MFJ-4103 A/C adapter for the FT-817ND. After getting home I set everything up in my den. Please ignore the clutter.


The antenna is a 7 to 30 Mhz AlexLoop. A lot of QRP operators favor one. I haven't used it enough to decide if I like it or not.

Setup of the SignaLink was pretty straightforward.


  1. Using the Allen wrench supplied, remove the front and back panels from the aluminum enclosure.
  2. Carefully align the jumper module and insert it.
  3. Reassemble the case.
  4. Connect a 6 pin mini-DIN to RJ45 cable from the SignaLink to the rig's DATA port.
  5. Connect an audio cable from the SignaLink to the rig's speaker jack.
  6. Connect the USB cable between the SignaLink and laptop.
  7. Since I want rig control, I connected my Valley Enterprises USB CT-62 cable between my MacBook Pro and the rig's ACC port.


Once everything was hooked up I changed the rig from VOX to PSK31-U data mode, and in Fldigi, selected the USB AUDIO CODEC for sound input and output.

Below, I'm monitoring a PSK31 QSO in Fldigi.


I played around with this setup for about an hour and was able to receive several signals. I called CQ but did not make any contacts. I gave up when 20M died.

I was impressed with the ease of setting up the SignaLink and wish that I'd bought one awhile ago. It's easier to adjust than the internal sound card.

The MFJ-4103 power supply looks like a good buy, also. It looks like a laptop power supply and would be a good choice for anyone traveling with an FT-817ND or using one as a base station where there is 120VAC power.

Friday, April 08, 2016

Valley Enterprises Yaesu Programming Cable

Last week I got a Valley Enterprises FTDI chipset-based programming cable for my Yaesu FT-817ND. This is a USB version of the Yaesu CT-62 serial cable used for rig control and programming.

I took today off to finish my income taxes and after I was done I decided to play with the cable. I already had an FTDI driver on my MacBook Pro, so I was able to just plug it in, connect it to the radio, and use it to program the rig using CHIRP. I also tried it with Fldigi and once I selected the correct driver in the config screen, it worked. If I put the rig into memory mode and manually selected the frequency it immediately showed up in Fldigi. Likewise, if I used Fldigi to change the frequency it worked on the radio.

Tomorrow I'm planning to head down to Ham Radio Outlet and pick up a Signalink USB, among a few other things. The Easy Digi interface I have now works but it's a rat's nest of cabling. The Signalink USB should reduce the clutter and simplify setup and teardown. Combined with the Valley Enterprises cable I tested today, it should make digital mode operation a lot easier.

Monday, November 02, 2015

FT-817 Legs

The Yaesu FT-817 is a great all band, all mode QRP rig, but one feature it lacks is a set of legs to prop it up so the face is at a good viewing angle. My previous solution was a stand made from a CD jewel case. A nicer fix is to add folding legs.

Back on October 17th, I ordered a set of "Black Edition Carbon Fiber Sport Legs" from eBay seller radioshackus (not to be confused with Radio Shack). Anyway, they arrived today from Hong Kong and I installed them tonight.

They came sans instructions but after looking at the pic on the eBay listing I figured it out. I'll note that if you get these legs or something similar, you will need a good, properly fitting Phillips head screwdriver to remove the OEM Yaesu screws holding on the carry strap brackets. They are in tight.

A couple of pics of the legs as now installed on my radio:


If you prefer to order FT-817 legs from a US vendor, see here. Note that while the seller is American, these are made in Germany.

Compared with an external stand, the folding legs are a lot more convenient and add no noticeable weight to the radio.

Thursday, August 13, 2015

AlexLoop Walkham Antenna

One type of antenna I've wanted to try for HF has been a magnetic loop or magloop, for short. For portable operations they have a few advantages: small size, light weight, and fast setup and takedown. The disadvantages of small, non-resonant magloops include lack of efficiency and very narrow bandwidth (although the latter can be advantageous in certain circumstances).

In particular, one that gets almost universally excellent reviews is the AlexLoop Walkham by PY1AHD. It's a QRP antenna limited to 10W PEP but for use with my Yaesu FT-817ND that's not an issue. (The FT-817ND's max output is 5W.)

I was down in Delaware for work today at a site about mile from the New Castle, DE Ham Radio Outlet, who carries the AlexLoop. One came home with me. After work I set it up out back on my patio.

I had it sitting on the same camera tripod I used with my Arrow 2M yagi antenna.


Close up of the control box:


You use the knob on the bottom to tune it. The way I did so was to tune for maximum noise. Because it is very narrow banded, if you change frequency even a few kHz, you must retune.

Although it says right there on the box that you should have an SWR meter inline, dummy me forgot to get a BNC-to-UHF adapter so that I could do so. Instead, I configured the FT-817ND to display rough SWR readings on transmit, which allowed me to fine tune the antenna.

So how's it work? I'd say it's promising. On 20M PSK31, here are the signals I received in a couple hours that Fldigi reported to pskreporter.info. I saw more than these on the waterfall, however.


And here's what I received.


Not shown were the several European stations I saw on the waterfall, including Spain, Italy, Serbia, Slovakia, Bulgaria, and Poland.

I completed two QSOs, one with a ham in MO about 815 miles away, and another with an operator in Italy, 4348 miles away. For whatever reason, he didn't show up as receiving me on pskreporter.info.

I also tried 40M for a few minutes but the band was dead.

The AlexLoop should be a good choice for portable operation, especially when camping. It collapses down into a small, light package, and came with a nice carrying bag. Setup is easy and quick, and unlike my portable vertical, it doesn't require any counterpoises to be laid out and gathered up. It wasn't cheap, but it's well made and should last a long time.

If you're looking for a portable antenna for QRP HF, the AlexLoop Walkham is worthy of consideration.

Saturday, June 20, 2015

Testing the Arrow 146-3BP 2M Yagi Antenna

I tested out the Arrow 2M Yagi antenna that I got a couple weeks ago, by hitting the Pottstown repeater on 2.5 watts from my yard. The repeater is about 25 to 20 miles away. I spoke to another ham who said I had some background noise but was intelligible.


To attach the antenna to the camera tripod, I made an adapter from a piece of 5/8" aluminum rod. I turned one end down to fit into the antenna boom, and then drilled and tapped a 1/4"x20 hole in the other end.


There's about 2" of rod in the antenna boom, while there's about 1/2" of engagement with the mounting screw on the tripod head. This is a temporary, light duty setup, but it's easily portable.


Sunday, June 07, 2015

A Little More Backyard Digital Work

I played around with the FT-817ND and digital some more today. I wanted to try my 20M MFJ-1620T hamstick antenna with the same base as my telescoping vertical. I figure that the hamstick would be good for situations where you need to be a little stealthier, or need to set it up more quickly. The hamstick is about 7' tall, in contrast to my MFJ-1979 telescoping whip, which is about 17' tall.

However, I got the high SWR warning on the rig when I transmitted. So, if I want to use it I'll need to tweak it some to reduce SWR, or use my LDG Z-817H tuner.

It's very difficult to get a clear picture of the hamstick when deployed in my yard. It blends very well into the background. Note that the antenna is nowhere near the power lines in the background.


Even with the high SWR and low power, my PSK31 signal got out as far west as Missouri and as far south as Florida.


I changed over to the MFJ-1979 telescoping vertical whip, which gives better performance and lower SWR.

Transmitting PSK31 on 20M using 5 watts, my signal was heard 2285 miles away in Washington state, and ~2100 miles away in Venezuela. I didn't have QSOs with those guys, but their PSK software uploaded the reception reports to pskreporter.info.


Pretty decent for QRP, IMHO.

Saturday, June 06, 2015

Configuring Fldigi on a Mac for use with an Easy Digi Radio Interface

In my prior post I mentioned that I used my mid-2009 MacBook Pro with my Yaesu FT-817ND for digital mode (PSK-31 and Olivia 16/500) operation. I used an Easy Digi USB-to-RS232 interface from Clifford Wareham, KF5INZ.

Here's what you need to get this working. This is specific to Mac laptops and the Yaesu FT-817ND, but setup for other Yaesu rigs should be similar.

1. First, setup the radio to SSB mode and transmit using VOX. See page 28 of the FT-817ND Operating Manual for how to set it to SSB, and page 29 for how to set it for VOX. VOX is needed with the Easy Digi interface because we're not using the rig control features of Fldigi.

2. The Easy Digi USB-to-RS232 interface uses an FTDI chipset. KF5INZ includes a driver disc for Windows with the unit, however, it's a mini-CD. Do not put a mini disc into a slot loading optical drive! It'll get jammed. Anyway, I needed the Mac driver, which I downloaded from FTDI, here. (That is a direct link to the .dmg file containing the driver installer.) Before you run the installer, download and read the installation guide PDF. Follow the directions in the install guide and make sure to reboot the machine after installing the drivers.

3. After rebooting, plug the Easy Digi interface into your Mac's USB port. Then, open Terminal.app, and type in cd /dev. Then type in ls -l | grep usbserial. You should see something like the screenshot below.


Note that you will not see the drivers listed unless you have the Easy Digi connected to your Mac. They are dynamically loaded and unloaded when needed.

If you don't see the drivers listed you'll need to troubleshoot your installation.

4. Now open Fldigi. Go to Configure > Sound Card. Under Devices, select PortAudio. For Capture, select Built-Input. For Playback, select Built-In Output. Click Save.


5. Next, go to Configure > Rig Control > Hamlib. Select your radio from the drop down menu. For Device, use /dev/tty.usbserial-A103OP5V, and make sure the Baud Rate matches your rig. Don't forget to click Save.


6. Now you need to connect the physical parts.

  • Connect the white RJ45 mic cable from the Easy Digi to the mic port on the radio.
  • Run a 3.5mm audio cable from the Easy Digi's Radio SPKR JACK to the rig's headphone/speaker port.
  • Run a 3.5mm audio cable from the Easy Digi's RX AUDIO TO PC to the audio input port on the Mac.
  • Run a 3.5mm audio cable from the Easy Digi's TX AUDIO FROM PC port to the audio out (headphone/speaker out) port on the Mac.
Note that on newer Macs with a single 3.5mm audio in/out port, you'll need some sort of splitter/combiner adapter cable.

At this point, you should be able to receive signals in the Fldigi waterfall, and if you transmit, it should activate VOX on the radio to send out your signal. You may need to fine tune volume levels on the Mac and the radio to prevent overdriving your output or to prevent overloading the input.

Edited to add:

If you would like a PDF formatted version of this guide to keep handy, I have it available here on my Google Drive.

Backyard Digital Radio Practice

Earlier this week I received another Easy Digi interface from Clifford Wareham, KF5INZ. This one is to allow me to use digital modes on my Yaesu FT-817ND using a laptop, rather than my iPad. This Easy Digi interface has a built in USB-to-RS232 serial adapter based on the FTDI chipset. It connects to your laptop using a USB port, along with 3.5mm audio cables from your audio input and speaker output ports. It connects to the FT-817 using the RJ45 microphone port and the 3.5mm speaker/headphone port. You do wind up with a bit of spaghetti but with some twist ties it's manageable.


Juice for the rig was supplied by the small 12V sealed lead acid battery in the background. Although lithium ion batteries are great for supplying power while being light, and I'll use one if I ever take my rig backpacking, SLA batteries are nice because they are cheap and use more common chargers.

The primary advantage of using a laptop rather than the iPad is that I can run pretty much any digital mode, not just PSK-31. The downside is that the laptop is a lot bulkier and the iPad and uses more power.

We have a chance of some thunderstorms today but I decided to give it a try out back, using my portable vertical antenna.


As you can see, I used my 15", mid-2009 MacBook Pro, which is running OS 10.9.5 and Fldigi. I did a separate post on configuring it.

I first tried calling CQ on 20M PSK31. Nobody came back but checking pskreporter.info showed that my signal was getting out as far as Montana.


I then posted to the AR15.com ham forum and switched frequencies to our forum's digital mode channel, and had a nice, extended rag chew with a member in Missouri, using Olivia 16/500. I was running 5 watts, while he ran 10 watts into a G5RV at about 35'. We both had 100% copy over a QSO that lasted a good 15 minutes.

This was a great proof of concept. I'll be bringing it with me camping in Tioga County, PA, next weekend.

Tuesday, January 20, 2015

Lightweight Backpack Radio Guide

The following was posted on AR15.com by member "Harlikwin" on January 19, 2015.  Harlikwin is a ham with a great deal of experience operating QRP, manpack radios. He has generously given me permission to reproduce it here.

Lightweight Pack radios 

I’m writing this piece from the standpoint of needing a lightweight back-packable radio that I can take with me on overnight and several night outings so weight and power out are critical considerations.My definition of lightweight is that I will use the target weight of approximately 5lbs or less to design a lightweight packable radio system (minus antennas) capable of SSB use.

Thoughts on power 

One thing I will talk about is what I consider useable power levels, and I acknowledge that this topic is highly divisive so I’ll put down my opinions on it and people can disagree with me if they like (and I know they will). I will begin with a simple fact: nearly all of the worlds militaries have for four decades decided on a ~20-30W power level for their portable SSB backpack radios as the best compromise for reliable man portable SSB HF communications and in my opinion for reliable SSB work this is probably the best compromise between power out and weight and power consumption. However, very few of the examples examined here offer a full 20W output as a stock configuration, so some sort of amplifier is required. I will fully acknowledge that SSB contacts CAN be made with very little power under the right conditions, been there done that, but in general it is my experience that there is a big difference between making SSB contacts with 5W and 20W, not merely the measly 1 S unit of power as many folks with come back with as a counterpoint. I will break it down as saying as 5W SSB is great for CW and data modes such as PSK31 but generally unsuitable for making reliable SSB comms. 10W of power is again great for CW and data but still a bit marginal for SSB. In my opinion and experience, 20W+ is the best range for low power SSB under most ionospheric conditions. That being said I will jump in and examine the commonly available options in the new and used ham radio market, the list isn’t meant to be comprehensive but I feel like I’ve covered most of the basic rigs available.

The configurations 

I will discuss 3 different configurations, the base radio and what it weighs (with batteries) and then 20W and 50W configurations with an outboard amplifier. For the sake of comparison I have chosen the MX-P50 Chinese amplifier and a Zippy 4.2Ah LiFePo4 external battery and various elecraft or LDG ATUs (noted) for the comparison to keep the configurations simple, all weights posted include internal batteries if available as well. Certainly one can decide if 4.2Ah is enough capacity to run the system for the required time, but I’ve used it as convenient placeholder. It should be noted the amplifier listed does require a very good antenna match, hence all configurations will include an ATU. Alternately I suppose you could use a perfectly matched antenna, but in practice in the field its too much of a pain IMO, a tuner is the same weight or less and much easier to use.

The contenders 

Elecraft KX3 HF+6m 

The KX3 is often bandied about as the do it all super lightweight wonder radio for backpacking, SOTA and other lightweight activities. It certainly boasts a lot of great features such as IF DSP, internal ATU and batteries and fancy things like CW/PSK31 decode, AND it is lightweight and compact to boot. Unfortunately the advertised weight is listed without internal batteries, or optional things like an ATU or optional 2m radio module or extra filters or the “optional” mic so it is a bit misleading. Also unadvertised is the fact that to realize its full 10W of output power it does require an external 13.8vdc power source. With those two caveats however it is still very lightweight and does put out a very usable 10W of power. With an external LiFePo4 battery and internal batteries and ATU option the weight comes in at 3.4lbs for 10W output which has the best power to weight and volume ratio at that power option of the radios listed. Adding an external 20 or 50W amplifier is certainly an option however to my knowledge one must also add an external tuner to utilize it with the KX3. With a MX-P50M tuner and outboard T1 or Z817H ATU the weight climbs to 4.9lbs and 5.5lbs for 20W/50W respectively, we can use the outboard battery to run the amplifier and the internal batteries to run the radio. The one area where the KX3 does fall short compared to all the other options is cost, the price for the various configurations is roughly double that for any other configuration running from about 1430 for a loaded (ATU/Filters/mic) base configuration to about 1800 for a configuration with the amplifier and external ATU.

Yaesu FT817 HF/VHF/UHF

The FT817 was the first QRP radio marketed as such, with a very small footprint for the base radio and a 5W power output, achievable on internal batteries, it took the low power world by storm. However almost all later radios had 10W+ power output after folks became frustrated by the FT817’s lack of SSB performance, also partly due to lack of power and any sort of speech processing which should absolutely be included (easily fixed by aftermarket mics or kits). It should be noted that the FT817 is the only radio reviewed that can cover the whole frequency range from HF to UHF, which may make it attractive to some. The base configuration with batteries weighs in at 2.5lbs for 5W of performance (I should note the kx3 is a bit lighter ~2lbs running 5W). For effective HF SSB performance the FT817 benefits the most from an outboard amplifier, using theMXP50A amp and a LDG Z817/Z817H tuners one gets weights of 5.5 and 6lbs for 20W/50W respectively. Essentially the FT817 is half a pound more than the KX3 at every turn and volumetrically comparable to the KX3 configurations. Cost wise it depends, used FT817’s vary widely from ~300-600 USD so the configurations can run from 800 (assuming a 450 base cost) to ~1000 USD depending on if one gets a new or used FT817 to start off with.

Icom IC703/703+ HF+6m 

The ICOM703 comes in a 10W configuration with a built in narrow range autotuner. This was a very popular radio for some time but was discontinued by ICOM for some reason. At first glance it is very comparable to the KX3, though the KX3 boasts features like IF DSP vs AF DSP and CW/PSK decoding. Also the stock IC703 with external battery (no internal batts) weighs in at a hefty 5.5lbs and volumetrically is comparable to the 20 and 50W configurations of the FT817. If we start adding things like the amplifier and external ATU the weight rapidly climbs out of “lightweight” territory. The 703 isn’t a terrible choice if you can find one cheaply, and it is nicely integrated aside from the external battery, its just going to be a bit heavier than other options. For those interested add about 2.5lbs to add the 50W amplifier and Z817H tuner for a final weight of ~8lbs and about double the volume. Cost wise since its discontinued varies quite a bit, anywhere from 500-700 on auction sites in the authors experience and then 50 dollars for the battery, in this sense it’s a pretty good deal if one decides 10W is all that is required for the user and one doesn’t need the fancy features and light weight of the KX3.

SGC SG2020 HF only 

The SGC SG2020 is sort of the oddball, like the 703 it is no longer produced, it had a mixed repuatation for problems and perhaps that is why it is no longer made. It is a genuine 20-25W radio though it also needs an external battery to run and an ATU is again recommended to match field antennas. In a configuration with our battery and a lightweight elecraft T1 ATU the weight comes in right at 6lbs; not terrible given the power out it compares reasonably well to the amplified KX3 and FT817 based configurations in terms of weight and volume. Cost wise since its discontinued varies quite a bit, anywhere from 500-700 in the authors experience and then 50 dollars for the battery and $160 for theT1 ATU.

Youkits TJ5A 4 HF bands only 

A recent interesting offering from youkits targeted at the SOTA and backpacking crowd and running 20W power out. The base rig is fairly barebones, but it is offered with a clip on 4AH LiIon battery pack. Combine this with an T1 ATU and the rig becomes a very lightweight 4.3lb 20W rig, it has a superior power to weight ratio at the 20W power level to every other rig examined. It is fairly basic however and does not cover all bands, it comes in two configurations of 40/20/15/10m and 40/20/17/15m or fancy things such as speech processing (though one presumes this could be user added like on the FT817). The fully assembled radio with T1 ATU and battery comes in at 610 making the cheapest option.

Antennas 

No discussion of QRP radios would be complete without discussing antennas. There are a ton of options in this regard, from ultra-lightweight wires to fancy portable vertical systems such as the buddistick and buddipole. From the authors standpoint of camping antennas, they have to be lightweight and fairly idiotproof. The paar EFZ trail friendly comes in at .5lbs advertised and will handle 25W power on 40/20/10m. If ones camping site has trees (this is not always possible for me) then it is an ideal antenna to take to throw in a tree. Comparable designs include the EARC antenna kit from Hawaii. The buddistick is another popular option, and one that can be emplaced without supports, though it weighs a bit more. It should be noted that while both of these options can be used without tuners in theory, in my experience the EFZ and other multiband designs will be mostly resonant on only one band and close on the others which necessitates some sort of ATU (unless one is very confident of their finals). It is a similar story for the buddistick, the swr will vary somewhat on the surrounding environment, therefore either an antenna analyzer or ATU is required for the best match and frankly the ATU’s weigh about the same as analyzers and are easier to use with presets for the buddistick.

Concluding thoughts. 

The right radio for someone really depends on primarily on budget and operating style. If you are a drive to your operating site and setup on the picknick table type of operator, a few pounds weight means absolutely nothing to you (why are you even reading this?). However, if one seeks the lightest weights possible at any cost and is willing to give up a bit of SSB power, the base KX3 with an external power pack is probably the best option. If one wants a highly flexible, highly modular and lightweight setup that can be heavily customized ala carte, the FT817 based platform is the best choice as it can run from a uber lightweight 2.5lb 5W CW rig to a 6lb 50W SSB rig and a variety of configurations in between. If one requires a cheap 20W SSB radio and lightweight, then the youkits offering is very tempting both in terms of price and performance though it is limited in terms of band coverage. However if budget and frequency coverage are desirable then the SG2020 and IC703’s if acquired at the right price can also be good choices.

What I’m doing in case you care 

I got into a used FT817 for a very good price a few years back, so frankly upgrading that has made a lot of sense for me since I didn’t pay anywhere near “new” prices. I really do like the flexibility of the platform, if I really need lightweight I can take the radio and the internal lithium pack I run and it is enough to work CW barefoot (or data if I did that sort of thing) for a few nights at a weight of 2.5lbs. I can add an outboard Z817 tuner or external battery if I’m concerned about antenna mismatches (and I usually am) or need more runtime for a pound more at 3.5lbs. And then If I feel I need more power, or need to take a SSB radio I can add the Z817 tuner MX-P50 amp and the zippy battery for a 5.5lb 20W out configuration (I use 20W since I am limited by my tuner and by battery life).

What I would do if I were starting from scratch 

If I were to do it using “new” components and had a pile of money to spend I would very seriously consider the KX3, it would be as good on SSB in the stock configuration (5w), but it would weigh a bit less (2lbs if numbers can be believed) and have an internal ATU compared to my current setup. If I decided I needed lightweight and a bit more power I just grab a battery pack which gets the weight to 3.4 lbs. Then if I decided I needed more talk power I’d grab the amp and outboard tuner for a weight of 5.5lbs and 20 or 50W out (assuming I used the Z817H tuner so I could run 50W). The only thing I would really give up vs the KX3 is the 440mhz capability, which I really don’t need in the wilds (though 2m has come in handy once in a while).

However, If I weren’t daddy warbucks, I would also very seriously consider the TJ5A as a runner up for a man portable SSB rig given its very low cost and high power output. The band limitations might bother me a bit, but realistically one can certainly get by without 80, 30 and 12m, and the 40/20/15/10m configuration nearly perfectly matches the paar EFZ.

What I wish one of the major manufactures would build. 

A waterproof(rainproof, not diveable), durable 20W all mode/band rig that weighs less than 5lbs and is compact with a wideband ATU and with an internal battery bay or clip on Lithium battery pack that can run the rig for an hour or two on SSB (say about the size of the IC703 with battery included max). There should be a provision for vertically mounted HF whip for manpack use, and possibly a separate VHF/UHF whip (though that could be switched internally I suppose) and a front panel mounted BNC connector. There should be a 3 position switch VHF/HF/BNC to indicate where the active antenna is connected. Also there should be effective DSP, and there should be a USB connector for DATA. And it should cost no more than currently priced FT817

Thursday, January 01, 2015

Portable Vertical Antenna for HF v2.0

Yesterday the CB antenna mirror mount that I ordered after I determined that my homebrew mount was too flimsy arrived. This morning I put together v2.0 of my portable vertical. Aside from the mirror mount, I also replaced the original steel drill rod stake with an 18" long piece of 3/8" diameter aluminum rod that was bought at Home Depot.

Before securing the mount to the aluminum rod, I used a file to put a point on the end that goes into the ground. I also roughed up the area that the mirror mount clamps to with the edge of the file, to help ensure a good grip.

Because the bolts which came with the mirror mount were a little larger in diameter than the machine screws I'd used with the homebrew mount, I had to replace the ring terminals on the radials with spade terminals.

Click on any pic for the full sized version.


I used the original nuts that came with the  mirror mount when putting it together, then used two 1/4x20 wing nuts to hold the radials on.


The finished mount with the collapsed MFJ-1979 whip:

Closeup of the mounted whip and deployed radials:


And finally, the whole shebang, now standing tall even with a slight breeze:


The FT-817ND tuned to 14.070 MHz running 5W QRP powered by a 12V SLA battery*, and my iPad Mini 2 running PSKer, tied together with KF5INZ's Easy Digi interface:


The temp today on my back patio in the shade was in the mid-30s and it starting feeling rather cold. I received signals from as far away as Michigan. I called CQ several times and almost completed a QSO with a ham in Georgia but there was too much QRM. But here's where pskreporter.info showed my signal reaching, from my home near Philadelphia, PA:


All in all, I rate this HF vertical as a success for portable 20M ops. I received many PSK-31 signals and got my signal out into the midwest. I'm looking forward to nicer weather when I can take the rig with this antenna to a nice hill and try for some digital QSOs.


* Note re the battery: I previously posted about using a lithium polymer battery sold for use with radio controlled cars and planes. What I didn't realize in my initial tests is that the radio powered up from its internal battery pack. When I tried it without the internal pack, the radio would not power up from the LiPO pack. It may not be providing the 3A needed for the rig to power on. It's very frustrating, especially since I spent about $50 on the LiPO battery and accessories. It might be useful for recharging the internal pack, however. In the meantime I'm going to use this 18 ah SLA battery. I'm looking at getting a 7 ah to 12 ah SLA battery which will be a lot lighter and easier to backpack.

Update 1/20/14: I got the battery working. AR15.com's Harlikwin messaged me about this, prompting me to look at it again. It turned out that I had the Power Pole connection on the negative side was bad. The little tab inside the PP wasn't fully seated. I was able to disassemble the PP, reseat it, and verified that I can power the radio from the lithium battery alone. w00t!!!!!

Thursday, December 25, 2014

Portable Vertical HF Antenna Proof of Concept

Yesterday was the first day of my Winter vacation, and I took a ride down to the Delaware Ham Radio Outlet. My goal was to get some parts needed to construct a portable vertical antenna for 20M to 6M, based on the “FXTenna” by KD5FX.

KD5FX’s design centers around the MFJ-1979 telescoping stainless steel whip, which extends to 16.9 feet. I also wanted to try a 20M Hamstick-type antenna, so I picked up an MFJ-1620T HF Stick. Both are commonly used for portable ops, and have a 3/8”x24 threaded male stud at the base end. This is the same thread as most CB antennas.

Along with the MFJ-1979 and –1620T, I bought three 3/8”x24-to-SO-239 studs, an Anderson Powerpole-to-alligator clip with a fused negative cable, and a package of Bongo Ties for cable organization. I also went to the Radio Shack a few doors down and picked up a couple crimp-on PL-259s.

After getting home and grabbing something for lunch, I fabricated a mount for the antenna elements, mostly using stuff I already had in my shop. The 3/8”-24-to-SO-239 stud was attached to a couple pieces of steel strap that I salvaged from the trash at work. These were held to a 19” long piece of 1/4” drill rod.

Since the radiating element of a vertical antenna needs something to work against, I made six 17’ long radials from 18 gauge speaker wire, which had ring terminal added to the ends. Some heat shrink tubing was then placed over the terminals and a couple inches down the wire, to reinforce the connection.

The radials attach to the steel strap with a machine screw and a couple nuts.

Since pictures are worth a thousand words, take a look below.

Mount next to collapsed MFJ-1979 and a yardstick for scale.

As you can see, once the kinks (described below) are worked out, this will make a nice, portable antenna.

One thing I learned the hard way was that in order to prevent creation of a Gordian knot, it’s important to wind up each radial individually, hence the multiple Bongo Ties.


Detail of top of mount:


Detail of mount bottom:


It turned out that the steel straps weren’t rigid enough to support the weight of the MFJ-1979, so I swapped on the MFJ-1620T. The provided marginal support, and the wind today didn’t help:

The ends of the radials were secured in place with large nails driven into the ground.

Unfortunately, the mount wound up being too flimsy. It would probably work if I guyed the antenna, but I want something more rigid so that guys are not necessary. Also, the hose clamp connection between the straps and the drill rod stake are not very secure. I accidentally pulled the mount right off the stake at one point.

So, design defects aside, how’d it work as an antenna?

With my Yaesu FT-817ND powered by a 12V battery and pumping out a whopping 5 watts, my PSK-31 signal reached northern Indiana, Columbus, OH, and Lexington, KY, according to pskreporter.info. I only saw a few other signals on the waterfall, but the 20M band wasn’t doing very well, per comments I saw in PSKer.

Still, not bad. In fact, it’s a downright promising proof of concept.

Things to do:

  • Make the base more robust by using a CB antenna mirror mount attached to the stake. I may replace the steel drill rod with a lighter weight aluminum rod.
  • Grind a point on the end of the stake, to make it easier to drive into the Earth.
  • Replace the nut securing the radials to the mount with a wingnut so they can be removed without tools. I didn’t have one of the correct size handy.

Incidentally, the ring terminals, shrink wrap, and hose clamps all came from Harbor Freight variety packs. These are cheap and handy to keep around for when you need a miscellaneous part.

Another experiment for the future is to get a second 20M hamstick and an MFJ-347 mount, then construct a hamstick dipole that can be hoisted from a tree in a vertical orientation, or raised on a painter’s pole for horizontal polarization. Yet another idea is to cut a length of wire, put an alligator clip on one end, then connect it to the top of the MFJ-1979 and run it horizontally as an inverted-L antenna. I might be able to get it to work on 30M and 40M this way.

This kind of experimentation is part of the fun of ham radio, and builds your knowledge base so that you can provide communications under less than optimal conditions, or using improvised equipment.