Tuesday, December 29, 2015

Archery for Preppers?

With my interest in archery having been rekindled of late, naturally I began to consider whether or not including archery in one's preps makes sense. Certainly, archery played a major role in humankind's rise over the animal kingdom, and bows were important military weapons for millennia, but do they have a place in the 21st century prepper's armory?

Searching the Internet for "survival bow," "survival archery," or "bows for preppers" results in a ton of hits. Several prepper oriented sites recommend adding a bow to your equipment. E.g., this article, complete with a pic of Our Hero wearing a hoodie and gas mask and getting ready to loose an arrow.

But, I'm going to go out on a limb and state that for most preppers in the USA, archery equipment should be far down on the list of gear to get, after food, water, shelter, and firearms. If you're in a jurisdiction that does not allow or heavily restricts civilian ownership of guns but does allow archery equipment, a bow or crossbow moves up the list.

A smart prepper will prepare for the most likely events. Trying to live off the land by hunting and fishing is far less likely than surviving a period of unemployment, short duration social disruptions, or natural disasters. Only the latter two situations really require that you be armed.

Even if the end of the world as we know it happens, wild game is likely to be depleted in a short time. Go compare the amount of wild game available in the 1940s after the Great Depression, when the only source of protein for many was wild game, with what's available now, after decades of conservation. Planning to survive TEOTWAWKI by heading for the hills and adopting a hunter/gatherer lifestyle is planning to fail.

IMNSHO, the single most versatile weapon for a prepper is a concealable handgun such as a Glock 19 or S&W M&P Shield. This allows you to be discretely armed in public and can double as a home defense gun. If your finances permit, add a suitable long gun as a dedicated home defense gun.

Further, even firearms which are now considered obsolete replaced bows and arrows as primary weapons, largely due to them being much easier to learn how to shoot well. As much as I love archery, I would take a flintlock musket over a bow for either hunting or defense.

That said, archery gear does have some advantages:

1. Regulations for purchase are typically minimal or non-existent. Even in many areas that heavily restrict firearms ownership, archery equipment is unregulated. If I lived in a a country where civilian gun ownership is banned, I'd definitely have a recurve bow with a good supply of arrows, and practice with them. I'd also learn how to make arrows from hardware store materials. See, e.g., The Dowel Arrow Handbook.

2. Bows and arrows are quiet compared to unsuppressed guns. That means you're less likely to be discovered if you need to shoot. Crossbows are surprisingly loud, however.

3. Traditional bows can be made at home for low cost, from either hardware store lumber or even PVC pipe. Similarly, arrows for traditional bows can be made from carefully selected dowels or bamboo tomato stakes. Lethal arrowheads can be fashioned from sheet steel or old saw blades (YouTube link). Note that this does NOT apply to arrows to be shot from modern compound bows.

35# PVC bow by Backyardboywer

Home Depot tomato stake arrows by "tenbrook" on Primitive Archer.

4. Bows can be used to take game ranging from squirrels and birds up to moose. With the right kind of arrows, you can even take fish.

5. Bows can be used for defense, although they are far from ideal for this. Even short, Asian-style bows are long and cumbersome indoors. If you're outside, they do give you a standoff option if you don't or cannot have a gun.

6. Within limits, arrows are reusable. When shot into game, it's not unusual for wooden arrows to break or aluminum arrows to get bent. Modern carbon shafts will usually be fine afterwards, although they may need refletching and the edges on the broadhead should be resharpened.

7. With a lot of practice, an archery shooting a traditional bow can fire several arrows quickly.

8. Crossbows are almost as easy to shoot as a rifle out to about 50 yards, and can be carried ready to fire.

And of course, archery has some disadvantages:

1. Compound bows that are relatively easy to shoot well are not easy to maintain, once they need repair or periodic maintenance. You need a bow press to work on a compound bow, and you'll need suitable strings and cables to keep it going.

2. Compound bows require modern arrows made from aluminum or carbon fiber.

3. The rate of fire for a modern compound bow is low. Between nocking the arrow and clipping the release to the bow's string or D-loop, rapid fire isn't very feasible. Older compounds that can be shot by drawing with your fingers can be shot faster, of course. Crossbows are even slower.

4. Traditional bows, whether purchased or made at home, require a lot of practice to use effectively. One of the main reasons that early firearms superseded bows on the battlefield is because it takes a lot less training to use a gun effectively.

5. Even expert archers have a shorter effective range than a moderately trained person armed with a rifle or shotgun and slugs. Most traditional archers limit themselves to 20 - 30 yards when hunting deer-sized game. You can stretch this a bit if shooting in defense. An arrow through a non-vital area like a shoulder or leg is likely to at least slow down an assailant even if he isn't put out of commission permanently.

So, having looked at the pros and cons of archery, if you're still looking to add a bow to your preps, what are some good choices?

IMO, the maintenance requirements of modern compounds outweigh their advantages for long term survival use, so strike them from your list, unless you're already an archer and learn to maintain them and stock the required tools and materials.

If you don't have the time to dedicate to learning how to shoot a traditional longbow or recurve, then a recurve crossbow makes sense. There are some inexpensive Chinese made crossbows on Amazon that get good reviews, although I don't have any first hand experience with them. E.g., the SA Sports Fever and the Arrow Precision Fury. Back in April, I bought a Barnett 78615 Recruit recurve crossbow for deer hunting and have been pleased with it. (Still haven't shot any deer with it, though.) On the high end, look at Excalibur crossbows.

My Barnett Recruit recurve crossbow.

Another option is to haunt Craiglist for deals on used crossbows. This is especially true after deer hunting season closes, since a lot of guys like to dump archery gear (not to mention deer rifles) in January. A good choice would be an old, wood-stocked Barnett Wildcat, as long as it's been reasonably well maintained. Dave Canterbury did a good video on that here, showing off one that he sangged at a gun show for a paltry $25.  If you go this route you may need to replace the string, and picking up a couple spares wouldn't be a bad idea, either.

If you're willing to put in the time for practice a used longbow or recurve is a good choice, since they are so simple. A takedown bow can be handy if storage space is limited, and helps when traveling or if it's going into your bugout kit.

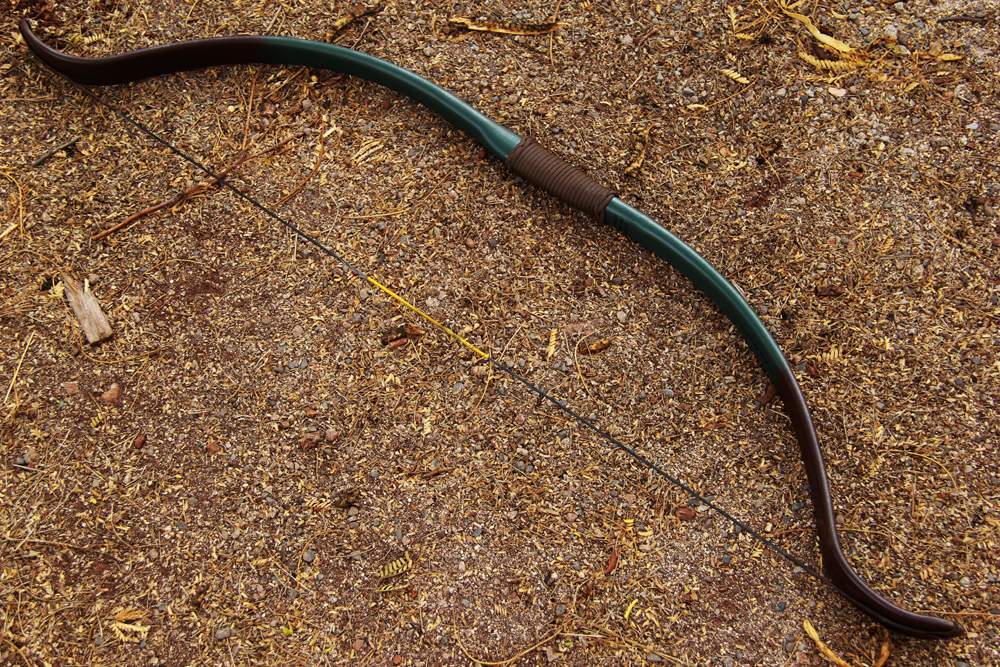
My Samick Sage takedown recurve bow.

I recently posted on Blog O'Stuff about the Samick Sage takedown recurve. It is a good choice for a survival bow. The going rate on them is about $139, and for the money it's an excellent buy. Since it's a takedown and Samick sells limbs separately, you can buy limb sets in different weights. E.g., 35# for extended practice sessions and 50# for hunting. As a takedown it can be stored in a compact case complete with arrows, glove or tab, and bow stringer.

In summary, archery gear may have a place in your preps. But when deciding whether or not to include it make sure that you take into account all the legal, technical, and tactical reasons for adding it.

Monday, December 07, 2015

Lever Action Carbines for Defense

Recently I was able to get some shooting in over a friend's house (he lives in the country). One of the guns I shot was my Rossi 92 lever action in .357 Magnum. It's a replica of the Winchester 1892, designed by John Moses Browning. Shooting the R92 got me to thinking about the practical application of this 19th Century design in late 2015, especially in light of current events.


Those of us who live in free states have unfettered access to modern defensive rifles like AR-15s, with full capacity magazines. However, if you live in a ban state such as New York, unless you're willing to break the law, no more standard capacity magazines will be available. If you're just now looking to get a defensive rifle, modern semiautos and acessories may be limited in availability.

In my opinion, a lever action is a viable alternative, even though the basic design is a century and a half old. If we're looking at a rifle for defense against bad guys (as opposed to dangerous animals) the ones to look at are those which fire handgun cartridges. Although there are several other options, if buying a levergun for social purposes I suggest that you choose one in .357 Magnum, .44 Magnum, or .45 Colt. These are currently the most common such cartridges and are easy to reload for.

Of these three, my first pick is the .357 Magnum. Ammunition is widely available at less cost than .44 Magnum or .45 Colt, it provides effective terminal ballistics, and recoil is mild.

From rifle length barrels, magnum revolver cartridges get a big performance boost. For example, a .357 Magnum 158 grain bullet that leaves a 4" revolver barrel at about 1250 FPS will probably be doing at least 1700 - 1800 FPS from a 20" carbine. .357 loads with 125 grain bullets can exceed 2,000 FPS from a rifle! The muzzle energy of a .357 Magnum round fired from a rifle can be double that of the same load fired from a handgun.

Compared with a shotgun, lever action carbines have less recoil, smaller and lighter ammo, and greater magazine capacity (generally speaking).

Currently, the Rossi 92 is probably the most commonly available pistol caliber levergun. The Marlin 1894 is still around, but 1894s in .357 seem to scarce as hen's teeth. There are also Winchester 1894s in .357, .44, and .45 available on the used gun market, if you can find one.

Some features that I like about the Rossi 92 include:


  • The 20" barreled models hold 10 cartridges in the under barrel magazine. The 16" models hold 8, while the 24" rifles hold 12 rounds.
  • In the 20" barreled version, it weighs in at about 5 pounds. Even my 11 year old daughter is able to shoulder it.
  • The .357 Magnum carbines have very mild recoil, even with full power loads. I've single loaded .38 wadcutters, which recoil like and sound like a .22 when fired from the 20" barreled carbine. This is great for familiarization firing for new shooters, and can also be used for small game.
  • The design includes a built-in gunlock incorporated into the hammer. It is unobtrusive and is locked/unlocked with a key included with the rifle. If you want to secure a loaded rifle outside of a safe, it's one of the better solutions I've seen. IMO, it's safer than gun locks that go in the trigger guard.
  • Rossi 92s are reasonably priced and readily available, although you might need to order one through a local FFL or from an online retailer. 
  • While my rifle is blued steel, Rossi also makes the 92 in stainless steel. If you need a rifle for a boat or other humid environment this is definitely a big plus.


Some things I don't care for:


  • There are some rough edges inside the loading gate that I need to debur. They can chew on your fingers when loading the magazine.
  • Several years ago Rossi added a manual safety on top of the bolt to John Browning's original design. It feels cheap and cheezy. I removed mine and replaced it with a plug from Steve's Gunz. The gun still has the original half cock on the hammer.
  • The magazine follower is a cheap piece of plastic. I replaced mine with a steel follower from Steve's Gunz.
  • The finish on the wood was not only bland, but it didn't seal the wood well, either. I gave it a couple coats of Watco Danish Oil to better protect the stocks. Boiled linseed oil, tung oil, or a sprayed on polyurethane would also work well.
  • Browning's design does not lend itself to easy takedown. The good thing is that takedown is rarely required. Marlins are much better in this regard.

Steve's Gunz has a good DVD on slicking up the Rossi 92s.

As an aside, Rossi's quality control can sometimes be a little spotty. Years ago I had an 1892 Short Rifle in .357 made by Rossi for EMF. It had a 20" octagonal barrel, crescent buttplate, and no barrel band around the forearm. It was a beautiful rifle but when I first got it, it gave me extraction problems. Rossi had me send it in and they fixed it, but this was a hassle. At some point I traded it off but I do regret that.

The pistol caliber lever actions give you a light, fast handling rifle that fires an effective cartridge, can be operated quickly, and especially in .357 and .45 Colt, has mild recoil. It's worth a look for home or property defense if you can't have a modern rifle.

Monday, November 02, 2015

Day Trip to the Conrad Weiser State Forest

Yesterday I went up to the Port Clinton tract of the Conrad Weiser State Forest and had the chance to try a few pieces of gear.

1. Sony DSC-W810 digital camera. I chose this as my 15 year gift from my employer. I used it to take the pictures in this post. It takes good quality still photos but for video it sucks -- grainy, focusing problems, etc. Disappointing.

2. Etowah Outfitters 10 x 10 tarp. It's polyurethane coated ripstop nylon, and is nice and light. Instead of grommets it has nylon webbing loops sewn on. If one tears out you can sew it back on in the field.


I bought the Etowah tarp so that I could have a larger shelter than my USMC field tarp, for when I go camping with my daughter. The 10 x 10 tarp will allow me to set it up with enclosed sides but still give us adequate room. I brought it yesterday to try setting it up. If I was planning to spend the night I'd rig it so that the sides touched the ground, to block as much wind as possible. This pitch would work to protect you from rain pretty well, however. There was plenty of room underneath it for me and my gear.

3. Etekcity canister stove. Ten bucks on Amazon Prime and it works great for boiling water. I used it with my Stanley cookset to boil water for my Mountain House chili mac & beef lunch, and a cup of coffee. I've lit it a few times and each time, the built in piezo igniter started it on the first click. I don't know how well it'll hold up in the long run but for an occasional use unit, it looks like it'll do the trick.

4. Stanley 24 oz. Adventure Camp Cook Set. Well made except for the plastic tab handle on the lid. I previously replaced that with a stainless steel key ring. I didn't use the plastic cups that came with it. I'd left them home so I could store the stove, a bandana, and a fuel canister inside the pot. An Olicamp or GSI cup will nest over the outside. It is too tall and narrow for eating from, but it's good for boiling water on a canister stove. It has graduations stamped into the side for measuring water.


The foam pad was from Dick's Sporting Goods. It was good for kneeling on, but next time I'll schlep my REI camp chair, which is a lot easier to sit down on or get up from.


I made myself a cup o' joe after lunch using a Folger's coffee single. It's basically a tea bag, but with coffee. I'd rate it as better than instant coffee but not as good as coffee made using a drip, French press, or percolator. However, it's very convenient.

Finally, I practiced a little bit of fire starting. Pic of the ashes before I doused them:


FT-817 Legs

The Yaesu FT-817 is a great all band, all mode QRP rig, but one feature it lacks is a set of legs to prop it up so the face is at a good viewing angle. My previous solution was a stand made from a CD jewel case. A nicer fix is to add folding legs.

Back on October 17th, I ordered a set of "Black Edition Carbon Fiber Sport Legs" from eBay seller radioshackus (not to be confused with Radio Shack). Anyway, they arrived today from Hong Kong and I installed them tonight.

They came sans instructions but after looking at the pic on the eBay listing I figured it out. I'll note that if you get these legs or something similar, you will need a good, properly fitting Phillips head screwdriver to remove the OEM Yaesu screws holding on the carry strap brackets. They are in tight.

A couple of pics of the legs as now installed on my radio:


If you prefer to order FT-817 legs from a US vendor, see here. Note that while the seller is American, these are made in Germany.

Compared with an external stand, the folding legs are a lot more convenient and add no noticeable weight to the radio.

Saturday, October 10, 2015

Tramontina Bolo Machete from Baryonyx Knife Company

This week I picked up a Tramontina bolo machete from the Baryonyx Knife Company. For an extra $6.00, I paid for the "Special Grade" treatment, which involves:


  • Flush the scales with the tang
  • Finish the edge to a thin convex which is brought all the way to the point
  • Grind the spine square for tinder shaving and fire steel striking
  • Shape the tip to a fine point (as much as is possible for a bolo!)

Since machetes generally come dull from the factory, I felt that six bucks was a more than reasonable price to have it pre-sharpened, not to mention the handle and spine work.


Baryonyx performs a 7-point checkup on the knives they sell, and the owner also included a P-38 can opener as a gift.


As you can see, it came with the edge taped over, then packed in a USPS box. It did not come with a sheath, as is typical for most machetes.

When it arrived the bolo was able to shave the hair on my arm, the handle was flush with the tang and based on the smell, it appears that Baryonyx applied a light coat of boiled linseed oil to the wood.


Specs for the bolo are:
  • Overall Length: 19 & 1/2"
  • Blade Length: 14 & 1/2"
  • Steel: 1070 High Carbon
  • Thickness: 1.25mm
  • Weight: 11 oz.
After my initial inspection I took it outside to trim back some branches coming over my back fence. It cut through several thin branches with little effort and this thicker one that was overhead took only a few whacks.


Putting a pointed end on a stick, e.g. for use as a spear or in a trap, or for making a tent stake was easy.


The edge handled more delicate work peeling bark, but I found the bolo awkward for this sort of task.


After chopping back several branches, putting points on a few sticks, and peeling some bark the bolo could still shave.

Since it required two hands I couldn't get a picture, but I did try using the spine to scrape sparks from a ferro rod, for which it worked well.

Finally, I used it with a baton with the bolo to split some pieces of kindling off a hunk of some well-seasoned and very hard oak. 


I will probably modify the handle further so that it better fits my hand. I'll also drill a hole and add a lanyard.

The Tramontina bolo will make a good chopper for yard work and bushcraft. Based on how it chopped through hardwood, it would make a fearsome weapon as well. The "Special Grade" treatment from Baryonyx Knife Company was absolutely worth $6.00 to get a razor sharp blade out of the box, along with the reworked spine and handle.

Monday, September 28, 2015

Wednesday, September 23, 2015

Emberlit Wood Burning Camp Stove

Earlier this month I posted about camping stoves, including the Emberlit wood burning stove which I bought last winter, but didn’t get a chance to use it until Labor Day weekend. This is a follow up.

The stainless Emberlit weighs 11.45 oz., has a footprint of about 4.5” inches square, and is 6 inches tall. The stove walls taper so that the top is a little smaller than the bottom. I think the earliest production models did not come with the cross bars for the top, which allow you to use smaller cups on it. They also add rigidity.

On the Labor Day camping trip I used it to make coffee in my percolator and fry up some Spam.

emberlit-percolator

It worked to get the coffee boiling but really isn’t ideal for use with this percolator. It really needs a wider footprint for better stability. (That’s my friend’s modified Kelly Kettle in the background. Both are sitting on top of a park-type grill he has at his place in the mountains.)

On the other hand, it worked well to fry up some Spam to go with our breakfast.

emberlit-spam

Today I decided to give it another try, this time to make some Lipton chicken noodle soup.

Here’s what it looks like unpacked, ready for assembly. As you can see, it’s still has some soot on from the camping trip but the case kept it off the rest of my gear.

emberlit-unpacked

And put together, loaded, ready to be lit. I wasn’t sure how much fuel I’d need to get a cup of water boiling so I prepped a good amount, which turned out to be more than required. To get the sticks going I used some dried out flower stalks from my garden, lit with a match.

emberlit-assembled

Until the flower stalks burned off and the sticks ignited the Emberlit gave off quite a smoke cloud. But once the flower stalks were gone it burned cleanly with little smoke.

emberlit-burning

(This picture was actually from the second burn of the day. For the second burn I moved the stove into the shade so I could get better pictures.)

I used a 750 ml Toaks titanium pot with lid and bail to make the soup. The dimensions of the pot are 3.75” in diameter at the base by 4.375” tall, not including the lid or bail.

emberlit-cooking

I’ve used this Toaks pot a few times on my last couple of camping trips, and like it a lot. It weighs only 4.7 oz. and holds a decent amount of water. If you remove the lid it’ll fit over the bottom of a 32 oz. Nalgene bottle. The bail stays upright on its own and allows you to either hang it over a fire or pick it up. The handles are robust. The lid fits well and has a little loop handle on it that can be set to stand up, so you can easily grab it, yet still folds flat.

The one cup of water took only a few minutes to start boiling.

boiling

So, I added the soup mix and in a minute or so it boiled over, even though I only had one cup of water in the pot. I took the pot off for a few seconds then set it back on the stove but off to the side a little so the soup could simmer.

boiling-over

I used an 8.5” long Optimus titanium spoon to stir the soup and later eat it. The long spoon is also handy for eating from Mountain House pouches.

optimus-spoon

After a few more minutes the soup was done and I had lunch. Afterwards, there were a few coals leftover in the stove. It had burned the sticks very efficiently.

leftover-ash

As I was eating lunch my daughter wandered out and asked me to make her a cup. After finishing I was able to rekindle the flame from the coals, using some more of the dried flower stalks, some sticks, and a lot of blowing on the coals.

Compared with my first time using the stove I now have a better impression of it, based on:

  1. Using a more suitably sized cooking vessel.
  2. Having an adequate supply of fuel prepped and ready to go.

However, compared with my Kovea Spider canister stove, it’s:

  1. Dirtier (not just the stove, but the soot left on your pot).
  2. Requires more attention while you’re cooking something.
  3. Generally less convenient.

That said, it’s a very viable option for backpacking and even for emergency use. For example, charcoal briquettes are a fuel commonly found in urban and suburban areas, and for which it’s cheap and easy to store a large amount. For use in an emergency, an Emberlit would be make more efficient use of briquettes than a typical grill. I need to give this a try.

Emberlit also sells a titanium version of this model which weighs only 5.8 oz., making it even more attractive to backpackers.

Sunday, September 20, 2015

Polish Lavvu Tent

After seeing previous posts about the Polish surplus rain cape/shelter half tents (AKA "lavvus") I decided to get one. It's currently hard to find them in the US, so I ordered a complete set from a Polish eBay seller on 9/8/15. It arrived yesterday here in Pennsylvania. Priced including shipping was about $70. (As of this writing Sportsmans Guide lists the Polish rain capes with an expected in-stock date of January 2016. I'm hoping to use mine before then, so I splurged.)

This is the Polish equivalent of the old US military shelter half tent pup tent, used from the Civil War up at least until the 1990s. I like the Polish setup better. It has more floor space and headroom, and each half is also intended to be used as a rain cape.

The two halves were unissued. One was dated 1974 while I couldn't find a date on the other. They had that four-decade-milsurp smell, so I washed them in warm water using Fel's Naptha Soap, and ran them through the dryer on medium heat. I was hoping that this would also tighten the weave of the canvas to make them more weatherproof.

I set up the lavvu in my backyard this afternoon with the help of my 11 year old daughter Amanda.

Rolled up next to a common rubber mallet for scale:


Unrolled, showing the collapsable aluminum poles and stakes. One pole in each set has the smaller end plugged, while one has a removable plug in the base. The former is used for the top while the latter is the base. One of the top poles has a small split but it shouldn't affect the function.


The stakes are curved so that when stored inside one of the pole sections they don't rattle. Unfortunately, the stakes are flimsy and don't hold well. Also, one half came short one stake so to set up the tent we borrowed a peg from my daughter's Walmart dome tent. After setting up the tent and deciding that the supplied pegs suck, we ran out to REI and bought some replacement pegs made from steel, and a bag to hold them.


The new stakes are a lot more robust, hold better, and still fit through the grommets on the lavvu. They were a buck each, plus $4.95 for the carrying bag.

To setup the tent, we first buttoned one side together and laid it out on the ground. It looks like a milsurp Pac Man.


Then stake out a couple opposite sides and then put the assembled pole up, and put in the remaining stakes. One person could do it alone but having a helper makes it easier.

Hold off on driving the stakes all the way home until you have all of them where you want them. You want the tent as taut as possible, to maximize interior space and help rain run off. It could be a little tauter in this pic.


Note that I pitched the tent with the extra cape found on each half inside, opposite of how you'd wear one half as rain cape. This way, the arm holes will be more water tight.

I also tried it with leaving the flap open.


With an 11 year old for scale.


It was nice and dark inside which is great if you want to sleep in. A lantern could be hung from the center pole. With the door flap closed there isn't much ventilation and it quickly began to get uncomfortably warm inside. (It was about 77*F and sunny.) On the other hand, this should be a great tent for cool/cold weather. A candle lantern suspended from the pole would help to take the chill off if in wasn't too cold.

I've seen several places on the 'net where guys have made small wood stoves from .50 caliber ammo cans and run the chimney through a stove jack out one of the arm holes. That would be nice in subfreezing temps but would make it a one-person tent.

The lavvu has plenty of space for me and one kid, plus some gear. I'm 5'4" and can stretch out fully even when I'm not near the center of the tent. I think the intended use of sheltering two soldiers would be pretty cramped.

One potentially useful mod that I've seen is to sew a loop at the peak to suspend the tent from an overhead support, allowing you leave out the pole in the middle, for more room inside.

I am hoping to get it to the woods after we have a couple of frosts to kill off the creepy crawlies.


Pine Tar Soap as Insect Repellent

Before the advent of DEET, woodsmen used a variety of concoctions as insect repellents. Even today, many people don't like to use DEET since among other things, it'll damage plastic.

In Woodcraft and Camping, "Nessmuk" (George Washington Sears) described his bug dope" as follows:

It was published in Forest and Stream in the summer of 1880, and again in '83. It has been pretty widely quoted and adopted, and I have never known it to fail: Three ounces pine tar, two ounces castor oil, one ounce pennyroyal oil. Simmer all together over a slow fire, and bottle for use. You will hardly need more than a two-ounce vial full in a season. One ounce has lasted me six weeks in the woods. Rub it in thoroughly and liberally at first, and after you have established a good glaze, a little replenishing from day to day will be sufficient. And don't fool with soap and towels where insects are plenty. A good safe coat of this varnish grows better the longer it is kept on—and it is cleanly and wholesome. If you get your face and hands crocky or smutty about the camp-fire, wet the corner of your handkerchief and rub it off, not forgetting to apply the varnish at once, wherever you have cleaned it off. Last summer I carried a cake of soap and a towel in my knapsack through the North Woods for a seven weeks' tour, and never used either a single time. When I had established a good glaze on the skin, it was too valuable to be sacrificed for any weak whim connected with soap and water. When I struck a woodland hotel, I found soap and towels plenty enough. I found the mixture gave one's face the ruddy tanned look supposed to be indicative of health and hard muscle. A thorough ablution in the public wash basin reduced the color, but left the skin very soft and smooth; in fact, as a lotion for the skin it is excellent. It is a soothing and healing application for poisonous bites already received.

Nowadays, I'd avoid adding the pennyroyal oil, as it is known to be a liver toxin.

However, it may not be necessary to make up a solution, since pine tar by itself can do a pretty good job of repellent biting insects. Yesterday I gave Granpa's Pine Tar Soap as test as insect repellent, during the opening day of archery deer season here in Pennsylvania.

When I took my morning shower I used the pine tar soap as both shampoo and to wash my skin.

The temps ranged from the mid-60s up to the 80s in the afternoon. There were plenty of mosquitoes and gnats flying around but none of them would land on me, except for a single skeeter that landed on my pant leg, where I squashed her (only female mosquitoes bite).

It remains to be seen if the pine tar soap repels biting flies, but for mosquitoes and gnats it works. I may even wash the sniper veil I use to break up my outline in it, and maybe some clothes. You smell like a campfire after washing with pine tar soap, but that beats getting bitten.

Monday, September 14, 2015

A DIY Programming Cable for Baofeng Radios

One problem which has plagued many owners of Baofeng radios has been getting the programming cable, or more specifically the drivers, working properly under Windows. This may be a viable solution:

http://www.miklor.com/COM/UV_ProgrCable.php

I mostly use a Mac to program my radio so it hasn't been much of a problem for me, but I have had to deal with troubleshooting this on a friend's PC, and it was a major PITA. Miklor's page on troubleshooting the drivers has been the best that I've found.

Tuesday, September 08, 2015

Camp Stove

Another piece of kit that I got to try on this past weekend's camping trip was the Emberlit stove that I bought last Winter, but has since languished in my camping gear box.

(Picture borrowed from Amazon.)

The Emberlit stove is well made from stainless steel sheet metal that takes down into a flat package, and comes with a nice little carrying case. Emberlit also sells a titanium model, and a smaller version as well.

It can burn pretty much any solid fuel and is also usable as a windscreen/pot holder for alcohol burners like a Trangia stove.

I used it Sunday morning to heat my percolator for coffee. It burns twigs very efficiently down to almost no ash, but it requires constant attention. I.e., you need to keep feeding it fuel, so you should have a good stack prepped beforehand. It also gives your pot a good, thick coat of soot.

I want to try the Emberlit out with charcoal briquets. I think it would burn them very efficiently and would probably require less constant attention.

In my opinion, it would be good as a backpacking stove if you're going into an area where there will be a lot of fuel that you can scrounge, or as a backup. For truck camping, a butane/propane canister stove like my Kovea Spider is a lot more convenient. For example, on Monday, I set my percolator on the Kovea and was free to do other breakfast prep while it was bringing the coffee to a boil. Likewise, when we needed hot water for washing dishes I was able to get it ready with the Kovea while I worked on other task. I really like the Kovea Spider.

Another stove we got to use was a butane powered, single burner unit like this one. He bought it from a local restaurant supply store for use during power outages, because it's so simple to use and the butane cartridges are inexpensive. (Many local Asian restaurants use them for on-table fondue-type meals.) The low, flat, wide design is very stable, important with a bunch of kids around.

It worked well for sautéing vegetables and frying bacon, but requires you to provide a windscreen, since it's really designed for inside use. The downside with these butane cartridges is that they'd be useless in cold weather.

There is a huge variety of camp stoves available. Evaluate your needs as to fuel and convenience, and choose accordingly.

ParaCord Spool Tool

This past weekend I was out in the woods and had the chance to use a recent addition to my camping gear, a ParaCord Spool Tool.


(Picture borrowed from Amazon.)

It's a flat piece of plastic designed to allow you to neatly keep up to 100 feet of parachute cord and has a built-in cutter. The fingers in the bottom center of the picture holds a mini-Bic lighter for melting the ends of pieces that you cut, and the slots on the left allow you to draw the molten ends through to make them neat, instead of blobs.

It is a clever and very convenient piece of gear. I needed to cut some paracord this weekend and this made it easy to do without having to fish out a knife and lighter.

Monday, August 31, 2015

Choosing your first police scanner

Sparks31 has advice on choosing your first police scanner. Read it here.

Thursday, August 27, 2015

Free Book Download from Sparks 31

I've been following Sparks 31's blog for awhile now, and bought his book Communications for 3%ers and Survivalists. He's decided to make the full text of that book and his other tome, The Modern Survivalist available as one PDF, for free.

https://sparks31.wordpress.com/2015/08/26/free-book-download/

It's worth a gander.

Thursday, August 13, 2015

AlexLoop Walkham Antenna

One type of antenna I've wanted to try for HF has been a magnetic loop or magloop, for short. For portable operations they have a few advantages: small size, light weight, and fast setup and takedown. The disadvantages of small, non-resonant magloops include lack of efficiency and very narrow bandwidth (although the latter can be advantageous in certain circumstances).

In particular, one that gets almost universally excellent reviews is the AlexLoop Walkham by PY1AHD. It's a QRP antenna limited to 10W PEP but for use with my Yaesu FT-817ND that's not an issue. (The FT-817ND's max output is 5W.)

I was down in Delaware for work today at a site about mile from the New Castle, DE Ham Radio Outlet, who carries the AlexLoop. One came home with me. After work I set it up out back on my patio.

I had it sitting on the same camera tripod I used with my Arrow 2M yagi antenna.


Close up of the control box:


You use the knob on the bottom to tune it. The way I did so was to tune for maximum noise. Because it is very narrow banded, if you change frequency even a few kHz, you must retune.

Although it says right there on the box that you should have an SWR meter inline, dummy me forgot to get a BNC-to-UHF adapter so that I could do so. Instead, I configured the FT-817ND to display rough SWR readings on transmit, which allowed me to fine tune the antenna.

So how's it work? I'd say it's promising. On 20M PSK31, here are the signals I received in a couple hours that Fldigi reported to pskreporter.info. I saw more than these on the waterfall, however.


And here's what I received.


Not shown were the several European stations I saw on the waterfall, including Spain, Italy, Serbia, Slovakia, Bulgaria, and Poland.

I completed two QSOs, one with a ham in MO about 815 miles away, and another with an operator in Italy, 4348 miles away. For whatever reason, he didn't show up as receiving me on pskreporter.info.

I also tried 40M for a few minutes but the band was dead.

The AlexLoop should be a good choice for portable operation, especially when camping. It collapses down into a small, light package, and came with a nice carrying bag. Setup is easy and quick, and unlike my portable vertical, it doesn't require any counterpoises to be laid out and gathered up. It wasn't cheap, but it's well made and should last a long time.

If you're looking for a portable antenna for QRP HF, the AlexLoop Walkham is worthy of consideration.

Tuesday, July 28, 2015

E-Book: Practical Antenna Design 140-150 MHz VHF Transceivers

Thanks to Fo Time on Facebook, I ran across this e-book on antenna construction, Practical Antenna Design 140-150 MHz VHF Transceivers, by Elipidio Latorilla. Included are a couple variations on the familiar VHF ground plane, but the details look like these would be easier to construct than most such designs.

This book is worth adding to your library.

Tuesday, July 21, 2015

Gun Training in Nasty Weather

Over on gundigest.com, Dave Morelli has an article in which he advocates gun training in bad weather.

I see nothing in the article with which I disagree. The author isn't advocating going out in crappy weather to learn the fundamentals. He's telling you to get out there in sub-optimal conditions to learn what your gun does -- and what you do -- when it's windy, rainy, or cold.

Based on my own experience in shooting practical rifle matches at my club, operating your gun in extreme weather conditions stresses the shooter in ways not experienced when it's 75 and sunny. If it's humid, lenses (both eye glasses and scope lenses when you accidentally breathe on them) get fogged. If it's snowing ice can form on your gun while you're waiting to shoot, rendering it slippery. When it's hot, your sweat gets in your eyes and on the gun.

Or step in a 10" deep puddle of ice water while your waterproof boots are only 8" high, then go on to finish the stage.

In cold weather your clothing limits your movement and makes working fine controls more difficult.

Get the basics down in good weather. Then go see what happens when it's shitty out.

It was about 12 degrees out when this pic of me was taken back in January.


Under stress you will default to the level of your training. If you train easy, you will fail get life gets hard.

Monday, July 20, 2015

Got Comms?

Sparks has recently posted  about Internet service interruptions, some of which are the result of intentional action. See this post, too (and my readers may recognize the picture of the FT-817).

Today, I ran across this story on Ars Technica, reporting a fiber optic cut near San Francisco which was the twelfth such interruption in that area this year.

A sufficiently motivated party could cut several such fiber optic lines, or take out a colo facility in which many such lines pass through, and thereby cut off comms for a large number of people for a significant period. Given our current dependence on the Internet and telecommunications, this could be disastrous for those affected.

BTW, from the viewpoint of someone who's worked for an ISP for nearly 15 years, if somebody takes out a colo facility, Shit Just Got Real.

The Internet was designed to route around breaks but as it has grown in the past 15 years, the level of overall redundancy has dropped in many areas. Too many parts of the infrastructure are vulnerable to intentional disruption. With Islamic terrorism happening more frequently on US soil, I am concerned that at some point they'll go for infrastructure.

This is why I highly recommend getting at least a General Class amateur radio license. The General Class license gives you operating privileges on most of the frequencies allocated to ham radio operators in the US, and isn't much more difficult to get than the entry level Technician license, now that there is no Morse Code requirement.

There's a lot of overlap in the Tech and General exams, but you get a lot more privileges on High Frequency (HF) with the General ticket. HF is what's needed for long distance communications, or certain kinds of regional comms (see, NVIS).

The ARRL maintains a web page with info on getting licensed, including training and finding an exam, here.

You need to get licensed now, before you need comms, because you need to know how to operate your radio, and understand on-the-air procedure. You cannot expect to be able to turn on a ham radio, press a button, and talk to someone like you're using walkie talkies. Just like having an AR-15 doesn't make you a Navy SEAL, having a radio doesn't make you a competent operator. It takes practice, and the only way to get it is to get on the air.

If you're not licensed, don't expect to be able to get on the air with a fake call sign. Not only will licensed hams not talk to you, they may very well track you down and sick the FCC on you. The penalties for unauthorized transmissions can include $10,000 fines.

It's not a bad idea to have unlicensed communications options available, as well. FRS and GMRS* are good for local comms, as is CB Radio. See Dialtone's posts on the "Jungle Telegraph," here and here.


* I know, GMRS requires a license. However, I'll bet that 90% or more of bubble pack FRS/GMRS radios are operated without one.

The Revenant

Over on Arfcom one of the members started a thread about the upcoming Leonardo DiCaprio film, The Revenant, coming out this December. Here's the trailer:


The movie is based on the story of real-life mountain man Hugh Glass, who was mauled by a grizzly bear, was left for dead without a gun or even a knife, and then crawled 200 miles to the nearest white outpost, making Glass' tale one of the most amazing and enduring survival stories ever.

Glass' saga was also told in the novel Lord Grizzly, which I read years ago. It was a best seller when released in 1954, and is a classic. I decided it would be worth rereading, so I bought a new copy to read on Kindle.

Saturday, July 18, 2015

Programming the Uniden BC996XT Trunk Tracker IV Scanner

This morning, I've been working on getting my new Uniden BC396XT programmed to search frequencies in my country, the surrounding counties, and a few nationwide radio services like CB, FRS/GMRS, and NOAA weather. To start out with, I am using FreeSCAN, which is very full featured and of course, free.

I've also downloaded the demo of  ProScan, which has a 30 day demo.

Both ProScan and FreeSCAN feature rig control, which given the highly menu-driven UI of the Uniden scanner, is nice to use if you have a PC handy. Unfortunately, both are Windows-only.

Compared with programming an amateur radio, as a scanner n00b this is more complicated, which came as a bit of a surprise. Part of it is the new interface but aside from that, there are a lot of frequencies to monitor and organizing them is a challenge.

Uniden includes an RS-232 serial cable for programming the unit. C'mon guys, it's 2015. How about a USB programming cable? Yes, Uniden sells one, but it's about $50 after shipping. (There are clones out there on Amazon and eBay, but I have no idea if they are any good or not.)

For several years, most computers haven't come with serial ports, so you'll probably need a USB-to-Serial adapter if you want to use the supplied cable. I already have a Keyspan USA-19HS USB-to-Serial adapter, which I've found to be one of the more trouble free such units when working with things like network routers and switches. It works with Windows, Mac, or Linux computers. Amazon has a less expensive TRENDnet alternative.

If you're serious about scanning, then a Premium subscription to Radio Reference is a must. Having the Premium membership allows you to enter your credentials into your programming software and have it download groups of frequencies into your local database, then upload them to the scanner. Given the number of frequencies you'll want to monitor, this is necessary so you don't have to spend days manually entering the info.

Note that to programm the CB, FRS/GMRS, and MURS frequencies, you need to use FreeSCAN's EZGrab function, that lets you copy a table from a web page and paste it into the program. Radio Reference doesn't have these frequencies in their database to download. It would be nice if FreeSCAN could have these as a menu item, similar to what is found in CHIRP, which a lot of us hams use for programming amateur radios.

Another valuable resource is the Easier to Read Manual from Mark's Scanners page. I may buy a hard copy from Scanner Master.

Thursday, July 16, 2015

Uniden BC396XT Trunk Tracker IV Scanner

I've been wanting to get a better picture of radio activity in my locale, and have a way to pick up official transmissions in the event of an emergency, so I bought a Uniden BC396XT Trunk Tracker IV scanner from Amazon.


(My Icom 7200 is peeking in from the left, and my Motorola Talkabout FRS/GMRS radios on the top right.)

In order to more easily program it, I downloaded Freescan and upgraded my account at radioreference.com to a 180-day Premium one. A Premium account allows you to configure Freescan to directly download from the Radio Reference database, and then upload it to your scanner.

The user interface of the scanner isn't what I'd call intuitive. However, I was able to program it with Freescan and have managed to pick up transmissions from a local fire/EMS group, police, SEPTA, and a couple hams conversing on the W3EOC UHF repeater. All this was using the stock rubber duck antenna while sitting in my house. An external scanner antenna is on my to-buy list.

Learning how to maximize the value I get from this scanner will take awhile, but I think it'll be a valuable addition to my radio capabilities.

Thursday, July 09, 2015

"Technical Glitches." Uh huh.

Unless you were under a rock, you know about the following three things:

  1. The Chinese stock market dive.
  2. "Technical glitches" grounding all United Airlines flights in the US yesterday.
  3. "Technical glitches" causing all trading to be halted for several hours on the New York Stock Exchange yesterday.


Unless the network and system admins at UAL and the NYSE are totally incompetent, they have major redundancy in place to prevent shutdowns like this from happening. There's simply too much money at stake to have single points of failure.

Now, was Anonymous responsible? Perhaps it was someone looking to divert attention from the Chinese stock market meltdown. Whatever really happened I doubt that the powers that be would share the truth, for fear of upsetting the apple cart.

My tinfoil hat feels a bit warm. It would be a good time to revisit your emergency preparations.

Saturday, June 27, 2015

Plans for an Arrow Antenna

Over on Bushcraft USA, another member linked to this PDF version of an article from the April 1992 issue of 73 Amateur Radio Today by KA0VFF and N0IMW on how to build a 2M Yagi antenna using aluminum tubing and aluminum arrow shafts for the elements. In the thread discussing it, the poster mentioned being able to check into a repeater on Greens Peak in AZ, from Flagstaff, a distance of about 150 miles using 50 watts. Pretty damn good, IMO. (The thread is here, but I think you need to be registered with BCUSA to view it.)

As a 4-element design, it should have a little more gain than my 3-element Yagi from Arrow Antennas. This will manifest itself only under extreme conditions, however.

With suitable weather sealing, it looks like this design would be a good choice for a permanent mount.

Finally, N5DUX's site has a good collection of ham-related PDFs. It's worth checking out.

Tuesday, June 23, 2015

Nifty Ham Radio Guides

An accessory that I find indispensable for all of my ham radios is the appropriate Nifty Ham Radio Operating Guide. The Nifty guides are produced on laminated paper. For the more complex rigs like my Icom 7200 and Yaesu FT-817ND, they are spiral bound. Those for the HTs are foldable cards. Each of them contains the most important functions of the radio in an easy to find format. They aren't as comprehensive as the OEM operator's manuals, but they are a worthwhile supplement, especially for field use.

Monday, June 22, 2015

The Other End of my 2M Yagi Test

As I mentioned in a comment to my original post on testing the Arrow Antenna 2M Yagi, I was able to have a QSO on 2M FM simplex with a friend using this rig. Distance was about 22 - 25 miles. 5W on my end, while he was using 50W into a Kenwood 2M mobile with a home Yagi on his end. (He would've lowered power but forgot how and didn't have his rig's manual handy.) Here's a pic of his setup, with a very post-apocalyptic vibe going on.


We also tried it with a Baofeng HT connected to his tape measure Yagi, but all I could hear was static when he called me, even though he was able to hear my 5W transmissions clearly. 

At some point I'd like to try 2M SSB, which should punch through better than FM, but don't currently know anyone else relatively nearby with a 2M SSB capable rig.

Sunday, June 21, 2015

A Ham Radio for SHTF Only?

My post yesterday, Testing the Arrow 146-BP3 Yagi Antenna, got picked up by a couple sites, including Sparks31 and Amateurradio.com. Thanks, guys! It also generated the following question:

Can you recommend a ham radio for emergency use only (hand held if available)?

There really isn't a good, quick, "Buy this radio," type answer.

Obviously, ham radios are a valuable addition to your preps, otherwise I wouldn't write about them so much. However, being able to effectively use a radio is more complicated than unboxing it, turning it on, speaking into the mic, and expecting someone to answer with useful information. You must learn something about radio operations and get some practice in before the SHTF. To do so, you must get licensed.

Piccolo summed up very well on Arfcom, here, why you need to get your ham license before the SHTF.

Getting a ham license is not hard for most people. Kids get licensed. Morse code is no longer required. The entry level Technician license requires you to pass a 35 question multiple choice test. This allows you to operate on VHF and UHF frequencies, which are good for local communications. The next level up, General class, gives you access to most of the HF (shortwave) frequencies, which depending on your setup, can give you regional to global communication capabilities. This is a second 35 question exam. There's a lot of overlap in the two exams, so it's not uncommon for someone to pass the Technician exam and then take and pass the General exam in one sitting, for one $14 fee.

The American Radio Relay League has info on how to get licensed, here.

After you've read some of the Technician level study material you'll have a better idea of the capabilities you need/want in your commo gear.

Now, if I've convinced you of the need to get licensed, I'll mention that no license is required to purchase a ham radio, and you can listen as much as you want. Just don't key the transmitter until you're licensed.

Saturday, June 20, 2015

Testing the Arrow 146-3BP 2M Yagi Antenna

I tested out the Arrow 2M Yagi antenna that I got a couple weeks ago, by hitting the Pottstown repeater on 2.5 watts from my yard. The repeater is about 25 to 20 miles away. I spoke to another ham who said I had some background noise but was intelligible.


To attach the antenna to the camera tripod, I made an adapter from a piece of 5/8" aluminum rod. I turned one end down to fit into the antenna boom, and then drilled and tapped a 1/4"x20 hole in the other end.


There's about 2" of rod in the antenna boom, while there's about 1/2" of engagement with the mounting screw on the tripod head. This is a temporary, light duty setup, but it's easily portable.