I need to get a Foodsaver.
Showing posts with label bugout. Show all posts
Showing posts with label bugout. Show all posts
Wednesday, November 30, 2016


Saturday, November 26, 2016
Lixada Wood Gas Stove
The other day I ordered a Lixada wood gas stove using an Amazon gift card. This stove is sold under a number of different brand names on Amazon and eBay, generally for a bit under $20. The stove is made from stainless steel and has the following components, which nest together:


- Base with air holes.
- Double-walled combustion chamber with holes on the inside near the top.
- A bottom part to hold the fuel off the ground. It also has air holes in it.
- A pot stand with folding arms.
- A bowl which can be placed in the combustion chamber to burn liquid or gelled alcohol fuel. If inverted it can be a platform for hexamine or trioxane tablets.
Along with the stove itself a nylon mesh bag was included for storage and transport.
Since I had some time this afternoon I decided to give it a try, using some sticks from my yard. The stove did not come with any instructions but I'd read up on them online. Supposedly, they work best with the combustion chamber filled with sticks oriented vertically, burning top-down.
I used a piece of dryer lint/paraffin wax fire starter to get it going.

After a few minutes the wood gas that's released by the burning wood gets flowing through the sidewall, comes out the interior holes and ignites.

Shortly after it got going I put my Olicamp Space Saver Cup with home made lid on top. I had 12 oz. of water in the cup to make some tea.

A couple things caused my boil time to be overly long (i.e., damn near a half hour):
- It was windy, which caused a lot of heat loss via convection. The next time I use the stove I'll use a wind screen.
- Some of my wood was damp. Also, I waited too long to refill the stove when the fuel burned down, which made it take longer to ignite. I should have fed it small pieces of wood before the flames died out.
As long as I kept it fed so that the wood gas was being burned it was pretty much smoke free. If I let it die down and then added fuel, it was smokey.
The idea of a stove for which you can forage fuel is very attractive for camping, hiking, and bugouts. I need to play around with it a bit more to get the knack of minimizing cook times. In particular, one fuel I want to try is charcoal briquettes, which we keep up at my friend's place where we camp a few times each year. Another fuel which other owners have reported works well are wood pellets, as used in pellet stoves.
I'm planning to follow this up with a video, once I get the raw footage edited.
Sunday, June 12, 2016
Trailer Hitch and Accessories
Last summer I bought a Curt Class III receiver hitch for my 2007 Nissan Xterra. With the help of a friend with a garage and air tools, installation was easy. The primary reason for the hitch wasn't for towing anything. Rather, I wanted to be able to expand the carrying capacity of the truck by using a hitch mount cargo carrier.
The cargo carrier I got was this one from Harbor Freight. If you catch it during one of their sales and use a 20% coupon, you can probably snag it for about $70 - $80. I found it to be pretty well designed but at some point I might replace the screws holding it together with stainless steel screws. Assembly was pretty straightforward with a screwdriver and nutdriver.
As a compact/mid-sized SUV, the Xterra has enough room for a long weekend camping for two people. When I bring both kids, though, I need to leave the back seats up and lose about half my cargo capacity. Before I got the external cargo carrier I used a bag strapped to my roof rack. This is OK for duffle bags but is a major pain to access and kills gas mileage. In contrast, the hitch mount carrier is easy to mount and has enough space to hold a cooler, Rubbermaid Action Packer box full of stuff, a Coleman stove, and a roll up aluminum table from REI.
The major downside of the hitch mount carriers is that if you leave them unattended whatever is on them is vulnerable to theft. Also, you don't want to overload them because doing so will change the balance of your vehicle, affecting its handling.
The secondary reason for the hitch was for a bike rack. I finally ordered one this week. My girls have been after me to get one so I can take them to local trails for cycling. Now that they are beyond the little kid stage they'll be able to bike for long enough to make such trips worthwhile. I used to be into cycling but it's been years since I did more than a couple laps around my subdivision. It's a good, low impact way to get some exercise.
The cargo carrier I got was this one from Harbor Freight. If you catch it during one of their sales and use a 20% coupon, you can probably snag it for about $70 - $80. I found it to be pretty well designed but at some point I might replace the screws holding it together with stainless steel screws. Assembly was pretty straightforward with a screwdriver and nutdriver.
As a compact/mid-sized SUV, the Xterra has enough room for a long weekend camping for two people. When I bring both kids, though, I need to leave the back seats up and lose about half my cargo capacity. Before I got the external cargo carrier I used a bag strapped to my roof rack. This is OK for duffle bags but is a major pain to access and kills gas mileage. In contrast, the hitch mount carrier is easy to mount and has enough space to hold a cooler, Rubbermaid Action Packer box full of stuff, a Coleman stove, and a roll up aluminum table from REI.
The major downside of the hitch mount carriers is that if you leave them unattended whatever is on them is vulnerable to theft. Also, you don't want to overload them because doing so will change the balance of your vehicle, affecting its handling.
The secondary reason for the hitch was for a bike rack. I finally ordered one this week. My girls have been after me to get one so I can take them to local trails for cycling. Now that they are beyond the little kid stage they'll be able to bike for long enough to make such trips worthwhile. I used to be into cycling but it's been years since I did more than a couple laps around my subdivision. It's a good, low impact way to get some exercise.
Sunday, January 10, 2016
Campsite Intruder Alarm With Fireworks
This is a neat video from Survival Lilly showing how to create a tripwire-activated campsite alarm using a firecracker/noisemaker, matches, twine, and duct tape.
With a little work, this could be weatherproofed and a better mounting system could be devised. That said, this is a good starting point.
With a little work, this could be weatherproofed and a better mounting system could be devised. That said, this is a good starting point.
Tuesday, March 03, 2015
Vehicle Safety Tip: Keep a Set of Spare Wiper Blades in Your Car
For the second time since I started driving I had to replace a windshield wiper while away from home, before I could drive anywhere.
After work and getting off the train tonight and getting back to my truck, I started to clear the windshield of a sleet accumulation. I was a bit careless and managed to hit the driver's side wiper blade with my scraper, and bent it, breaking a plastic piece. Thankfully, I had a set of spare blades in the box that I keep in the back of my Xterra. What could have been a major PITA was just a minor inconvenience.
The first time I had to change a wiper blade while away from home was about 20 years ago, during a commute to law school. I was driving during a snow and ice storm, and the driver's side wiper ripped. I had spares with me so I pulled over and changed it.
When I change my wiper blades as part of ordinary maintenance, typically what I'll do is rotate out the ones I kept as spares, then put the new blades in my truck box. That way the spares don't get too old and possibly dry rot.
After work and getting off the train tonight and getting back to my truck, I started to clear the windshield of a sleet accumulation. I was a bit careless and managed to hit the driver's side wiper blade with my scraper, and bent it, breaking a plastic piece. Thankfully, I had a set of spare blades in the box that I keep in the back of my Xterra. What could have been a major PITA was just a minor inconvenience.
The first time I had to change a wiper blade while away from home was about 20 years ago, during a commute to law school. I was driving during a snow and ice storm, and the driver's side wiper ripped. I had spares with me so I pulled over and changed it.
When I change my wiper blades as part of ordinary maintenance, typically what I'll do is rotate out the ones I kept as spares, then put the new blades in my truck box. That way the spares don't get too old and possibly dry rot.
Saturday, February 21, 2015
Hellcat ALICE Pack
Back in 2011 Rod Teague of the Liberty Tree blog posted his tutorial on how to build what he calls the “Hellcat” ALICE pack. The Hellcat ALICE combines parts from recent MOLLE II rucksacks with the old standby ALICE pack. It’s an excellent blend of modern and older technology and has proven to be popular among bushcrafters and survivalists.
One of my goals for 2015 is to do a bushcrafty camping trip where I hike into a campsite and carry all I need on my back. To do so I need rucksack larger than what I had, so last weekend I picked up a large ALICE in very nice shape, and then ordered parts to build my own Hellcat.
The parts all arrived this week and I put it together today. Here is it shown with my USGI Military Sleep System inside to provide some shape to it.

The MOLLE II waist belt and shoulder straps came from eBay vendors. I also wanted to replace the antiquated metal sliders on the compression and pocket straps with Fastex buckles. For these, I ordered a repair kit from Amazon.
The buckles arrived first so that was the first mod that I tackled. The original metal sliders need to be removed from the ruck first, without damaging the existing straps. I used a set of Wiss aviation snips to clip them off. You can also use a Dremel with a cutoff wheel. With the old sliders removed you can install the repair buckles. You’ll need five of the 1” wide on a large ALICE; the kit comes with four. For the last one I used a buckle that I had in my junk pile and used the snips to cut a slot like the one found on the repair buckles. It’s the black one on the middle pouch, below.

For additional security I put a cable tie around each short strap where it snaps to the pocket.
The Fastex buckles make opening and closing the pockets a lot easier, and allows you to move the lid out of the way much better than the original sliders. Even if you don’t do the full Hellcat mod the Fastex buckle mod is very worthwhile.
The MOLLE II shoulder strap kit that I got is a bit different from the one shown in the original tutorial. The design probably evolved over time. The frame attachment straps are different so I had to come up with a slightly different way to attach the shoulder strap yoke to the frame. The load lifter straps are just threaded under the top frame bar, through the loops on the frame, then secured in place with the Fastex buckles.

The web straps had a couple areas that were folded over and stitched so that the webbing was three times the thickness of the unfolded webbing. I carefully removed this stitching so I could thread it through the buckles and give me a little more length. To make threading the webbing easier, I cut each end on an angle then fused the ends with a lighter. The short connector straps that come with the shoulder strap assembly were discarded after removing the buckles, which were used as shown above.
The shoulder strap assembly that I got has a different long middle strap from the one described by Teague. Instead of a Fastex buckle it has an ALICE-type metal slider, and I believe the webbing is shorter. After removing the slider I had to come up with a way to attach it to the middle of the frame. I settled on using a couple cable ties:

I may replace these cable ties with some 550 cord or beefier ties.
The bottom of each shoulder strap is threaded through the round hole on either side of the ALICE frame at its base. This also shows a side view of how the waist belt is attached to the frame.

And here’s a top view of the waist belt attachment. You thread the attachment straps through the same loops on the frame that the ALICE kidney pad uses, and then secure them with the buckles on the pad.

The waistbelt is the most important part of the conversion for making the ALICE carry like a modern pack. Properly adjusted it allows you to transfer most of the weight you’re carrying from your shoulders to your hips. There’s a little movement in the attachment but we’ll have to see if it’s a problem under load.
The final component of the Hellcat conversion is the MOLLE Sleep System Carrier. This is a bag that straps onto the bottom and which holds your sleeping bag. I haven’t yet obtained one but will be ordering one shortly. At first I thought I might be able to compress my MSS down and just carry it in the main compartment, but doing takes up pretty much the whole thing. So, I’ll get the carrier bag and strap it onto the bottom.
Were I to starting out all over with this project, I’d order a Hellcat conversion kit including the straps, waistbelt, and sleeping bag carrier. One place to get such a kit, an ALICE with conversion kit, or a complete Hellcat is The Old Grouch’s Military Surplus.
The Hellcat and Fastex buckle mods greatly improve the performance of the ALICE pack, making for a low cost alternative for recreational backpacking or your bugout bag.
Wednesday, February 18, 2015
DIY Emergency Tarp from IA Woodsman
IA Woodsman posted this video of a DIY emergency tarp shelter made from a mylar space blanket, a couple garbage bags, duct tape, and parachute core.

DIY Emergency Shelter
Tuesday, January 20, 2015
Lightweight Backpack Radio Guide
The following was posted on AR15.com by member "Harlikwin" on January 19, 2015. Harlikwin is a ham with a great deal of experience operating QRP, manpack radios. He has generously given me permission to reproduce it here.
Lightweight Pack radios
I’m writing this piece from the standpoint of needing a lightweight back-packable radio that I can take with me on overnight and several night outings so weight and power out are critical considerations.My definition of lightweight is that I will use the target weight of approximately 5lbs or less to design a lightweight packable radio system (minus antennas) capable of SSB use.
Thoughts on power
One thing I will talk about is what I consider useable power levels, and I acknowledge that this topic is highly divisive so I’ll put down my opinions on it and people can disagree with me if they like (and I know they will). I will begin with a simple fact: nearly all of the worlds militaries have for four decades decided on a ~20-30W power level for their portable SSB backpack radios as the best compromise for reliable man portable SSB HF communications and in my opinion for reliable SSB work this is probably the best compromise between power out and weight and power consumption. However, very few of the examples examined here offer a full 20W output as a stock configuration, so some sort of amplifier is required. I will fully acknowledge that SSB contacts CAN be made with very little power under the right conditions, been there done that, but in general it is my experience that there is a big difference between making SSB contacts with 5W and 20W, not merely the measly 1 S unit of power as many folks with come back with as a counterpoint. I will break it down as saying as 5W SSB is great for CW and data modes such as PSK31 but generally unsuitable for making reliable SSB comms. 10W of power is again great for CW and data but still a bit marginal for SSB. In my opinion and experience, 20W+ is the best range for low power SSB under most ionospheric conditions. That being said I will jump in and examine the commonly available options in the new and used ham radio market, the list isn’t meant to be comprehensive but I feel like I’ve covered most of the basic rigs available.
The configurations
I will discuss 3 different configurations, the base radio and what it weighs (with batteries) and then 20W and 50W configurations with an outboard amplifier. For the sake of comparison I have chosen the MX-P50 Chinese amplifier and a Zippy 4.2Ah LiFePo4 external battery and various elecraft or LDG ATUs (noted) for the comparison to keep the configurations simple, all weights posted include internal batteries if available as well. Certainly one can decide if 4.2Ah is enough capacity to run the system for the required time, but I’ve used it as convenient placeholder. It should be noted the amplifier listed does require a very good antenna match, hence all configurations will include an ATU. Alternately I suppose you could use a perfectly matched antenna, but in practice in the field its too much of a pain IMO, a tuner is the same weight or less and much easier to use.
The contenders
Elecraft KX3 HF+6m
The KX3 is often bandied about as the do it all super lightweight wonder radio for backpacking, SOTA and other lightweight activities. It certainly boasts a lot of great features such as IF DSP, internal ATU and batteries and fancy things like CW/PSK31 decode, AND it is lightweight and compact to boot. Unfortunately the advertised weight is listed without internal batteries, or optional things like an ATU or optional 2m radio module or extra filters or the “optional” mic so it is a bit misleading. Also unadvertised is the fact that to realize its full 10W of output power it does require an external 13.8vdc power source. With those two caveats however it is still very lightweight and does put out a very usable 10W of power. With an external LiFePo4 battery and internal batteries and ATU option the weight comes in at 3.4lbs for 10W output which has the best power to weight and volume ratio at that power option of the radios listed. Adding an external 20 or 50W amplifier is certainly an option however to my knowledge one must also add an external tuner to utilize it with the KX3. With a MX-P50M tuner and outboard T1 or Z817H ATU the weight climbs to 4.9lbs and 5.5lbs for 20W/50W respectively, we can use the outboard battery to run the amplifier and the internal batteries to run the radio. The one area where the KX3 does fall short compared to all the other options is cost, the price for the various configurations is roughly double that for any other configuration running from about 1430 for a loaded (ATU/Filters/mic) base configuration to about 1800 for a configuration with the amplifier and external ATU.
Yaesu FT817 HF/VHF/UHF
The FT817 was the first QRP radio marketed as such, with a very small footprint for the base radio and a 5W power output, achievable on internal batteries, it took the low power world by storm. However almost all later radios had 10W+ power output after folks became frustrated by the FT817’s lack of SSB performance, also partly due to lack of power and any sort of speech processing which should absolutely be included (easily fixed by aftermarket mics or kits). It should be noted that the FT817 is the only radio reviewed that can cover the whole frequency range from HF to UHF, which may make it attractive to some. The base configuration with batteries weighs in at 2.5lbs for 5W of performance (I should note the kx3 is a bit lighter ~2lbs running 5W). For effective HF SSB performance the FT817 benefits the most from an outboard amplifier, using theMXP50A amp and a LDG Z817/Z817H tuners one gets weights of 5.5 and 6lbs for 20W/50W respectively. Essentially the FT817 is half a pound more than the KX3 at every turn and volumetrically comparable to the KX3 configurations. Cost wise it depends, used FT817’s vary widely from ~300-600 USD so the configurations can run from 800 (assuming a 450 base cost) to ~1000 USD depending on if one gets a new or used FT817 to start off with.
Icom IC703/703+ HF+6m
The ICOM703 comes in a 10W configuration with a built in narrow range autotuner. This was a very popular radio for some time but was discontinued by ICOM for some reason. At first glance it is very comparable to the KX3, though the KX3 boasts features like IF DSP vs AF DSP and CW/PSK decoding. Also the stock IC703 with external battery (no internal batts) weighs in at a hefty 5.5lbs and volumetrically is comparable to the 20 and 50W configurations of the FT817. If we start adding things like the amplifier and external ATU the weight rapidly climbs out of “lightweight” territory. The 703 isn’t a terrible choice if you can find one cheaply, and it is nicely integrated aside from the external battery, its just going to be a bit heavier than other options. For those interested add about 2.5lbs to add the 50W amplifier and Z817H tuner for a final weight of ~8lbs and about double the volume. Cost wise since its discontinued varies quite a bit, anywhere from 500-700 on auction sites in the authors experience and then 50 dollars for the battery, in this sense it’s a pretty good deal if one decides 10W is all that is required for the user and one doesn’t need the fancy features and light weight of the KX3.
SGC SG2020 HF only
The SGC SG2020 is sort of the oddball, like the 703 it is no longer produced, it had a mixed repuatation for problems and perhaps that is why it is no longer made. It is a genuine 20-25W radio though it also needs an external battery to run and an ATU is again recommended to match field antennas. In a configuration with our battery and a lightweight elecraft T1 ATU the weight comes in right at 6lbs; not terrible given the power out it compares reasonably well to the amplified KX3 and FT817 based configurations in terms of weight and volume. Cost wise since its discontinued varies quite a bit, anywhere from 500-700 in the authors experience and then 50 dollars for the battery and $160 for theT1 ATU.
Youkits TJ5A 4 HF bands only
A recent interesting offering from youkits targeted at the SOTA and backpacking crowd and running 20W power out. The base rig is fairly barebones, but it is offered with a clip on 4AH LiIon battery pack. Combine this with an T1 ATU and the rig becomes a very lightweight 4.3lb 20W rig, it has a superior power to weight ratio at the 20W power level to every other rig examined. It is fairly basic however and does not cover all bands, it comes in two configurations of 40/20/15/10m and 40/20/17/15m or fancy things such as speech processing (though one presumes this could be user added like on the FT817). The fully assembled radio with T1 ATU and battery comes in at 610 making the cheapest option.
Antennas
No discussion of QRP radios would be complete without discussing antennas. There are a ton of options in this regard, from ultra-lightweight wires to fancy portable vertical systems such as the buddistick and buddipole. From the authors standpoint of camping antennas, they have to be lightweight and fairly idiotproof. The paar EFZ trail friendly comes in at .5lbs advertised and will handle 25W power on 40/20/10m. If ones camping site has trees (this is not always possible for me) then it is an ideal antenna to take to throw in a tree. Comparable designs include the EARC antenna kit from Hawaii. The buddistick is another popular option, and one that can be emplaced without supports, though it weighs a bit more. It should be noted that while both of these options can be used without tuners in theory, in my experience the EFZ and other multiband designs will be mostly resonant on only one band and close on the others which necessitates some sort of ATU (unless one is very confident of their finals). It is a similar story for the buddistick, the swr will vary somewhat on the surrounding environment, therefore either an antenna analyzer or ATU is required for the best match and frankly the ATU’s weigh about the same as analyzers and are easier to use with presets for the buddistick.
Concluding thoughts.
The right radio for someone really depends on primarily on budget and operating style. If you are a drive to your operating site and setup on the picknick table type of operator, a few pounds weight means absolutely nothing to you (why are you even reading this?). However, if one seeks the lightest weights possible at any cost and is willing to give up a bit of SSB power, the base KX3 with an external power pack is probably the best option. If one wants a highly flexible, highly modular and lightweight setup that can be heavily customized ala carte, the FT817 based platform is the best choice as it can run from a uber lightweight 2.5lb 5W CW rig to a 6lb 50W SSB rig and a variety of configurations in between. If one requires a cheap 20W SSB radio and lightweight, then the youkits offering is very tempting both in terms of price and performance though it is limited in terms of band coverage. However if budget and frequency coverage are desirable then the SG2020 and IC703’s if acquired at the right price can also be good choices.
What I’m doing in case you care
I got into a used FT817 for a very good price a few years back, so frankly upgrading that has made a lot of sense for me since I didn’t pay anywhere near “new” prices. I really do like the flexibility of the platform, if I really need lightweight I can take the radio and the internal lithium pack I run and it is enough to work CW barefoot (or data if I did that sort of thing) for a few nights at a weight of 2.5lbs. I can add an outboard Z817 tuner or external battery if I’m concerned about antenna mismatches (and I usually am) or need more runtime for a pound more at 3.5lbs. And then If I feel I need more power, or need to take a SSB radio I can add the Z817 tuner MX-P50 amp and the zippy battery for a 5.5lb 20W out configuration (I use 20W since I am limited by my tuner and by battery life).
What I would do if I were starting from scratch
If I were to do it using “new” components and had a pile of money to spend I would very seriously consider the KX3, it would be as good on SSB in the stock configuration (5w), but it would weigh a bit less (2lbs if numbers can be believed) and have an internal ATU compared to my current setup. If I decided I needed lightweight and a bit more power I just grab a battery pack which gets the weight to 3.4 lbs. Then if I decided I needed more talk power I’d grab the amp and outboard tuner for a weight of 5.5lbs and 20 or 50W out (assuming I used the Z817H tuner so I could run 50W). The only thing I would really give up vs the KX3 is the 440mhz capability, which I really don’t need in the wilds (though 2m has come in handy once in a while).
However, If I weren’t daddy warbucks, I would also very seriously consider the TJ5A as a runner up for a man portable SSB rig given its very low cost and high power output. The band limitations might bother me a bit, but realistically one can certainly get by without 80, 30 and 12m, and the 40/20/15/10m configuration nearly perfectly matches the paar EFZ.
What I wish one of the major manufactures would build.
A waterproof(rainproof, not diveable), durable 20W all mode/band rig that weighs less than 5lbs and is compact with a wideband ATU and with an internal battery bay or clip on Lithium battery pack that can run the rig for an hour or two on SSB (say about the size of the IC703 with battery included max). There should be a provision for vertically mounted HF whip for manpack use, and possibly a separate VHF/UHF whip (though that could be switched internally I suppose) and a front panel mounted BNC connector. There should be a 3 position switch VHF/HF/BNC to indicate where the active antenna is connected. Also there should be effective DSP, and there should be a USB connector for DATA. And it should cost no more than currently priced FT817
Lightweight Pack radios
I’m writing this piece from the standpoint of needing a lightweight back-packable radio that I can take with me on overnight and several night outings so weight and power out are critical considerations.My definition of lightweight is that I will use the target weight of approximately 5lbs or less to design a lightweight packable radio system (minus antennas) capable of SSB use.
Thoughts on power
One thing I will talk about is what I consider useable power levels, and I acknowledge that this topic is highly divisive so I’ll put down my opinions on it and people can disagree with me if they like (and I know they will). I will begin with a simple fact: nearly all of the worlds militaries have for four decades decided on a ~20-30W power level for their portable SSB backpack radios as the best compromise for reliable man portable SSB HF communications and in my opinion for reliable SSB work this is probably the best compromise between power out and weight and power consumption. However, very few of the examples examined here offer a full 20W output as a stock configuration, so some sort of amplifier is required. I will fully acknowledge that SSB contacts CAN be made with very little power under the right conditions, been there done that, but in general it is my experience that there is a big difference between making SSB contacts with 5W and 20W, not merely the measly 1 S unit of power as many folks with come back with as a counterpoint. I will break it down as saying as 5W SSB is great for CW and data modes such as PSK31 but generally unsuitable for making reliable SSB comms. 10W of power is again great for CW and data but still a bit marginal for SSB. In my opinion and experience, 20W+ is the best range for low power SSB under most ionospheric conditions. That being said I will jump in and examine the commonly available options in the new and used ham radio market, the list isn’t meant to be comprehensive but I feel like I’ve covered most of the basic rigs available.
The configurations
I will discuss 3 different configurations, the base radio and what it weighs (with batteries) and then 20W and 50W configurations with an outboard amplifier. For the sake of comparison I have chosen the MX-P50 Chinese amplifier and a Zippy 4.2Ah LiFePo4 external battery and various elecraft or LDG ATUs (noted) for the comparison to keep the configurations simple, all weights posted include internal batteries if available as well. Certainly one can decide if 4.2Ah is enough capacity to run the system for the required time, but I’ve used it as convenient placeholder. It should be noted the amplifier listed does require a very good antenna match, hence all configurations will include an ATU. Alternately I suppose you could use a perfectly matched antenna, but in practice in the field its too much of a pain IMO, a tuner is the same weight or less and much easier to use.
The contenders
Elecraft KX3 HF+6m
The KX3 is often bandied about as the do it all super lightweight wonder radio for backpacking, SOTA and other lightweight activities. It certainly boasts a lot of great features such as IF DSP, internal ATU and batteries and fancy things like CW/PSK31 decode, AND it is lightweight and compact to boot. Unfortunately the advertised weight is listed without internal batteries, or optional things like an ATU or optional 2m radio module or extra filters or the “optional” mic so it is a bit misleading. Also unadvertised is the fact that to realize its full 10W of output power it does require an external 13.8vdc power source. With those two caveats however it is still very lightweight and does put out a very usable 10W of power. With an external LiFePo4 battery and internal batteries and ATU option the weight comes in at 3.4lbs for 10W output which has the best power to weight and volume ratio at that power option of the radios listed. Adding an external 20 or 50W amplifier is certainly an option however to my knowledge one must also add an external tuner to utilize it with the KX3. With a MX-P50M tuner and outboard T1 or Z817H ATU the weight climbs to 4.9lbs and 5.5lbs for 20W/50W respectively, we can use the outboard battery to run the amplifier and the internal batteries to run the radio. The one area where the KX3 does fall short compared to all the other options is cost, the price for the various configurations is roughly double that for any other configuration running from about 1430 for a loaded (ATU/Filters/mic) base configuration to about 1800 for a configuration with the amplifier and external ATU.
Yaesu FT817 HF/VHF/UHF
The FT817 was the first QRP radio marketed as such, with a very small footprint for the base radio and a 5W power output, achievable on internal batteries, it took the low power world by storm. However almost all later radios had 10W+ power output after folks became frustrated by the FT817’s lack of SSB performance, also partly due to lack of power and any sort of speech processing which should absolutely be included (easily fixed by aftermarket mics or kits). It should be noted that the FT817 is the only radio reviewed that can cover the whole frequency range from HF to UHF, which may make it attractive to some. The base configuration with batteries weighs in at 2.5lbs for 5W of performance (I should note the kx3 is a bit lighter ~2lbs running 5W). For effective HF SSB performance the FT817 benefits the most from an outboard amplifier, using theMXP50A amp and a LDG Z817/Z817H tuners one gets weights of 5.5 and 6lbs for 20W/50W respectively. Essentially the FT817 is half a pound more than the KX3 at every turn and volumetrically comparable to the KX3 configurations. Cost wise it depends, used FT817’s vary widely from ~300-600 USD so the configurations can run from 800 (assuming a 450 base cost) to ~1000 USD depending on if one gets a new or used FT817 to start off with.
Icom IC703/703+ HF+6m
The ICOM703 comes in a 10W configuration with a built in narrow range autotuner. This was a very popular radio for some time but was discontinued by ICOM for some reason. At first glance it is very comparable to the KX3, though the KX3 boasts features like IF DSP vs AF DSP and CW/PSK decoding. Also the stock IC703 with external battery (no internal batts) weighs in at a hefty 5.5lbs and volumetrically is comparable to the 20 and 50W configurations of the FT817. If we start adding things like the amplifier and external ATU the weight rapidly climbs out of “lightweight” territory. The 703 isn’t a terrible choice if you can find one cheaply, and it is nicely integrated aside from the external battery, its just going to be a bit heavier than other options. For those interested add about 2.5lbs to add the 50W amplifier and Z817H tuner for a final weight of ~8lbs and about double the volume. Cost wise since its discontinued varies quite a bit, anywhere from 500-700 on auction sites in the authors experience and then 50 dollars for the battery, in this sense it’s a pretty good deal if one decides 10W is all that is required for the user and one doesn’t need the fancy features and light weight of the KX3.
SGC SG2020 HF only
The SGC SG2020 is sort of the oddball, like the 703 it is no longer produced, it had a mixed repuatation for problems and perhaps that is why it is no longer made. It is a genuine 20-25W radio though it also needs an external battery to run and an ATU is again recommended to match field antennas. In a configuration with our battery and a lightweight elecraft T1 ATU the weight comes in right at 6lbs; not terrible given the power out it compares reasonably well to the amplified KX3 and FT817 based configurations in terms of weight and volume. Cost wise since its discontinued varies quite a bit, anywhere from 500-700 in the authors experience and then 50 dollars for the battery and $160 for theT1 ATU.
Youkits TJ5A 4 HF bands only
A recent interesting offering from youkits targeted at the SOTA and backpacking crowd and running 20W power out. The base rig is fairly barebones, but it is offered with a clip on 4AH LiIon battery pack. Combine this with an T1 ATU and the rig becomes a very lightweight 4.3lb 20W rig, it has a superior power to weight ratio at the 20W power level to every other rig examined. It is fairly basic however and does not cover all bands, it comes in two configurations of 40/20/15/10m and 40/20/17/15m or fancy things such as speech processing (though one presumes this could be user added like on the FT817). The fully assembled radio with T1 ATU and battery comes in at 610 making the cheapest option.
Antennas
No discussion of QRP radios would be complete without discussing antennas. There are a ton of options in this regard, from ultra-lightweight wires to fancy portable vertical systems such as the buddistick and buddipole. From the authors standpoint of camping antennas, they have to be lightweight and fairly idiotproof. The paar EFZ trail friendly comes in at .5lbs advertised and will handle 25W power on 40/20/10m. If ones camping site has trees (this is not always possible for me) then it is an ideal antenna to take to throw in a tree. Comparable designs include the EARC antenna kit from Hawaii. The buddistick is another popular option, and one that can be emplaced without supports, though it weighs a bit more. It should be noted that while both of these options can be used without tuners in theory, in my experience the EFZ and other multiband designs will be mostly resonant on only one band and close on the others which necessitates some sort of ATU (unless one is very confident of their finals). It is a similar story for the buddistick, the swr will vary somewhat on the surrounding environment, therefore either an antenna analyzer or ATU is required for the best match and frankly the ATU’s weigh about the same as analyzers and are easier to use with presets for the buddistick.
Concluding thoughts.
The right radio for someone really depends on primarily on budget and operating style. If you are a drive to your operating site and setup on the picknick table type of operator, a few pounds weight means absolutely nothing to you (why are you even reading this?). However, if one seeks the lightest weights possible at any cost and is willing to give up a bit of SSB power, the base KX3 with an external power pack is probably the best option. If one wants a highly flexible, highly modular and lightweight setup that can be heavily customized ala carte, the FT817 based platform is the best choice as it can run from a uber lightweight 2.5lb 5W CW rig to a 6lb 50W SSB rig and a variety of configurations in between. If one requires a cheap 20W SSB radio and lightweight, then the youkits offering is very tempting both in terms of price and performance though it is limited in terms of band coverage. However if budget and frequency coverage are desirable then the SG2020 and IC703’s if acquired at the right price can also be good choices.
What I’m doing in case you care
I got into a used FT817 for a very good price a few years back, so frankly upgrading that has made a lot of sense for me since I didn’t pay anywhere near “new” prices. I really do like the flexibility of the platform, if I really need lightweight I can take the radio and the internal lithium pack I run and it is enough to work CW barefoot (or data if I did that sort of thing) for a few nights at a weight of 2.5lbs. I can add an outboard Z817 tuner or external battery if I’m concerned about antenna mismatches (and I usually am) or need more runtime for a pound more at 3.5lbs. And then If I feel I need more power, or need to take a SSB radio I can add the Z817 tuner MX-P50 amp and the zippy battery for a 5.5lb 20W out configuration (I use 20W since I am limited by my tuner and by battery life).
What I would do if I were starting from scratch
If I were to do it using “new” components and had a pile of money to spend I would very seriously consider the KX3, it would be as good on SSB in the stock configuration (5w), but it would weigh a bit less (2lbs if numbers can be believed) and have an internal ATU compared to my current setup. If I decided I needed lightweight and a bit more power I just grab a battery pack which gets the weight to 3.4 lbs. Then if I decided I needed more talk power I’d grab the amp and outboard tuner for a weight of 5.5lbs and 20 or 50W out (assuming I used the Z817H tuner so I could run 50W). The only thing I would really give up vs the KX3 is the 440mhz capability, which I really don’t need in the wilds (though 2m has come in handy once in a while).
However, If I weren’t daddy warbucks, I would also very seriously consider the TJ5A as a runner up for a man portable SSB rig given its very low cost and high power output. The band limitations might bother me a bit, but realistically one can certainly get by without 80, 30 and 12m, and the 40/20/15/10m configuration nearly perfectly matches the paar EFZ.
What I wish one of the major manufactures would build.
A waterproof(rainproof, not diveable), durable 20W all mode/band rig that weighs less than 5lbs and is compact with a wideband ATU and with an internal battery bay or clip on Lithium battery pack that can run the rig for an hour or two on SSB (say about the size of the IC703 with battery included max). There should be a provision for vertically mounted HF whip for manpack use, and possibly a separate VHF/UHF whip (though that could be switched internally I suppose) and a front panel mounted BNC connector. There should be a 3 position switch VHF/HF/BNC to indicate where the active antenna is connected. Also there should be effective DSP, and there should be a USB connector for DATA. And it should cost no more than currently priced FT817
Thursday, July 17, 2014
Cen-Tech 3-In-1 Portable Power Pack
On my trip to Tioga County on Field Day, I wanted to try operating my Icom 7200 from battery power. As mentioned in my AAR, this didn’t happen because I had issues with my battery. So, shortly after getting back home I swung by Harbor Freight and bought a Cen-Tech 3-In-1 portable 12V power pack, item number 38391. I had a coupon so I was able to get it for $39.99 plus sales tax.

Photo borrowed from HF.
The Cen-Tech power pack has three functions:
The unit weighs about 14 pounds, so it’s easily portable.
Upon getting it home I removed the back cover of the power pack to verify that all of the connections were secure. That taken care of, I proceeded to charge it for 48 hours per the quick-start guide. Recharges should take 34 hours. Aside from a wall plug it also comes with a charger that allows you to plug it into a vehicle’s 12V outlet, but the manual warns you that it won’t charge the battery as well as mains power.
To go with the Cen-Tech unit I bought a Powerwerx Cigbuddy from Ham Radio Outlet.
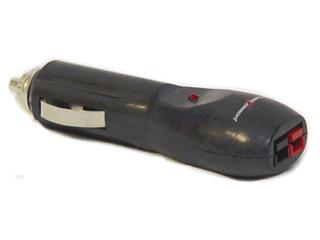
Photo borrowed from HRO.
As you can see, it’s a 12V cigarette lighter outlet to Andersen Power Pole adapter. This allows me to plug my Icom 7200 into the HF box.
As I write this I have the Icom 7200 monitoring 14.070 MHz and viewing PSK31 signals on the FLDIGI waterfall, on battery power.
Harbor Freight has a deserved reputation for varying quality when it comes to its products. This model was recommended by Sparks for use as portable 12V power supply* and so far it seems OK, but of course, only time will tell. At $40 it was worth a try.
We’re heading upstate again at the end of July and plan to bring the Cen-Tech battery pack with me for powering my radio.
*He posted a picture here and I asked him about it on Facebook.
Photo borrowed from HF.
The Cen-Tech power pack has three functions:
- It’s a jump starter for vehicles with 360 cold cranking amps.
- It has a small work light. It’s a 3.6 watt incandescent bulb and probably will get little to no use by me.
- It has a 12V cigarette lighter-style outlet on the side for powering electronics.
The unit weighs about 14 pounds, so it’s easily portable.
Upon getting it home I removed the back cover of the power pack to verify that all of the connections were secure. That taken care of, I proceeded to charge it for 48 hours per the quick-start guide. Recharges should take 34 hours. Aside from a wall plug it also comes with a charger that allows you to plug it into a vehicle’s 12V outlet, but the manual warns you that it won’t charge the battery as well as mains power.
To go with the Cen-Tech unit I bought a Powerwerx Cigbuddy from Ham Radio Outlet.
Photo borrowed from HRO.
As you can see, it’s a 12V cigarette lighter outlet to Andersen Power Pole adapter. This allows me to plug my Icom 7200 into the HF box.
As I write this I have the Icom 7200 monitoring 14.070 MHz and viewing PSK31 signals on the FLDIGI waterfall, on battery power.
Harbor Freight has a deserved reputation for varying quality when it comes to its products. This model was recommended by Sparks for use as portable 12V power supply* and so far it seems OK, but of course, only time will tell. At $40 it was worth a try.
We’re heading upstate again at the end of July and plan to bring the Cen-Tech battery pack with me for powering my radio.
*He posted a picture here and I asked him about it on Facebook.
Tuesday, July 08, 2014
Multi-Family Camping Trip AAR
From Jun 27 - 29, 2014 three of my friends and I took our respective kids up to Tioga County, PA for a camping trip. We had a total of 10 kids ranging in age from 8 to 11.
We are experienced campers, and have taken our kids on local overnighters, but this adventure was a lot more involved due to the distance involved and the fact that this time we were staying out for two nights. Along the way, we learned some lessons that are applicable to both recreational camping and a buyout situation.
TRANSPORTATION AND THE DRIVE UP
We first met at the Cabela’s in Hamburg, PA. On other trips we’ve used FRS/GMRS radios for inter-vehicle commo. This time we ran into some difficulties with the privacy codes that were enabled on a couple of the radios, preventing us from hearing one of the other units. The privacy codes also caused inter-operability problems between Motorola and Midland units. Unfortunately, none of us had our radio manuals with us and we couldn’t figure out how to disable the codes. The codes just prevent you from hearing other FRS/GMRS users not sending the correct sub-audible tone. They don’t prevent other people listening in on you. IMO, they are more trouble than they are worth.
I’ve been working on my friends to get at least a Technician level ham radio license (I have my General and I’m studying for Amateur Extra). If we all then got the same model of radio programming them would be simpler, and of course we could just pick a simplex frequency on 2 meters to use without any privacy codes to worry about. Even HTs would work, especially with an external antenna.
CB would also be a viable option.
From Cabela’s we convoyed upstate with a planned break for lunch at a rest stop on I-80. We had packed our lunches ahead of time but the rest stop does have some of the park-style BBQ grills available for use, which could be handy. One of my friends used his canister stove and a French press to make coffee at the rest stop.
Our next stop was at Walmart in Mansfield. We had decided that rather than buying food ahead of time and having it sit in the hot vehicles for most of a day, we’d just get it in Mansfield, about a half hour from our destination. IMO, this was a mistake. As soon as we got out of our vehicles it was like unleashing a swarm of locusts. As we shopped we had to corral 10 kids running this way and that. It would have been better to just get the food and paper goods ahead of time, or to send one or two guys into town to shop, while the remaining vehicles continued on to our campsite, about a half hour away.
On the way up my girls were able to keep themselves occupied in the back of the car with their iPhones. One of them has an app that is teaching her French that she played with that for a couple hours. My wife and I aren’t into electronic parenting at home, but smartphones or tablets are great for keeping children occupied on a long road trip.
Our vehicles consisted of two minivans and two SUVs: a Toyota Sienna, Honda Odyssey, Honda Pilot, and a Nissan Xterra. The minivans are great for hauling a lot of gear, get decent gas mileage, and have a lot of amenities. The Pilot is a nice ride with a good amount of storage space, and handles the rough driveway of my friend’s land better than the minivans. My Xterra is the only true offroad capable vehicle in the group, but it lacks cargo space compared with the others. I had to use a roof top cargo bag to augment the inside space, since I couldn’t lower the rear seats as I normally do on camping trips.
SHELTER and BEDDING
Once at camp we setup three tents (one of which is huge and handled one adult plus 7 girls). The large tent is a Walmart Ozark Trail 10-person tent and has been used during all seasons, even though it’s a three-season tent. The design is well thought-out but now that it’s a few years old, the fiberglass poles are starting to break. During our Spring trip one split and we repaired it with duct tape. This time, two more split and had to be repaired by wrapping them with bailing wire and then covering the wire with duct tape. (I keep both in my truck toolbox.) The lesson here is that if you’re going to rely on China-Mart quality control you must be prepared to fix it when it fails.
The other tent was a Coleman (not sure what model) and didn’t give us any problems.
The third tent was my REI Basecamp 6, which I’ve used numerous times and never had a problem with. The other tents had plain blue tarps underneath but I sprung for the REI footprint when I bought mine. For warm weather like we had I wouldn’t mind a little more ventilation, but for cold weather use you can really button up and keep out the wind. Since we pitch camp on top of about a foot of gravel, this time I brought along 4 landscaping spikes that I had laying around for use as stakes. They worked well but I couldn’t remove two of them. Two were stuck fast so I just pounded them in flush with the ground when I struck the tent, so they wouldn’t be tripping hazards.
Finally, the property has a 16’ x 24’ steel-roofed pavilion that we use to get out of the sun or rain. At some point my friend is probably going to wall it in, have a cement floor poured, and then we’ll have a cabin to use.
We used a mix of cots, foam pads, and air mattresses for beds. I used my Big Agnes air mattress and while it’s well-made and doesn’t leak, unless I’m sleeping under a tarp, from now on I’m going to squeeze my cot into the truck no matter what. At 46, cots are easier to lay down and get off of, and give you storage space underneath.
Most everyone used a sleeping bag but I used my old, GI-issue, woodland camo poncho liner. Nighttime temps got down into the 50s. I was comfortable in my woobie, a t-shirt, and shorts, but my daughters were a little cold even in the 40* rated sleeping bags, so they put on hoodies inside their bags. This demonstrates how small kids often don’t handle cooler temps as well as adults.
FOOD, WATER, AND COOKING
During our time there we realized that children raised in a modern American middle class household have no concept of water discipline or a limited supply of things like paper plates, bottled water, or paper towels. For example, we setup a 7 gallon jug and unless we watched it like hawks, the kids were prone to using it just like a faucet, i.e., turn it on and leave it open while washing hands. None of the adults remembered to bring a big container of hand sanitizer, which would have conserved a lot of water.
Likewise, some of the kids were prone to grabbing a bottle of water, taking a few sips, forgetting where it was, then going and getting another bottle when they got thirsty again. We took to marking their initials on a water bottle and then locking the cases in a vehicle. We experienced the same thing with paper plates and bowls.
One of the guys didn’t bring enough spoons and forks for his kids so we ran short. We were also short on cups. I suggested to him that he get a Rubbermaid Action Packer box and put all his camping gear in it so that it’s always ready to go. Going forward, each kid will be issued a cup and a spork and be held responsible for it.
Checklists are a good way to prevent you from forgetting things.
In the past we’ve done a lot of cooking on the campfire but last year a park style grill was put in at the site. This is easier to use because it’s at a convenient height. Hot dogs, hamburgers, sausage, and steak was cooked on it using Kingsford briquettes. We use a couple chimney starters to get the briquettes going. Saturday night we made chili (win a cast iron Dutch oven, using briquettes for heat.
Breakfast on Saturday and Sunday was oatmeal. We used my Kovea Spider butane canister stove to boil water in both a Walmart grease pot and a Kelly kettle. I also used the Kovea stove for making coffee in a stainless percolator. (I know it’s a figment of my imagination but coffee tastes best when made in the perc over a campfire, but this time I didn’t have to clean soot off of it.)
My water jug will leak a little when laid down so you can use the spigot. I’ve taken to keeping a roll of Teflon plumber’s tape wire tied to the handle, and use it to seal the cap threads.
OTHER GEAR
I use the first aid kit in my truck on pretty much every camping trip for scrapes and cuts. This trip was no exception. On the second day my youngest stubbed her toe on a tent stake and peeled back some skin from the tip of her right pinky toe. I was able to patch her up but had to bum some triple antibiotic ointment from one of the other guys. This was a reminder that I needed to do the annual inventory and replenishment of my first aid kit.
As I mentioned in the section about shelter, I had to break out my toolkit for some onsite tent repairs. I keep a small bag with basic hand tools, duct tape, bailing wire, electrical tape, and WD40 in my truck at all times. I’ve also used the kit to fix air mattresses. One time we had to wire a valve shut, while this time another guy’s mattress had a pinhole leak that I was able to patch with duct tape. Make sure you bring good duct tape. "Duck” brand is good, as is Gorilla tape. The 3M brand duct tape that I’ve bought recently at Lowe’s is not up to snuff, in my experience
One of my buddies brought a Thermacell and damn, it works great. He set it on the table where we do food prep and it kept all the bugs away. I did pick up a few black fly bites when I was away from the area covered by the Thermacell. I need to add some After-Bite to my first aid kit.
ACTIVITIES
FISHING
All the kids had the chance to catch bluegills and one got a small catfish. We like the Zebco Dock Demon fishing rod sets with spin cast reels you can buy at Walmart.(I’d avoid the Dock Demons with spinning reels if you’re buying it for a kid, unless you want to spend a lot time untangling fishing line.) They are a good size for smaller kids and are cheap. They also seem better made than the rod sets sold specifically to kids, e.g., the Spiderman or whatever themed sets.
When dealing with 10 kids it’s only a matter of time before someone gets hooked. We used only barbless hooks, made by squashing the hooks’ barbs with a pair of pliers. This also makes it more like that the fish we release will survive. I have a small multi-tool that I got at Cabela’s for about $10 that I keep in my tackle box and used for this. I also used it to remove hooks from the mouths of fish.
SHOOTING
My friends and I also got to get a little shooting in on Saturday afternoon. I helped one guy zero the red dot on his new AR-15 and he also tested out the CMMG .22 LR conversion that he bought for it at Cabela’s. We were pleasantly surprised to see that it ran OK with CCI Standard Velocity ammo. He noticed that even after less than a full box of ammo his receiver was filthy inside, so keep in mind the need to clean it before switching back to 5.56 if using one,
I got some plinking in with my 1948-vintage Remington 550-1 semiauto .22. I tried two kinds of .22 LR in it: Remington .22 CBees and Aguila .22 LR Subsonics. It functioned just fine with either. Both rounds were pretty quiet out of the 24” barrel. The Aguila ammo shoots OK but seems to be on the dirty side, even for .22.
HAM RADIO
This turned out to be a total total SNAFU on my part. Our trip coincided with ARRL Field Day, when amateur radio operators practice under field conditions.
First, I had a problem trying to get my Hawaii EARC end fed antenna up in a tree. My slingshot didn't have enough oomph to launch a 1 oz. sinker tied to some 550 cord high enough, and then it broke. I should have used fishing line or maybe mason’s twine for the leader rope, since they are lighter. I may want to use a heavier sinker, as well, so it can drag the leader line down through left branches. Another option would be to use a plastic water bottle with the line tied to it, and just toss it up. I wound up finding a downed sapling and used that as a mast, with the end of the wire duct taped to to the top. It wasn't quite as along as I would have liked but it would have worked OK, I think, had the radio worked.
After I got the antenna up, my Icom 7200 radio wouldn't power up from my battery. {Insert string of profanities here.} I just got a clicking sound when I hit the power button. The battery had been on a trickle charger but it may just well be shot.
I'll be using a different option for power next year and an alternative means of hoisting my antenna. For power, last weekend I picked up a Centech 3-In-1 Jump Starter and 12V Power Supply at Harbor Freight for $39.99 + tax using a coupon. It has a 17ah SLA battery inside. I decided to get this particular one because (1) it’s cheap, and (2) it was recommended by Sparks. Before plugging it in for its initial charge I removed the back panel and verified that all the connections were snug. The downside to the SLA battery is that I need to top it off every month or so, or the battery will go bad.
Next time I may just bring my Jackite 31’ telescoping fiberglass pole instead of relying on a wood pole cut onsite. It’s one more thing to bring but being much lighter, will be easier to erect.
CONCLUSION
Our kids all had a great time and I don’t think any of the dads picked up too many new gray hairs. It reinforced the necessity of trying out your gear and testing your plans before you rely on them in earnest. It was a lot of fun and good practice if we ever find ourselves in a bugout situation.
Sunday, May 04, 2014

Monday, August 23, 2010
Standalone vs. Cell Phone Based GPS
A family trip this weekend reiterated for me why I do not think that cell phone based GPSes are viable 100% replacements for dedicated GPSes in your car. At least, not yet.
We went up to Sullivan County, NY visit with some of my family. The route we take to get there passes through NE PA, including the Delaware Water Gap. My cousin, who's house we went to, lives in a rural area in which cell phone signal is spotty and often depends on how you orient your phone.
For navigation we had directions but also brought my Garmin Nuvi 200W, and both my wife and I have Android-based smartphones (a Droid and a Droid 2) with GPS integrated with Google Maps. The Droids use the Verizon 3G data link to download maps on the fly. In contrast, the Garmin stores maps locally.
We had no or poor cell phone signal, or no 3G for a good part of the drive. Notably, the times when we had no signal were the times when the GPS was most needed. I.e., rural back roads with poor signage and no street lighting. If we had needed to depend on a phone-based GPS we'd have been out of luck.
There are a few applications designed to allow you to download and store maps offline in case you lose your cell phone signal, e.g., Maps (-). However, this may not help you if you need to significantly deviate from your route, or if you need the GPS in an emergency and the cell network is down.
If your cell phone GPS usage is limited to areas with good cell coverage and don't consider your GPS unit as part of your emergency preps, then you don't need a standalone unit. As for me, I'll be updating the maps in my Garmin soon.
We went up to Sullivan County, NY visit with some of my family. The route we take to get there passes through NE PA, including the Delaware Water Gap. My cousin, who's house we went to, lives in a rural area in which cell phone signal is spotty and often depends on how you orient your phone.
For navigation we had directions but also brought my Garmin Nuvi 200W, and both my wife and I have Android-based smartphones (a Droid and a Droid 2) with GPS integrated with Google Maps. The Droids use the Verizon 3G data link to download maps on the fly. In contrast, the Garmin stores maps locally.
We had no or poor cell phone signal, or no 3G for a good part of the drive. Notably, the times when we had no signal were the times when the GPS was most needed. I.e., rural back roads with poor signage and no street lighting. If we had needed to depend on a phone-based GPS we'd have been out of luck.
There are a few applications designed to allow you to download and store maps offline in case you lose your cell phone signal, e.g., Maps (-). However, this may not help you if you need to significantly deviate from your route, or if you need the GPS in an emergency and the cell network is down.
If your cell phone GPS usage is limited to areas with good cell coverage and don't consider your GPS unit as part of your emergency preps, then you don't need a standalone unit. As for me, I'll be updating the maps in my Garmin soon.
Wednesday, October 31, 2007
Qualcomm Stadium Evacuation Center AAR
The following email is reposted with the author's permission. It was originally sent to the Yahoogroups misc_survivalism_moderated group by mjgarcia -at- yahoo.com. It is unedited with the exception of slight formatting revisions.
From: mjgarcia -at- yahoo.com
Subject: [MSM] Qualcomm Stadium Evacuation Center AAR
Date: October 30, 2007 5:04:06 AM EDT
I don't know how valuable this will be to those out there. I mostly lurk here, and occasionally chuckle at the endless debates over calibers and the ideal handgun (which to settle that dispute...the ideal handgun is whatever gun you have in your hand that you can use with proficiency).
I spent a couple of days working at the main material distribution center at Qualcomm Stadium during the recent fires there. I live in Phoenix, but lived in San Diego for close to a decade and have family there.
My primary bug out vehicle as well as my daily driver is a modified 1991 VW Vanagon with the full camper interior. I've rebuilt and improved just about everything on it and added a fair amount to increase its reliability. I also use it to do a lot of camping
which further allows me to refine my gear and tactics. I'm very capable of being self sustaining without primary infrastructure support for extended periods.
I usually keep a notepad and pen with me and take notes constantly. I did so during this crisis. I just finished an After Action Review of my experience. Please bear in mind that these are my own limited observations. I'm sure other's experiences could be vastly
different.
I recommend volunteering during a similar crisis, if you can, without becoming a burden. Beyond lending a helping hand, the lessons learned are considerable.
Qualcomm Stadium After Action Review
Purpose:
1. Help out the evacuation efforts in whatever capacity possible
2. Exercise my own bug out practices
3. Learn more about large scale disasters and evacuations
Goals:
1. Be self-sustaining for whatever period needed to help out disaster relief. Initial plan was for 2 weeks minimum, limited by water. Food supplies were 4 weeks. If I find I'm getting in the way more than I'm helping, I'm leaving.
2. Support evacuation center during disaster
3. Be able to bug out of my own home within 30 minutes
What Happened?
Tuesday, October 23:
Went on-line to identify location of evacuation shelters, and print out the most current map of fires in San Diego County. Decided easiest place to start would be Qualcomm stadium. Updated my list of scanner frequencies.
Packed up van in 20 minutes. Longest item was filling up water (2-7 gallon containers). Gear was pre-packed in 4 Rubbermaid ActionPacker Storage Boxes and 1 24 gallon ActionPacker Storage Box for the food. Included a bag of work clothes prepacked for bugout. Left behind firearms, mountain bike and important documents. Was on
the fence about taking a pistol for personal protection, but decided not to run afowl of the law in California. Left the mountain bike behind because I didn't think I would be using it. Left behind the important documents because it wasn't my bug out, and I didn't want to have to leave them unsecured in my van. Going forward, I'll add a strong box to the van to secure such documents.
Left Phoenix at 11:30 pm, after filling gas tank and checking oil. Drove through the night, heading to San Diego via I-8. Monitored XM radio, channel 247, which was rebroadcasting feed from KOGO in San Diego.
Saw first glow from the fires from just west of El Centro, approximately 100 miles away. Saw first fires around Alpine, CA, just before sunrise.
Wednesday, October 24:
Arrived in El Cajon around 0630. Refueled gas tank and filled spare tanks. Called brother who lives in El Cajon to let him know how close the fires were. He's packed and ready to leave. His plan was to head East, and go to Phoenix to stay with me. Arrived at Qualcomm Stadium around 0730. Parked the van near a fenced area at the far end of the parking lot. I walked into the fenced area, and spoke to a person who appeared in
charge (carrying a clip board). After about 5 minutes of instruction, I began helping.
This was the main distribution hub for donations. The volunteers were working in one of 3 separate groups. The first was unloading donations from cars that were queued in 2 lines. Another similar group was unloading large volume donations from churches, stores,and other organizations. The second group, where I started working was taking the unloaded donations and separating them into various categories: pet food, hygiene products, snacks, staples, etc. The third group was helping the various shelters that would arrive with a U-Haul or truck to fill their orders for supplies.
It was very well organized for something so hastily put together. The man in charge was responsible for San Diego's warehousing operations.
Around 3 pm, National Guard troops showed up to provide security around our perimeter. The night before someone had cut the fence and made off with an undetermined amount of supplies. I worked throughout Wednesday into Wednesday night. I spoke with several of my family members who live in the San Diego area via cell
phone to get updates on how everyone was doing. No one had heard from my uncle who lives up in Rancho Bernardo and had to leave in a hurry. My Aunt who had to leave her home in the Vista area was OK and safe. Cellular service was spotty during the day with calls dropped and generally poor reception.
Thursday, October 25
I went back to work for a while helping to finish up organizing material. They announced that they had started clearing the stadium from the top down and that evacuees were going to be relocated to the Del Mar Fairgrounds. I was released around noon, since there were more than enough volunteers to finish up. At the Stadium they
also didn't need any more volunteers, so I left. I went to my brothers and check on other evacuation centers to see in they needed volunteers. None that I contacted needed any more help.
What worked:
1. Packing gear went smooth and fast. New collapsible handcart speeded loading of van considerably. $49 at Cabela's. Having pre-staged gear was useful
2. Bug out list. The only change to the list would be to add an American flag
3. Van ran well. No issues. Refueling before entering the effected area was a good idea. I had a range of 500 miles fully loaded. The small fan inside the van made sleeping easier.
4. The organization and teamwork at the stadium. The city and state didn't wait for federal officials to come in to `rescue' them as appeared to be the case after Katrina. By the time a federal disaster declaration was announced Wednesday, the evacuation and
distribution centers had been up and functioning for almost 72 hours.
5. Didn't need to bring firearms. There was sufficient security this time.
6. Personal hygiene planning. I used baby wipes to substitute for showers for close to 3 days. Made sure I had foot powder as well. Sunscreen helped as well as sunglasses and a wide brimmed hat.
7. Good work gloves and good work boots.
8. XM radio. I was able to determine the situation by listening to satellite radio
9. SSB radio. I spoke to a couple of truckers coming from San Diego to get first hand situation reports.
10. Scanner. I was able to program in the frequencies I needed to keep a good idea of the changing situation once I arrived in San Diego.
11. Security. In general good, especially after the National Guard showed up. But there were individuals and groups who tried to steal supplies, and some succeeded. The lighting in the parking lot helped with the sense of security. Power in the area was threatened by the fires, and had that gone down, the situation could have turned less secure pretty quickly. The distribution center was running off a stand alone generator, so I would have been able to gauge the situation and decide what to do in a lit and somewhat secure environment.
12. The wind changed direction on Wednesday. If it hadn't, things would have gotten worse. Potentially much worse.
What didn't work:
1. Mattress. After working long and hard, sleeping was difficult. I added a 1.5" memory foam mattress cover after I left, and spent a blissful night sleeping on that. Great improvement.
2. Air quality. The small paper face masks provided may have helped a little, but not much, especially with physical activity. Better face mask to filter out junk would be a major improvement in this scenario.
3. Noise and light. Trying to sleep was difficult in a lit parking lot full of activity. Ear plugs and eye covers would have helped.
What to do differently next time:
1. Calling tree. Within my own family it was difficult ascertaining everyone's status.
2. Backup calling tree.
3. Add a lockbox to the van to store important documents
4. Consider a satellite phone. Cellular phones weren't doing so well and were overloaded. Expensive but adds a layer of communication.
5. Add more solar panels. If this had gone beyond 72 hours, I would have had to run the engine to recharge the batteries, wasting fuel. The single solar panel wouldn't be adequate to maintain the batteries, and doesn't provide redundancy.
Several other thoughts:
While I was able to get out of my apartment in around 20 minutes, my uncle had less than a minute to get out. He had already loaded his car, so was able to take the most important items with him. His house wasn't severely damaged, except for smoke damage and ash everywhere. My aunt who also evacuated was able to return to her home Thursday, which wasn't seriously threatened. My brother's house in El Cajon wasn't affected and he wasn't forced to evacuate. I returned to Phoenix on Saturday. The 92 year old grandmother of the wife of one of my technicians here was evacuated to Qualcomm Stadium. They weren't able to contact her for several days. Again, a good calling tree would have helped me find that information out. I could have found her and relayed information.
Subscribe to:
Posts (Atom)

 Posts

