Saturday, April 16, 2022

New Tires for my E-Bike

Last year I bought a Lectric XP e-bike. After riding it for awhile I came to dislike the knobbie tires that it came with from the factory, since I ride it solely on pavement. They add drag and a lot of road noise. However, because it uses 20 x 4 tires options for replacement are limited.

I'd read a couple of posts online extolling the Vee Tire Company's Speedsters, which have a smoother, inverted tread pattern. However they were out of stock everywhere I looked for quite awhile. I checked their website in early March and saw that they had a special where I was able to get two tires for $160 shipped from Vee in Thailand. They arrived in a timely manner but I didn't install them until today.


I actually would have preferred blackwalls but all they had at the time were the gumwalls. That said, they give the bike a bit of a retro look.

After getting them installed I took the bike for a quick ride around the block to make sure I had everything reassembled correctly and to get a feel for them.

My initial impressions are very favorable. The bike rides much more smoothly and quietly now. I'm hoping that the reduced rolling resistance improves range a bit, too.


Sunday, April 03, 2022

.357 Magnum / .38 Special Opinions

 Over on Bushcraft USA, a member posted the following:

So, I've had this whole .357 magnum revolver idea stuck in my head about long enough now that it's kind of becoming a serious consideration.

I have no interest in concealed carry, this would be strictly a woods bumming gun.

I've owned very few handguns over the years. the two longest running are, a Contender in 7-30 Waters scoped bull barrel for about twenty years. It was fantastically accurate, but awkward to carry and shooting offhand was difficult at best. It was very barrel heavy. I traded it for a milling machine about ten years ago and as much as I enjoyed shooting it I don't miss it. It never really fit my hunting style. For deer I've always been a still hunter in very thick cover. 

I have a Ruger Bearcat .22 that it's only redeeming quality is it is light weight. I hate the fixed sights, to me that ruins the whole gun package. Also we don't have grey squirrels or cotton tails around here except in town pretty much. We can't shoot grouse with anything other than a shotgun. So snowshoe hares are the only thing to shoot with a .22.

In comes the .357.

I seem to think it would be fine for the heavy cover thick brush highly mobile style of deer hunting that I like with shots of 40 yards or less.

Loaded with .38 special it would be enough for the odd coyote or even more rare fox.

Maybe some wadcutter for small game if I wanted or just plinking and fooling around.

And realistically fooling around would probably be its primary job. 

I have most of my reloading stuff yet, so handloads are an option if I decided to go back down that rabbit hole again.

...

To which I replied:

My favorite handgun cartridge is .38 Special. It handles everything I need a pistol to do, with mild recoil, useful power, and excellent accuracy.

In my opinion, the most versatile handgun you can have is a medium frame .357 Magnum double action revolver with a 4" barrel. They a full sized guns but small enough for concealed carry with the right holster.

With the right ammo you can use them for target shooting, hunting game up to deer sized, training new shooters, and self defense.

Reloading .38 Special and .357 Magnum is relatively easy because they are straight walled, rimmed cases. Carbide sizing dies eliminate the need to lubricate cases. They are usable with a wide variety of powders (even black powder, since the .38 was originally designed for it). There is a huge variety of bullets available in cast, swaged, plated, powder coated, and jacketed flavors.

If you're OK with limiting yourself to single actions, Ruger makes the Blackhawk Convertible that comes with .357 and a 9mm cylinders, further increasing versatility. Taurus sells the 692 double action that comes with .357 and 9mm cylinders.

Check out the articles by Ed Harris about the .38 Special (among other things) hosted at https://www.hensleygibbs.com/edharris/backcreekdiary.htm.

And of course, a .357 revolver makes a dandy companion to a lever action in the same caliber. Even full house .357s are mild to shoot in a carbine and firing .38s in a carbine is much like shooting a .22.

Wednesday, March 30, 2022

Shotgun "Violin" Reloading Technique

In the TFBTV video I linked to yesterday, one of the things demonstrated is the "violin" reloading technique. This is a reloading method in which you place the butt of the empty shotgun on top of your strong side shoulder for support while reloading. The supports it with minimal muscle effort and allows you to load rounds into the chamber and magazine after the gun has run dry.

However, when we saw it in the video it was always done by a right handed shooter. I'm left handed and wondered how it would work for us southpaws. So, I grabbed my 1951-vintage Remington 870 Wingmaster and a couple snap caps.

As it turns out, the technique is viable for lefties:

  1. With the action open, place the butt on top of your left shoulder with the gun laying on its side so that the ejection port is skyward. Support the front end of the gun with your right hand.
  2. With your left hand, place a round into the ejection port and chamber it.
  3. Rotate the gun so that it's now upside down with the loading port skyward.
  4. Load rounds into the magazine using your left hand.
  5. After the gun is reloaded go back to a ready position or firing position, as the situation dictates.

Ok, cool. Is this something I really need to practice?

IMO it depends. It will be very useful when shooting a match or taking a shotgun class. On the other hand, if you're a civilian relying on a semiauto or slide action shotgun for defense, the odds of you ever needing to reload in a gunfight are very, very slim. As Greg Ellifretz recently posted on his blog:

I dug deeply into the details of almost 1800 shootings for my study on firearm stopping power.  Outside of cops shooting at barricaded suspects, I never saw a single gunfight where the defender emptied his shotgun.  If you plan to miss a lot, you’ll probably want to have some extra ammo on board.  But the reality is that if you hit your target, I rarely see cases that required more than two shotgun rounds.  One or two hits with 00 buck or slugs tend to be very decisive stoppers.

With most defensive shotguns holding between four and eight rounds, you probably will not need any extra ammo for your home defense shotgun.  I would not criticize you a bit for wanting to minimize weight by just carrying the rounds in the magazine tube.  Take a look at my SBS 870.  It only holds four rounds in the mag tube and I have no spare ammo on the gun.  The reality of the situation is that I’m exceedingly unlikely to need more than four 00 buck cartridges in my home defense gunfight.
Emphasis added by me.

Now, with that being said, practicing reloads is a good idea because it builds familiarity with your weapon, which makes it more likely that you can manipulate it properly under stress, and if you need to clear a malfunction it will be easier.

Of course, if you're a cop or a soldier armed with a shotgun, you should definitely practice reloads because as Ellifretz notes, there are fundamental differences between those who seek to avoid trouble and those who are charged with running towards it.

Finally, I recommend that anyone who has a gun for defense should buy a set of functioning dummies and/or snap caps. They are vastly safer to use when checking function or running drills at home than using live rounds.

Tuesday, March 29, 2022

TFBTV: Combat Shotgun Basics with Clint Smith of Thunder Ranch

 This video is one of the best I've seen on using shotguns for defense.


It's about 23 minutes long and worth watching the whole thing.


Friday, March 25, 2022

Esstac Shotshell Card

The old, cheap elastic butt cuff that used to adorn my Mossberg 500 stretched out after several years. Rather than purchasing another one, I decided to try putting on an Esstac 4-round shotshell card. It's attached to the stock with heavy duty Velcro tape.

Since I'm left handed, it's mounted on the left side of the stock so the right side is unobstructed.


I actually purchased two of the cards, so if I'm camping or the SHTF I can throw the second one in my pocket for another 4 rounds.

I've also seen pictures of shotshell cards attached to the left side of the receiver. This won't work for me because I keep the gun in a Mossberg Loc-Box that surrounds the receiver.

Anyway, the sewing on the Esstac card appears to be very high quality. The loops are tight, and it was a bit of a struggle inserting the shells. I expect they'll stretch a little. We'll see how the Velcro holds up.

If this doesn't work out my plan is to get a stock cuff from Hill People Gear.

Good reading on home defense shotguns

I recently found a few posts on the MDTS Training site that are worth reading, regarding defensive shotguns:

Recently, I bought 100 rounds of Prvi Partizan 2.75" 1200 FPS 00 buckshot. Full power buck is generally rated for 1300 FPS so this should hopefully have somewhat less recoil. The Prvi ammo is old school: non-buffered, it looks like it's not in a shot cup, and is held in place with a clear plastic over-shot card that's roll-crimped to secure it. I expect it to open up much more quickly than Federal Flite Control but for inside use in a subdivision that may not be a bad thing.

In a couple weeks I'll be heading upstate again and hope to test the Prvi buckshot for function and pattern in my Mossberg, after which I'll post a report.

Tuesday, March 22, 2022

New Stock for my Mossberg 500

Like millions of other Americans, I keep a 12 gauge shotgun for home defense. In my case, it's a Mossberg 500 Mariner. It's basically a regular 18.5" barreled Mossberg 500 but with an electroless nickel finish on the metal and it came with black plastic furniture.

Several years ago I replaced the too-long factory stock with a Hogue youth-sized stock, giving it a 12" length of pull. Even though I'm only about 5'5" tall that was too short to shoot comfortably, so I added a Kick-Eze slip-on recoil pad to add another inch or so. That wasn't ideal because it just didn't feel solid.

So, last week I replaced the Hogue with a Magpul SGA, which is adjustable via adding or removing spacers. I set it up for a 13.5" LOP.


The pistol grip section is more vertical than either the factory or Hogue stock, but it's comfortable for me. I was initially concerned that the comb was a bit too high but after shooting the gun with the new stock, it's not.

Last weekend I was camping on private property where I had the chance to shoot it with a couple different loads. First were a few Herter's buck and ball (a single .650 ball plus six No.1 buckshot) from Cabela's. Second were some Remington 00 buck that I bought years ago at Walmart.

Both were high-brass 1300 FPS 2.75" loads, and of course they kick quite a bit. The Magpul's recoil pad made them bearable for a few rounds.

At home, the Mossberg is kept ready with Federal reduced recoil 00 buck featuring Flite Control wads. They are a lot more pleasant to shoot and will be plenty effective in the unfortunate event I ever need to use it.

No doubt someone reading this will wonder why I'm using a shotgun for home defense in 2022 instead of a pistol caliber carbine or an AR-15. Shotguns remain highly effective defensive arms to this day. Greg Ellefretz has a recent post that mirrors my thoughts on the matter.

You'll note from the picture that my shotgun lacks a light, red dot, laser, sling, or curb feelers. IMO, home defense shotguns should be kept as slick as possible. It's been awhile but I've shot in multigun matches and my shotgun with a simple bead was always at least as fast as guns with ghost rings or optics. (Read Ellefretz's article on why I don't have a sling or light on it. I might add a light, but in the house a sling has too much potential for getting caught on something, IMO.)

Yes, it kicks a lot and doesn't carry a lot of ammo. But the Mossberg is light, handy, reliable, fast on target, and the terminal ballistics are basically unmatched at the range I would need it at.  I live in white bread suburbia, not a war zone.

As Ellefretz notes, it's extremely uncommon for someone defending his home with a shotgun to need to reload in a fight. That said, I had an elastic butt cuff with 5 spare rounds on it on the stock. I am replacing that with an Esstac 4-round card. That will allow me to grab the shotgun have nine rounds of GTFO in/on the gun.

One thing I found interesting during the early days of the pandemic was that aside from all the military-style rifles and handguns that sold out, so did fighting shotguns. Americans get combat shotguns more than most other people.

As an aside, when I got the Mossberg I sometimes ran into sticky extraction. I did some online searching and found that I wasn't the only Mossberg Mariner owner to experience this. I resolved the issue by polishing the chamber with some Flitz metal polish on a cleaning patch wrapped around a 12 gauge bore brush, chucked in an electric drill. Since then the function has been flawless.

Edit 3/25/22:

After some more consideration and seeing how it felt, I removed one of the stock spacers, so LOP is now at 13". This enables me to more easily tuck it into my shoulder and will also be helpful if I need to use it while wearing more than a T-shirt.

Saturday, February 19, 2022

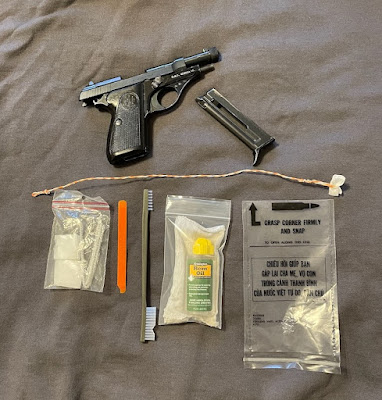
Ultra Compact Pistol Cleaning Kit

Several years ago I put together the first version of this cleaning kit to accompany an M1 Carbine I used as a road trip gun. I updated it today to keep with my Beretta 71.

Contents:

  • 1 pull through with loops on each end to hold a cleaning patch. This was made from two of the conductors stripped from a piece of CAT5e network cable. It's plastic coated so it won't damage the bore, and coils up to fit in the plastic bag at lower left. A boresnake or sectional cleaning rod could be substituted. I might make a short brass cleaning rod for the kit because then I could use it to push out bore obstructions.
  • 1 plastic bag containing some .22 - .270 cotton flannel cleaning patches, and two pipe cleaners.
  • 1 "Norton's Universal Cleaning Stick" from Countycomm.com. This is a thin plastic bar that can be used for scraping or pushing a cleaning patch through crevices.
  • 1 USGI-type gun cleaning brush.
  • 1 plastic bag containing a 1 oz. bottle of Rem Oil and a rag torn from an old T-shirt. Rem Oil isn't the best gun oil but it works well as a CLP for short term use and the bottle size is handy. Use your favorite gun oil or CLP.
  • 1 USGI Vietnam-era surplus "Chieu Hoi" bag, into which everything fits. These were originally intended to use as covers for 20 round M16 magazines in Vietnam. The idea was that they'd be discarded on the battlefield to induce any Viet Cong who picked them up to defect. They are still readily available and make good storage parts for small parts or kits like this one.

Naturally, this isn't a comprehensive maintenance kit. Rather, it's intended to be an ultra compact cleaning kit to keep in the pistol case to keep it running as part of a grab and go kit.


The pistol, extra magazines, and cleaning kit all fit into this US Peacekeeper attache-style gun case (Amazon affiliate link). A 100 round box of .22LR ammo should also fit.

Monday, February 14, 2022

Compact .22 Handguns

This is an interesting article:

http://straightforwardinacrookedworld.blogspot.com/2012/10/dark-arts-for-good-guys-22-lr-pistol.html

It was referenced in this thread on BCUSA (I think you can read it w/o being registered):

https://bushcraftusa.com/forum/threads/22-rimfire-survival-ruck-gun-discussion.289631/

I currently have three compact .22 pistols:

A Beretta 71 "Jaguar".

It's a great, sweet shooting, and very reliable piece. However, I it might not be the best choice for hard use  due to the lack of spare parts or factory magazines. That said, I managed to find a couple sources for used factory Beretta 7x magazines on eBay. I have one on order so hopefully it'll work well.

This afternoon I dug out the Jaguar and painted the front sight with a white base coat and a high-viz green. I've been doing this on most of my pistols because it really helps with visibility cf. a plan black blade.

A Ruger SR22.

Mine has the threaded barrel. DA/SA, reliable, polymer framed, and very light. Has current, American factory support. With good ammo it's reliable but IMO it could benefit from a stronger hammer spring.

A High Standard R-101 Sentinel revolver.

Even though the HS revolvers are long out of production, I wouldn't have a problem relying on this gun. They are known for durability and of course, magazines are not an issue. It holds 9 shots in the cylinder, which gives it an edge over 6 shooters. I just got it a little over week ago so I need to run a variety of ammo types through it to see if it prefers anything in particular. Accuracy with Federal Game Shock was mediocre. I got it to the range for the second time this weekend and it seems to like Aguila Super Extra and CCI standard velocity ammo. It also shot OK with CCI Mini Mags and Remington Golden Bullets.

I also have a Ruger 22/45 Lite, which while lightweight it's not very compact, and another 22/45. An advantage of the Lite is that aside from having a threaded muzzle, it also came with a Weaver rail so mounting a compact red dot sight is easy. Mine has a Bushnell TRS-25 red dot sight on it.


Friday, January 28, 2022

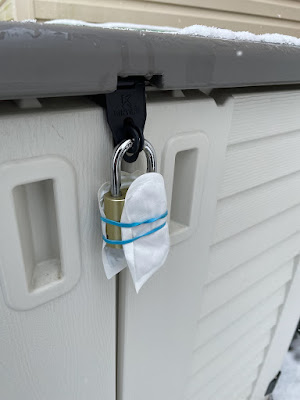
Thawing a Frozen Padlock

The padlock to my generator shed was frozen solid. I wanted to unlock it in case I need it for an incoming storm. The lock is in close proximity to plastic so I didn't want to use a torch. So, I took two disposable, stick-on toe warmers and sandwiched the lock between them, then waited awhile. (The rubber band was for a little extra holding power.)


I ran out to the hardware store and when I got back about an hour later, it opened right up.

It was in the upper 20s when I did this. If it was colder you could wrap some plastic around it to hold in the heat and block the wind, but I'd leave the bottom open to allow in some oxygen for the heaters.

Saturday, January 22, 2022

Sometimes Even High Quality Guns Break

Don't let anyone tell you that revolvers are 100% foolproof. If you shoot them long enough you'll run into functional issues and sometimes, parts breakage.

This afternoon I was shooting with a friend and this happened to his revolver:


That's a 1980s-vintage Smith & Wesson Model 64 K-Frame chambered for .38 Special, with a broken hammer nose. The gun is down hard until my friend replaces it. The fix shouldn't be difficult but it will require tearing down the gun pretty far.

This is the first time I've personally experience a broken S&W revolver firing pin. However, my brother owned a Rossi .357 in the 1990s and it experienced a similar failure.

If you have a small battery of guns, it's a good idea to have a spare of the one you use the most, so that you can rearm yourself if it goes down. Likewise, for small, easily lost parts, or parts known for breakage, keep spares on hand.

Friday, December 17, 2021

Varusteleka's Take on Lines of Gear

This morning I got the following email from Varusteleka:

Our spies told us that you recently bought some combat equipment. Now we want to give you some tips on how to structure your combat gear based on the line / circle principle.

In layered clothing, each layer has a specific role to play. A very similar model can be applied to other gear, too. Different countries use different terms to describe this but the concept is a similar three-layer model. In Finnish, these layers are called circles but elsewhere they are often referred to as lines. In this article, we go through the basic principles of this kind of thinking and give a few examples of how to use the concept in military and civilian applications.

The full article is here, and is worth reading. Unlike a lot of pieces I've seen on the "line" concept, it differentiates between different roles. E.g., recon scout, infantryman, military police, and civilian.

Other worthwhile articles discussing the different lines of gear include:

This concept is helpful in keeping your stuff organized, whether you're in the field or the city.

The email was prompted because the other day after watching Jess's review of the Särmä TST themal cloak, I decided to order one. I have a Jerven Original but it's a little small for use as a shelter. I also have a Jerven Hunter with 67 gsm Primaloft insulation, but I'm a bit wary of using it as a shelter because of the insulation and inner lining.

At approximately 7 feet by 7 feet, the Särmä cloak will work much better as a tarp while still not being too large for use as a bivvy or cloak. The one I ordered is one of their "special batch," which was made in the PRC rather than Estonia, as an expedient during Covid.

I should get the new Särmä thermal cloak next week, in time for my upcoming Winter break. Hopefully, I'll get a chance to try it out soon.

Wednesday, December 15, 2021

Särmä TST Thermal Cloak

Jess on Endurance Room has a really nice review of the Särmä TST thermal cloak. This is a shelter/poncho/bivy/sleeping bag inspired by the Jerven bag. Check it out.


I have a Jerven Original and a Jerven Hunter (insulated). These things just plain work and I'd expect the Särmä version to work just as well. A few years ago I used the Original on an overnighter as my shelter.


Incidentally, this pitch worked for the clear night I had, but the trekking pole in the middle was annoying when I had to get up in the middle of the night to pee. It protected me nicely from the wind, however.

One improvement I see on the Särmä is that it has loops for tie-outs instead of the grommets on the Jervens.

The one thing you need to be aware of when using these as a bivy or sleeping bag is condensation. They are waterproof and not at all breathable, so you'll get condensation. You'll want to air them out after a night's sleep.

A less expensive alternative for those on a budge is the USGI casualty evacuation blanket, or a heavy duty space blanket. I've used one many times as a "taco" around a sleeping bag or poncho liner. The downside is that they are smaller than the Särmä cloak.

Tuesday, October 26, 2021

SwissQlip Pocket Clip for Swiss Army Knives

 Over the years, I've owned several multitools from Gerber, Leatherman, and Victorinox. However, for my needs I've found that a Swiss Army Knife is far more useful and easier to carry.

For my needs, a SAK is also more useful than a pocket knife that's just a knife. I  use the other tools on a SAK as much or more than the cutting blade.

I've carried several SAKs, starting with a Victorinox Pioneer that I bought around 1981 for $13 at Herter's Cutlery at the King of Prussia Mall. (This was the first knife I bought and I still have it.)

One thing I haven't cared for is how SAKs eventually wear a hole in my pants pocket. I've found a couple solutions to that.

The first is attaching the knife via its keyring to a short lanyard looped around a belt loop. I made the lanyard just long enough to hold the knife vertically in my pocket. The lanyard has a plastic clip that allows me to easily detach and reattach the knife to it. Naturally, this requires the use of both hands but the SAK needs that to open any of the blades or tools anyway.

More recently I discovered the SwissQlip, an add-on pocket clip for most 91mm SAKs. (Check the list of supported SAKs at the link.) It attaches to the knife using the keyring's mounting hole, after you remove the ring.

I installed one on a Victorinox Fieldmaster. Small screws like the SwissQlip's attachment screw often have a tendency to loosen, so I put a drop of blue Loctite on it before screwing it in.


I've been carrying the Fieldmaster fitted with the SwissQlip now for a couple months and it works well, with a couple caveats.

First, it does block easy access to the tweezers. To get the tweezers out you need to use the toothpick to pry it up to the point where you can grab it.

Second, it also blocks access to the package hook unless you use something else like a small screwdriver to pry it open. This I don't care about since I have never used the package hook on any of my SAKs.

I'm willing to put up with these two things because overall the SwissQlip makes the SAK easier to carry. It's held securely to my pocket and has just the right amount of tension to keep it in place while still remaining easy to reinsert into my pocket.

I haven't found that the SwissQlip gets in the way when using the knife.

At $20 it's not exactly cheap but it is well made and functional. It's a worthwhile addition to a SAK.


Wednesday, July 28, 2021

My Longest Unassisted Ride Yet

Last weekend I got in a couple of nice bike rides.

On Saturday a friend and I did about 13 miles. He has a Trek hybrid bike while I rode my Trek 820. Prior to the ride I raised the stem a bit and it's more comfortable to ride with a more upright posture. It puts less pressure on my hands so I don't get tingling.


Sunday morning I woke up and got it into my head that I was going to do 20 miles. When I was into cycling in my teens and early 1920s I did 20+ miles plenty of times but the only time I've done so recently was on my Lectric XP e-bike. This time I wanted to do it on a bike powered solely by me.

So, I inflated the tires on the Nishiki Maricopa to about 115 PSI, put it on the bike rack, and took it down to Spring Mill. I got on the Schukyll River Trail and kept going until I hit a bit more than 10 miles, which brought me into Valley Forge National Park.


I took about a 5 to 10 minute brake to hydrate, slurp down a Clif Shot, and give my crotch a rest.

Looking down towards the river from the SRT:


I have to say that the final 5 miles were a bit of a chore. The Nishiki's seat is pretty firm and even though I wore padded bike undershorts, it got uncomfortable.

That said, I wound up doing 20.26 miles, which felt really damn good.

It's been about 2.5 months since I started riding regularly and while I haven't lost any weight, my cardio is considerably improved and I can feel that my legs are stronger.

Cycling really is a great way to get good, low impact cardio exercise.

Monday, July 12, 2021

Another Reminder to Periodically Test Your Gear, and Have Backups

Last weekend I was upstate at a friend's off grid cabin. Saturday morning I wanted to make coffee on my Kovea Spider canister stove. I was able to start the stove but it ran with a reduced output and then conked out after a few minutes. I shook the canister and found that it still had fuel. Then attached a propane adapter and tried that with no joy.

We tested both fuel canisters on my friend's stove and both worked.

I think what happened is that something got into the stove and clogged it. I'm going to try to disassemble it and blast it out with compressed air.

My friend's canister stove is one of those $10 units from Amazon. They work fine but I was using a large percolator which would have made it unstable (the Kovea connects the stove unit to the fuel canister by a tube, so the head is lower).

So, we went old school for Saturday's coffee:


I can't complain since nothing is better than sipping black coffee made on a campfire in the mountains.

We keep an old Coleman stove onsite so that's what we used on Sunday.


Wednesday, July 07, 2021

Screaming Good Deal on USGI MOLLE II Bandoleers 7/7/21 Only

 USGI MOLLE II bandoleers $3.75 each 7/7/21 only.​ 


This is a great deal on MOLLE bandoleers which normally run about $15 each. At this price they are great just for organizing AR15 magazines in storage. I ordered 10.

They also have them in Woodland camo for $16.99.

This article has some good ideas on other uses for them: http://defensiveconceptsnc.com/making-use-of-the-molle-bandolier/

Based on that post I setup one as a supplementary trauma kit.

Tuesday, July 06, 2021

More Rides on the Nishiki and a Rack

Now that I put the handlebar stem riser on the Nishiki Maricopa I've been riding it more. I've missed riding a road bike -- compared with a mountain bike or my Lectric XP, it's a lot more responsive and faster rolling.

On the 4th, I put it on my truck's bike rack and took it to the SEPTA Spring Mill station, which is an entrance point to the Schukyll River Trail. I took it west, doing 17 miles round trip. That's the longest ride on a conventional bike I've done in over 30 years.


This morning I got out and did about 8.4 miles on the same trail. It was a lot hotter and more humid today so I made sure to hydrate like crazy before, during, and after the ride. The heat and humidity were draining, despite that.

About midway, I stopped under the overpass for I-276 to drink water and slurp down a Clif Shot. If you click to enlarge you can see that I had two water bottles on the bike for this ride (I put the tool canister in my pack for this ride). The one on the down tube is a 33 oz. Zefal bottle filled with half strength Liquid I.V. hydration mix while the one on the seat tube held plain water. I drank about half of each on the ride and finished the straight water after I got back to my truck.


Train tracks parallel the SRT at this point and this train was there. The locomotive was LOUD underneath the overpass.


Hydration afterwards at home was a bit tastier ;) :


Since I've been riding it more I ordered a Planet Bike Eco rack, which is the same one I have on my Trek 820. This will allow me to mount a rack trunk to hold my tools and snacks, etc. I have another Lixada trunk on order, the same as on my Lectric XP. The rack and a replacement seat post clamp with mounting eyelets arrived yesterday and today. I installed it tonight.


It came with an L-bracket that allowed me to mount the Stupidbright tail light that was strapped to the seatpost.


For the price the Stupidbright tail lights are hard to beat. They use a single CR2032 lithium battery and have three modes: solid, fast blink, and slow blink. When blinking they are visible a couple hundred yards away at dusk. Because the Schukyll River Trail has a lot of sections that are in heavy shade, I like to run it along with a Planet Bike Spok front light so that I'm more visible. Both are really light and small, taking up minimal room on the bike.


Monday, July 05, 2021

My Take on a Mini Tool Kit

A couple of weeks ago I linked to this thread about mini tool kits on Arfcom. I liked the idea so much I put one together for myself.

The "Y-280" steel hip roof toolbox was part of my Father's Day gift this year. It came filled with an assortment of exotic jerky. You can find it on Amazon by searching for "Y-280 toolbox."


Click on the pictures to view the full size version.

The contents are:

Tools:

  • Craftsman 25 piece ratchet screwdriver set
  • Craftsman 35 piece right angle bit driver set
  • Craftsman 6" adjustable wrench
  • Craftsman 9' measuring tape
  • Telescoping magnetic retrieval tool (was included with the screwdriver set)
  • 7" Irwin curved jaw Vise Grips
  • Mitutuyo 6" machinist's rule, held to inside of lid with two small neodymium magnets.
  • ~0.75" x 1.5" magnet (not shown). To hold screws when disassembling something.
  • Milwaukee combination wire cutters, wire stripper, and pliers.
  • Plastic hobbyist's forceps from Countycomm.

Misc items:

  • Ten 8" cable ties, threaded onto another one with the head cut off. This keeps them organized.
  • 3 oz. can of WD-40
  • Tube of super glue
  • Tube of blue Loctite thread locker
  • Fine point Sharpie marker
  • Roll of electrical tape
I still need to add:

  • Long nose pliers
  • Penlight or headlamp
The Craftsman sets are from Lowe's, who now owns the Craftsman brand. I bought the Milwaukee pliers thingy several years ago at Home Depot.

My first use of the kit was to reinstall the kickstand on my Trek 820 bike today. I took the opportunity to try out the ratchet set with the 12mm socket to secure the bolt after I applied some blue Loctite to it. I had planned to replace the bolt with a stainless socket head bolt but it would have needed a larger Allen key than I carry in my bike toolkit. If it ever loosens again I can secure it in place with the zip ties in my bike trunk until I get home.

Saturday, July 03, 2021

A Little Bit of Bike Maintenance Today

Yesterday I did about 13 miles on the Nishiki road bike and I noticed two things needed attention. First, the tires were a bit low. Second and more importantly, I was getting "ghost shifting." In other words, I'd set the rear derailleur to one gear and it would shift itself to the next highest gear. Obviously, this is undesirable.

I did a bit of research after getting home and found this:

"...most all "auto shifting" or "ghost shifting" is the result of cable-tension problems. If the cable is a bit loose, the derailleur will try to shift "up" to a smaller cog. If too tight, it will try to catch the next larger cog. Cables stretch, especially after a short period where the new cables stretch to the point they're stable. after that, they should be good for a long time..."

Link.

So, this morning I dug out my bike maintenance stand, put the bike up on it, and played with the cable tension until it stopped shifting on its own. While it was on the stand I also gave it a wipe down, cleaned the rims, and adjusted the brakes. 

Before putting the Nishiki away I inflated the tires to 120 PSI and did a test ride up and down the block. According to the pressure gauge on my Blackburn pump, the tires were below 100 PSI. It rolls noticeably faster now (and of course the ride isn't as soft) and I didn't experience any ghost shifting.

While I had the maintenance stand out I also used it to give my Trek 820 a cleaning. The last ride I took on it was down in Valley Green on gravel and it was pretty dirty. It needed to be hosed off, needed the chain cleaned and relubed, and the rims cleaned.

For chain lube I am using Pedro's Ice Wax, which dries to a dry film lubricant. It should hopefully be a bit more resistant to washing off if I get caught in the rain, and won't retain dirt and grit like a wet lube will.

Back the 1980s a couple friends used to lube their bike chain by immersing them in melted paraffin wax, after degreasing them in a bath of gasoline. Yeah, it's amazing we survived. If I ever decide to try the molten wax bath I'll use odorless mineral spirits for the initial clean and degrease job.

If you're going to get into doing much bicycle maintenance I highly recommend some kind of maintenance stand. I have this one. It allows me to elevate the bike so I don't need to squat and to get the wheels and drivetrain moving so I can adjust the derailleurs and brakes.

Also recommended are the following books:

There's some overlap between the two but if you have both kinds of bikes, getting both books is worthwhile, IMO.

The Park Tool YouTube channel is another excellent bike maintenance resource.

Ever since the COVID lockdowns started, bike shops have been extremely busy. If you're able to do your own bike maintenance you'll save yourself money and time in keeping yourself on the road or trail. And bikes do need periodic maintenance, probably more per mile ridden than motor vehicles do. Preventative maintenance at home is preferable to fixing something on the side of the road.

Tuesday, June 29, 2021

Handlebar Stem Riser on the Nishiki Road Bike

This afternoon I installed a handlebar stem riser on my Nishiki Maricopa road bike. As I was reminded on my Saturday ride, having a gut make for a less comfortable ride on a road bike. By raising the handlebars I am able to have a more upright riding position.

As the bike came from the factory:


Removing the handlebars, using the Granite Rocknroll mini ratcheting tool kit:


And finally, with the Outerdoo stem riser installed:


I took it for a short test ride up and down the block. The derailleur and brake cables had enough slack in them so their function is unaffected. My riding position is now more upright and much more comfortable. We're currently in a heatwave so a full shakedown run will have to wait until Friday or Saturday.

If I ever do manage to lose my gut I can restore the bike to its original configuration.

A Couple More Rides

On Saturday I took a ride on my road bike for the first time in 4 or 5 years. It's a Nishiki Maricopa that I bought at Dick's Sporting Goods because I was missing my 1986 Nishiki Olympic 12, that I foolishly got rid of around a decade ago.


I put about 13 miles on it and it's amazing how much faster it rolls than my Trek 820 or especially the Lectric XP when it's set to PAS01 or 02.

One thing that had been holding me back from riding the Nishiki was the forward riding position. I have a gut that I'm trying to shrink and when I'm leaned over, it's uncomfortable. So, yesterday I ordered a stem extension to raise the handlebars about 2.7". This will give me a more upright riding position that should be more comfortable.

On Sunday I took out the Lectric XP on the longest ride I've done in over 30 years, about 22 miles. As usual, I took the Cross County Trail to the Schukyll River Trail and headed west towards Valley Forge. I wasn't wearing bike shorts so by the time I got to about 9 miles out my nether regions were complaining.


I did this ride mostly in PAS2 but kicked it up to PAS3 once I got to within 5 miles of home. By that point I wanted to get off the bike. When the ride was done the battery was down to about 60% left, so not bad at all.

You may have noticed that I replaced the OEM panniers with a Lixada bike trunk that I bought on Prime Day. The panniers were floppy, added even more wind resistance to an already fat bike, and I don't currently need the capacity. The trunk is a lot more streamlined and it's easier to access without bending over.

I also went back to the factory saddle. I tried a wider, softer Cloud 9 saddle on a couple rides but couldn't get it set comfortably.

It was over 90 degrees F (32.2 C) on both rides so I made sure that I hydrated well before, during, and after the rides. The Zefal 33 oz. bottle filled with half strength Liquid I.V. worked great for this. I also had a 16 oz. water bottle with me in the trunk on Sunday's ride. On Saturday I wore a light pack with a water bottle and a snack, since the Nishiki doesn't have a rack.

ASSuming that the stem extender works well and I start riding the Nishiki more, I'll want to install a rack and trunk. It has rack mounting eyelets at the rear wheel drops but nothing up top, so I'll either need a rack that clamps around the seat post or comes with an adapter.

I've only been taking these rides for about a month but I've already noticed an improvement in my leg strength and cardio.


Thursday, June 24, 2021

Electrolytes and Hydration

My renewed interest in cycling has me looking at electrolytes and hydration. A post in a private forum in which the author suffered the effects of dehydration offered some additional encouragement in this area. 

Also, I experienced the beginning stages of heatstroke once when I was a teen. I actually went blind for a few minutes until I got inside, cooled down, and rehydrated. (Incidentally, everything went white, not black. One of the two times I really came close to dying.)

I did some searching and ran across this article, Ask the Coach: Which Electrolytes Does a Cyclist Need? Another good article is from Blue Collar Prepping: Electrolytes Revisited.

The key takeaway from both articles is that if you'll be exerting yourself and sweating a lot in warm weather you need to replenish not only with water but also with salts your body needs.

On my hot weather rides, I've mostly been using Gatorade made from powder mix at 50% strength. I'll generally mix it in one bottle then split it between two, and then fill each bottle up from the tap to dilute it.

At the suggestion of the author of the private forum post I mentioned, I also bought some Liquid I.V. Hydration Multiplier. I tried the lemon lime and found that it's much sweeter than I like, when mixed full strength, but more palatable when mixed half strength.

Another option is SaltStick electrolyte chewable tablets. I bought a pack of these but haven't tried them yet.

Anyway, something to be aware of.


The Patrol Bike and Cycling for Preppers

Note: This post contains a bunch of Amazon affiliate links. If you buy something after clicking through, I'll get a cut at no extra cost to you.

A few years ago, Matt Bracken posted an article, "The Patrol Bike" over on American Partisan. It's worth a read, and I recently reviewed it due to my renewed interest in cycling.

One thing I want to comment on that's missing from many prepper-oriented articles about bicycles is the necessity for conditioning before you need to rely on a bike during an event. There are a lot of bikes out there gathering dust in garages and sheds because people bought them thinking that they could ride them around all day like they did when they were kids, and find out that is no longer true.

If you include bicycles as part of your preps you need to ride now, to make sure that your legs, butt, and heart can handle it.

Bracken noted that he switched to cycling from jogging because once he hit 60, his knees started complaining. In my case, my feet are so flat they may as well be flippers, so I've never been able to run much. Cycling is a good way to get in a cardio workout for those of us with similar physical limitations.

When I was young I did a lot of road biking. I still see cyclists on the road but I will no longer do so. IMHO, there are too many distracted motorists and I feel that it would only be a matter of time before I got hit by someone paying more attention to their cell phone than the road.

The good news is that many urban and suburban areas now have an increasing number of bike trails. Many of these are on former railroad beds and as such, are kept to a very minor grade. These paths are great for exercise and getting around. Bikemaps.org is a good resource for finding such trails.

Another article worth reviewing is from Greg Ellefritz at Active Response Training. "Your Tactical Training Scenario - Attacked on a Bike" raised a few points I had not considered, notably the ability for an attacker to use your bike helmet against you.

There are a few safety items that you should have:

1. Front and rear lights. These are for making you visible as much as lighting the way.  It's 2021 so we no longer need to power bike lights with big, heavy batteries or bottle dynamos. There's a wide variety of LED bike lights that run off AAAs, coin cells, or are rechargeable. I find that when riding on a crowded bike path that I appreciate it when other riders have their lights on, even during the day.

2. A helmet and gloves. Yeah, us Gen-Xers survived while not wearing bike helmets. Modern helmets are lightweight and will keep you from cracking your skull if you wipe out. I find that padded gloves make cycling more comfortable. Plus the last time I crashed my gloves prevented me from getting road rash on my palms, which would have really sucked.

There are some accessories you'll want to keep on your bike to keep running and make it more useful:

1. Patch kit and/or spare tube. Make sure you include a couple tire levers.

2. Pump and/or CO2 tire inflater. I use a floor pump at home. Many if not most currently made pumps will work with either Presta or Schraeder valves. If you must reinflate a fat tire in the field one or two CO2 cylinders will speed things up a lot compared with using a bike-mounted pump.

3. A rear cargo rack. I am happy with the Planet Bike Eco rack that I installed on my Trek 820 about 5 years ago. My Lectric XP came with a rack. A solid rear rack will also act as a fender to keep you from getting a racing stripe up your back when going through mud puddles. Use a little blue Loctite thread locker on the mounting bolts when installing a rack, to keep them from vibrating loose.

4. Bag to carry your toolkit. I like a trunk on my cargo rack because I can put my tools, a light windbreaker, snacks, and an extra water bottle in it. Another option is lashing a milk crate to the rack for bulky items.

5. Water bottle rack and bottle. Most bike bottles hold 20 - 24 oz. Zefal sells 33 oz. bottles, which are nice in hot weather. You can also get canisters that fit water bottle holders and can be used for your toolkit. Good for bike with more than one water bottle holder. 

6. Tool kit or multitool with wrenches to fit all the screws and bolts on your bike. Most bikes have used Allen bolts for the past 25 years but you may have one or two regular hex head bolts. Consider swapping them out for Allen head bolts. Otherwise, include an adjustable wrench. A pair of pliers and/or a Leatherman-type multitool may come in handy as well. If the bike multitool doesn't include a spoke wrench, get a separate one. I recently added this ratchet set to my bike kit.

7. In case something breaks, some zip ties and a roll of 1" wide Gorilla tape may come in very handy. I recently saw a forum post in which a guy was able to ride his mountain bike out of the woods after reattaching the front chain ring with zip ties.

8. Most importantly, the knowledge to use all of the above. Sheldon Brown's site is a good resource for all things cycling. Also, Park Tool's YouTube channel demonstrates many aspects of bicycle maintenance.


We're currently experiencing a shortage of new bicycles in shops due to increased demand and COVID-related supply chain disruptions. There are still plenty of bikes listed on places like Craiglist and Facebook Marketplace. Used bikes can be good deals. Older mountain bikes such as you'd find on those sites are especially well suited for prepper use due to lower cost and simpler construction, especially if you avoid bikes with suspensions. I do recommend avoiding any department store bikes, at least those made for sale in the past 25 years. Frankly, they are junk. Stick with brands sold in bike shops like Trek, Specialized, or Giant. Even low end models from these brands will be head and shoulders better than the crap you find at Walmart or Target.

To quote Freddy Mercury, "Get on your bikes and ride!" 

Mini Tool Kits

  This is an informative thread on Arfcom about mini tool kits that might give you some ideas.

This video by Brett at SurvivalComms is in a similar vein but focused more on commo:


Thursday, June 10, 2021

Cycling Again

 Back in 2016 I posted several times about cycling, but not since then.

Bicycles make a lot of sense for preppres for a few reasons:

First, regular cycling on a properly fitting bike is a good, low impact way to get cardio exercise.

Second, in the event of SHTF, a bike can provide a means of transportation that doesn't rely on external infrastructure. I.e, although you need to fuel yourself you don't need to fuel the bike. Also, they can be pretty stealthy, which could be good for local scouting or potentially a bugout.

Another use for a bike would be as a way to get home in a major emergency. For example, there are many adult sized bikes that fold up compactly and could be kept in your vehicle's trunk, to be used if you need to abandon your car or truck.

For what its worth, IMO the threat of an EMP rendering vehicle inoperable is so slim that it's not really worth considering. EMPs are a potential threat, but more towards infrastructure.

I've been riding two bikes lately.

The first is a one I got earlier this year. It's a Lectric XP folding e-bike. It's a v1.0. Lectric introduced their v2.0 last month.


I'd been considering an e-bike for awhile and was hoping that if we got two, it would be an activity that I could do with my wife. Unfortunately, she's since decided that she feels uncomfortable riding a bike, so that's out the window.

The battery is removeable and contained in the frame tube behind the logo. To get at it you need to fold the bike and then it slides right out.

It pretty well kitted out with, lights, fenders, and a nice rear cargo rack. Lectric also included panniers. I'd rate them as serviceable.

As shipped it's a Class 2 e-bike. I.e., it can be ridden with 5 levels of pedal assist or with a throttle. You can also pedal it with no assist, but with 20x4 tires and a weight of 65 lbs. doing so is more exercise than I want.

You can use the controller to change it to a Class 3 bike which would give you a top speed of 28 MPH vs. 21 MPH for Class 2s. This of course will decrease battery life. I'm leaving mine as a Class 2.

It's a 7 speed bike with a Shimano thumb shifter for the rear (and only) derailleur.

It has mechanical disk brakes. Some folks have swapped them out for hydraulics but they are working fine for me.

After my first shakedown run I decided to swap out the pedals and the saddle. I got some inexpensive pedals and a Cloud 9 comfort seat off Amazon. I've since put the stock saddle back on it and will just ride it with padded shorts. The Cloud 9 seat screwed up the bike's geometry for me. It felt too far forward even when pushed back all the way on its rails.


I also covered the gaudy "LECTRIC" logo with black duct tape. I wanted to reduce the chance of anyone giving me crap for riding an e-bike on the local bike paths.

I mostly ride it on pedal assist level 1 or 2, occasionally on 3. I find myself rarely using the throttle.

It's a folder but so far I'm not using that feature. It does lock up tightly. It feels as rigid as a solid frame. I've seen some comments by other owners on Facebook where the latch on their bike isn't tight. This is an adjustment issue.

The 4" knobby tires provide plenty of traction but are very noisy. I may change them out to 3" or 3.3" commuter tires with an inverted tread pattern to reduce noise and rolling resistance, which will increase the range. I may also replace the panniers with a rack mounted trunk.

My longest ride so far has been about 19 miles and I still had plenty of juice left for at least another 6 or 7 miles.

Lectric recently unveiled their v2.0 which now features 3" tires and suspension fork. IMO the narrower tires are an improvement, the suspension fork probably not so much. It adds complexity and I'm skeptical of the quality of a suspension fork at the Lectric's price point.

The other bike I've been riding is my 1999 Trek 820. It's an entry level mountain bike with no suspension. You can often find 1990s vintage mountain bikes at reasonable prices on Craigslist or at yard sales for very reasonable prices. Old mountain bikes like these  are an excellent choice for preppers because they are simple and rugged, especially if you get one with no suspension.


Assuming the bike is in good shape, they can often be ridden with minimal restoration needed. I do recommend replacing the tires and tubes if they are original because rubber deteriorates with age. You might also want to replace the brake pads for the same reason.

Sometimes the saddle has cracked due to age and will need replacement.

These bikes generally came with wide knobby tires that provide excellent traction on or off road, but have a lot of rolling resistance and are noisy on pavement.

You can replace the tires with slicks or something with a less aggressive tread if you'll primarily be riding on pavement. Modern commuter tires often have an inverted tread pattern that rolls quickly and quietly but provides more traction off pavement than slicks.

When I dragged the Trek out of retirement several years ago I replaced the knobbies with Bontrager H2 semi-slicks. They are great for riding on asphalt but not so great off road. So, yesterday I replaced them with Serfas Drifters with an interesting inverted tread pattern.


My initial impression of the Drifters is favorable. I was only able to ride it up and down the block and around my back yard on grass, but they appear to roll quickly and quietly. In the very short grass test they seemed to grip well. I should be able to take the bike for a real ride this weekend, on which I hope to also test them on gravel.

I stuck with 1.5" wide tires since I will be on pavement probably 95% of the time. If I knew I'd ben on gravel more often I would have bought the 2" wide version.

Sunday, April 04, 2021

The Gun Culture of the Konyak Naga

I recently learned of the Konyak Naga hill tribe of northern India and Mynamar (Burma). Apparently, guns are a big part of their culture and they make them themselves.

The Konyaks' guns seem all to be single or double-barreled muzzleloading shotguns with percussion locks. They make their own powder and caps.

There are a couple Youtube channels with information about the Konyak Naga gun culture that I've been watching lately.

This video has an overview of their gun culture:


Target shooting at a pig's skull suspended from a tall pole (apparently the object is to cut the string holding the skull):


And this one shows how they make percussion caps:


Finally, this video shows how they make gun powder:


I find this fascinating just because I am into black powder and muzzleloaders, but it also gives a glimpse of what's possible with primitive tools, a lot of skill, and patience.

Homemade Percussion Caps

 The current crazy ammo supply situation has even extended to black powder shooting supplies, including percussion caps. Although I was able to pick up a 1200 count sleeve of RWS 1075+ caps from MidwayUSA earlier this year, I wanted a fallback option as well.  So, in early January I ordered a #11 cap maker and a packet of Prime All from 22lrreloader.com. It took about a month to come in due to their backlog.

To go with the cap maker I bought a 12" x 30" roll of .005" thick copper foil at Amazon. This is a bit thicker than the beverage cans recommended by the cap maker's manufacturer.

After the cap maker came in I punched out about 100 cups. I am able to do so by hand but it's much easier using a mallet.


Anyway, the cups sat until yesterday. Instead of using the Prime All compound, I charged about a dozen with some Scheutzen 3Fg black powder topped with two toy caps, secured in place with a drop of Duco cement. It's a nitrocellulose laquer that acts as a binder, waterproofing agent, and is flammable.

I used a scoop made from a large pistol primer cup glued to a piece of bamboo from a chopstick to put the black powder in the caps.


Last night I tried the caps in my Euroarms Rogers & Spencer. I used them with Triple 7 as the main charge. I wanted to see how they'd do with a propellant that has a higher ignition temperature than black powder.

They worked pretty well. The first cylinder was charged with 20 grains by volume of Triple 7 3Fg, a lubricated wad, and .454 ball. All chambers ignited easily and the caps didn't fragment.

I then tried some paper cartridges with the same powder charge and ball but with 0.5cc of cornmeal filler. These must develop a higher chamber pressure, because I noticed that the gun was harder to recock due to the caps deforming more. Also, in this cylinder I had one misfire where the cap popped off but the main charge failed to ignite. It went off with a second cap but there was a noticeable delay. I think the nipple was clogged.

The Rogers & Spencer with my homemade caps on the nipples. I used a Delrin punch that I use for pushing out the wedges on Colt-style guns to seat the caps on the nipples. They are tighter than RWS 1075+ or Remington No.10 caps on these nipples.


I also shot two more cylinders tonight with 20 grains of Scheutzen 3Fg BP and RWS caps.

I regard this experiment as a success. I'm getting a 1/8" hole punch so I can more easily get the toy caps off the paper roll, which will speed production. I also need to try the Prime All compound.

Making percussion caps is tedious. I don't expect to make a whole bunch but I want to have the capability, just in case.


Sunday, March 28, 2021

Lithium Battery Shortage and Price Hikes

This announcement was posted on March 1st by NKON, a large supplier of batteries in the Netherlands. (Link goes to FB so you might need to login to see it there.)


Most of my lithium battery supply is from Battery Junction. I've found that they often have better deals than Amazon.

Sunday, March 14, 2021

Cap and Ball Revolver: Round Ball vs Conical Bullet

  This video from Paul Harrell provides a good comparison between round balls and conicals in percussion revolvers (in this case fired from a Ruger Old Army).


A few comments:

The conicals he used appear to have been cast from a Lee mold. They are similar in form to modern round nosed bullets that have been loaded in cartridges since the late 19th Century.

Conical bullets used in cap and ball revolvers in the 1850s and 1860s were generally more pointed. This would increase penetration but reduce terminal effectiveness because the bullet would be more prone to slip through tissue rather than punching a larger diameter hole.

Nowadays, more effective conical designs are available, intended for hunting, e.g. Kaido Ojaama's design, which has a wide, flat meplat.

In his book Sixguns, Elmer Keith recounted that Civil War veterans that he knew as a boy stated that round balls were more effective for antipersonnel use than the pointed conicals of the period.

Sunday, January 31, 2021

Battery Operated Fuel Pump

 We are forecast to get up to over a foot of snow and sleet here in Southeastern Pennsylvania. I just got inside from opening the locks to my sheds so they don't freeze shut, and putting gas in my snow blower. I keep gas in military surplus jerrycans.

This battery operated pump works really well for transferring gasoline from a can into the fuel tank of a generator, snow blower, or whatever without making a mess. I bought one in October and have used it a few times now. I wish I had one years ago.

Wednesday, January 20, 2021

Black Powder Shooting Supplies Now Getting Scarce

Last week I ordered 5 boxes of Hornady .454 round balls from Track of the Wolf. I got my order today, but only 1 box, with the rest cancelled, with a note that they cannot backorder balls.

So I checked out Midway. Hornady .454s are gone, no backorder. They did have Speer in stock so I ordered 10 boxes at $9.99 each.

That should keep me set for a while. I have a Lee .454 ball mold but it's either oversize or the alloy I used last time has some tin in it, because the balls dropped at .456 - .457. That's OK for my Ruger Old Army but unnecessarily hard to load in my Remingtons and Rogers & Spencer.

The online sources for black powder that I've checked have been depleted. I still have a decent supply from a bulk order from several years back.

Percussion caps have also been difficult to buy in the past couple of months. I was able to get a 2,500 count box of RWS #107+ caps last week from Midway, so I'm set for a while. Midway is now out of stock for all caps.

I'm still waiting to receive the percussion cap maker that I ordered at the start of the month from 22LRreloader.com.

Saturday, January 16, 2021

Combustible Paper Cartridges for Cap and Ball Revolvers

I have a sneaking suspicion that more than a few preppers have added a cap and ball revolver or two to their arsenals. Although obsolete since the 19th Century, they are still deadly weapons and when setup and loaded correctly, they are a reliable for six shots. On top of that, in most states they are available legally without completing any paperwork or submitting to a background check.

Most contemporary shooters load their cap and ball revolvers with cap and ball. However, in the 19th Century, especially in the Civil War, they were commonly loaded with combustible paper cartridges. These allow you to load them a lot faster and reduce the amount of gear required for you to take to the range or the field for a shooting session.


Over on Blog O-Stuff, I put up a post about making combustible paper cartridges for cap and ball revolvers. Check it out.