Tonight I ordered 100 gallon sized mylar bags, along with 100 O2 absorbers, as mentioned in my last post. We'll put some of the rice I purchased on Monday in canisters but at least half of it will get sealed in the bags to stay fresh until we get to eating it. I'll have plenty of bags left over, which I plan to fill with other bulk foods to be purchased in the near future.
I ordered the bags and O2 absorbers from Sorbent Systems. They have a page here which shows how to seal the bags using a regular iron, for those of us without commercial grade sealers.
Thursday, April 24, 2008


Tuesday, April 22, 2008
Load Up The Pantry
From the Wall Street Journal:
Load Up the Pantry
April 21, 2008 6:47 p.m.I don't want to alarm anybody, but maybe it's time for Americans to start stockpiling food.
No, this is not a drill.
You've seen the TV footage of food riots in parts of the developing world. Yes, they're a long way away from the U.S. But most foodstuffs operate in a global market. When the cost of wheat soars in Asia, it will do the same here.
Reality: Food prices are already rising here much faster than the returns you are likely to get from keeping your money in a bank or money-market fund. And there are very good reasons to believe prices on the shelves are about to start rising a lot faster.
Full article here.
I am currently looking into getting setup to seal bulk purchases into mylar bags with oxygen absorbers, so they don't spoil before we use them. I'll be posting about that. In the meantime, another good read is this food storage FAQ.Monday, April 21, 2008
Food Rationing Hitting the US?
Americans hear about food shortaged in the Third World frequently, and to our credit, we're the most generous people in the world when it comes to sending foreign aid. But food rationing in the US hasn't been an issue here for decades.
Now comes this story:
After reading the story above, I took a trip over to our local BJ's Wholesale Club (similar to Costco). There seemed to be no shortage at this particular store, but while I was there I figured it would be a good idea to pick up a couple bags of rice, along with some other staples.
No reason to panic yet, but this bears watching.
Now comes this story:
Full story here.Major retailers in New York, in areas of New England, and on the West Coast are limiting purchases of flour, rice, and cooking oil as demand outstrips supply. There are also anecdotal reports that some consumers are hoarding grain stocks.
At a Costco Warehouse in Mountain View, Calif., yesterday, shoppers grew frustrated and occasionally uttered expletives as they searched in vain for the large sacks of rice they usually buy.
After reading the story above, I took a trip over to our local BJ's Wholesale Club (similar to Costco). There seemed to be no shortage at this particular store, but while I was there I figured it would be a good idea to pick up a couple bags of rice, along with some other staples.
No reason to panic yet, but this bears watching.
Friday, April 18, 2008
Yaesu Update
Now that I've had my Yaesu FT-7800R in the truck for a little while I have a better idea of how it works. In a word: Great!
As I expected, it's a much more sensitive receiver than the VX-5RS handy talkie I'd been using, even with the same antenna. For example, I listen to the radio on my short drive to the train station each morning. It's common for me to pick up repeaters from Lancaster and even Harrisburg (I live just outside Philadelphia).
Last night I took my laptop with G4FHQ's FTB-7800 programming software out to the truck, and added a bunch of repeaters in anticipation of this weekend's trip down to Arlington, VA. After loading in the settings for repeaters in MD, DC, and VA, I had the radio scan through them. I picked up traffic from a couple repeaters in Baltimore. Remarkable! I haven't yet tried hitting those repeaters and suspect that I'll be able to listen to them from a much further distance than I can hit them with my transmissions, but this is still impressive performance.
Tuesday, April 08, 2008
Spyderco Sharpmaker and Gerber Diamond Pocket Sharpener
Part of every toolkit should be at least one sharp knife. Knives of course wear with use and require sharpening. Up until now, I've relied mostly on traditional sharpening stones or a Smith's sharpening system (similar to a Lansky).
Last weekend I asked my father to bring over his Spyderco Sharpmaker for me to try. I used it to touch up a couple of blades and was impressed with how easy and fast it was to get a good edge. So, Sunday night I ordered one from Knifecenter.com. While I was on their site I also ordered a Gerber Diamond Pocket Sharpener. UPS dropped them off today.
Before using the Spyderco I read the included written instructions and viewed the instructional DVD.
The Sharpmaker consists of a base, a set of medium grit ceramic rods, a set of fine grit ceramic rods, and two brass rods to act as handguards. When assembled the ceramic rods are set to give you a selectable edge angle of either 30 or 40 degrees. (See a picture here.) You hold the blade vertically and move it against the rods.
After dinner, I used it to sharpen several of my knives: a Case Moose with chrome vanadium blades, an Ontario RAT-3 with a 1095 carbon steel blade, a Benchmade Griptilian with a 440C stainless blade, a Schrade LB7 Bearpaw with a stainless blade, and a Mora Swedish Army Knife with a stainless blade. None of these knives were dull to start with, but now they're sharp. I had especially good results with the RAT-3, the clip blade on the Moose, and the Griptilian, all of which are now like razors (and I have the bald spots on my forearm to prove it).
I am impressed with not only the ease of using the Sharpmaker, but also with the speed one can put a sharp edge on a knife with it. Also, as shown in the video, the tool can be used to sharpen other implements like axes, serrated blades, and even scissors.
It's much easier to keep the blade vertical and move it against an angled surface, than it is to keep the blade at a constant angle and move it against a horizontal stone. This is a large part of why the Sharpmaker works so well.
The Gerber Sharpener consists of two sets of diamond grit coated rods, one fine and one coarse, in a plastic handle. You place the blade in the "V" between the rods and draw it through. It works fine for quicky sharpening jobs in the field. I used the fine rods to touch up the large blade on my Victorinox Explorer SAK, and it worked well.
Freehand sharpening with a stone remains a valuable skill. However, for routine sharpening of most knives, I'm going to use the Sharpmaker because I get better results with it than anything else I've tried. The Gerber sharpener will go into my possibles bag after I add a lanyard of some bright yellow string, to help me find it if I drop it. It weighs almost nothing and will serve to put a usable edge on a knife if it gets dull in the field.
Remember, dull knives are dangerous. They require you to exert more effort to cut something, which increases the likelihood you'll slip and cut yourself. Sharp knives are much safer. The Spyderco and Gerber are good tools to help you keep your knives sharp.
Last weekend I asked my father to bring over his Spyderco Sharpmaker for me to try. I used it to touch up a couple of blades and was impressed with how easy and fast it was to get a good edge. So, Sunday night I ordered one from Knifecenter.com. While I was on their site I also ordered a Gerber Diamond Pocket Sharpener. UPS dropped them off today.
Before using the Spyderco I read the included written instructions and viewed the instructional DVD.
The Sharpmaker consists of a base, a set of medium grit ceramic rods, a set of fine grit ceramic rods, and two brass rods to act as handguards. When assembled the ceramic rods are set to give you a selectable edge angle of either 30 or 40 degrees. (See a picture here.) You hold the blade vertically and move it against the rods.
After dinner, I used it to sharpen several of my knives: a Case Moose with chrome vanadium blades, an Ontario RAT-3 with a 1095 carbon steel blade, a Benchmade Griptilian with a 440C stainless blade, a Schrade LB7 Bearpaw with a stainless blade, and a Mora Swedish Army Knife with a stainless blade. None of these knives were dull to start with, but now they're sharp. I had especially good results with the RAT-3, the clip blade on the Moose, and the Griptilian, all of which are now like razors (and I have the bald spots on my forearm to prove it).
I am impressed with not only the ease of using the Sharpmaker, but also with the speed one can put a sharp edge on a knife with it. Also, as shown in the video, the tool can be used to sharpen other implements like axes, serrated blades, and even scissors.
It's much easier to keep the blade vertical and move it against an angled surface, than it is to keep the blade at a constant angle and move it against a horizontal stone. This is a large part of why the Sharpmaker works so well.
The Gerber Sharpener consists of two sets of diamond grit coated rods, one fine and one coarse, in a plastic handle. You place the blade in the "V" between the rods and draw it through. It works fine for quicky sharpening jobs in the field. I used the fine rods to touch up the large blade on my Victorinox Explorer SAK, and it worked well.
Freehand sharpening with a stone remains a valuable skill. However, for routine sharpening of most knives, I'm going to use the Sharpmaker because I get better results with it than anything else I've tried. The Gerber sharpener will go into my possibles bag after I add a lanyard of some bright yellow string, to help me find it if I drop it. It weighs almost nothing and will serve to put a usable edge on a knife if it gets dull in the field.
Remember, dull knives are dangerous. They require you to exert more effort to cut something, which increases the likelihood you'll slip and cut yourself. Sharp knives are much safer. The Spyderco and Gerber are good tools to help you keep your knives sharp.
Sunday, April 06, 2008
Some Lessons Learned From Paintball
Yesterday I went up to Skirmish USA in the Poconos to play paintball for a friend's birthday. Aside from a chance to run around in the woods and get muddy, I tried to approach it as a force-on-force learning experience. Keeping in mind that there are certain rules which decrease realism (e.g., hits below the elbow or knee, or on the gun don't count, the paintball guns hold a lot more ammo than any gun that's not belt fed), and the fact that rather than a bunch of trained operators each team was more like an uncoordinated mob, I think there were a few lessons to be gained as to the use of *real* force. In the end, it was still an exercise in which two groups of "armed" people were trying to shoot each other.
In no particular order:
1. People hide behind things when you shoot at them. If this was a real firefight, I'd want a round that offers good penetration. E.g., 7.62x39 or 7.62 NATO. I've witnessed multiple 5.56x45 bullets get stopped cold by a sapling which was maybe 3" in diameter. For home defense this may be an advantage. For combat, give me something that will turn cover into concealment.
2. Peering out from concealment is frequently enough to get you shot in the head. I think I got hit in the face/head 3 or 4 times yesterday.
2(a) Frequently, the only shot you may get on an opponent is of a head or other body part sticking out. For anything further than 20 yards, you're going to want a rifle, unless you have a shotgun with slugs and you can shoot it as well as a rifle. I hope to have a rifle if I ever get in a firefight.
3. Even when behind cover or concealment, frequently you will get shot by someone you didn't know was around.
4. That said, it's safer to stay hidden than to try closing with your enemy. Let him come to you and you'll survive longer.
5. When operating in thick woods or a built up area, there may be 40 people within an acre or two, and you may still not see anybody, friend or foe. The same applies if it isn't a paintball game. Some kind of short range radios for tactical commo would be *very* valuable.
6. Gloves are good. They allow you to drop to the ground without scraping your hands and provide limited protection against glancing blows. I wore Mechanix brand mechanic's gloves, which are thin enough to allow you to be reasonably dextrous. I wore these gloves in a practical carbine match back in December and they worked well for real shooting (I won the iron sight class, AAMOF). I got them at Lowe's.
7. Well-aimed suppressive fire can keep your opponent pinned down so he can't shoot you or your buddy. This is NOT "spray and pray." Rather, if you see an enemy behind cover, you can put rounds close to him, which will prevent him from poking out at you. Obviously, civilians don't usually have the luxury of using suppressive fire in defensive situations, since we need to be careful about not shooting innocent bystanders. Unfortunately, your opponent may not care. Keep this in mind so you can adapt your tactics to fit the situation.
8. Plain black iron sights won't be easy to see in the woods or inside a dimly lit building, especially when it's overcast or near dawn or dusk. At a minimum, your front sight should have a white or orange insert or paint. A (real) gold or ivory bead, or fiber optic front sight will be much better. A red dot sight is better yet. Fiber optic sight inserts and illuminated optics are two of the best innovations in the gun world ever, IMHO.
9. Even though I wasn't in any kind of danger, this kind of exercise made my adrenalin level skyrocket. Unless you are the kind of person who's unfazed by anything, expect your heart to be pounding. This is less of a factor if you're in good physical shape. Unfortunately, I'm a fat middle aged guy.
10. If you wear glasses or goggles, get some anti-fog coating if it's at all humid. Until I got some "Fog[Tech]" wipes from the pro shop I couldn't see much because my glasses and protective mask kept fogging up. If you can't see, you can't fight.
10(a) If you wear protective goggles, pick ones that wrap around so they don't limit your peripheral vision. The masks supplied by Skirmish USA eliminated peripheral vision, which exacerbated my inability to keep track of my surroundings. OTH, this helped simulate the tunnel vision many people report in the aftermath of a real encounter.
11. When involved in a force-on-force encounter (real or simulated), getting shot is a very real possibility. There's a good chance you won't even see who shoots you. Unlike the movies where the hero gets shot in the arm but goes on to prevail, expect to get shot in the hands, arms, face, head, chest, back, butt, and groin.
11(a). Yes, I got hit a two or three times in the crotch. Thankfully, I was wearing my spare ammo carrier so that it covered up my boys, so it didn't hurt. If you decide to practice force-on-force with airsoft or paintball, wear protection down there.
12. "Too much ammo" is an oxymoron.
In no particular order:
1. People hide behind things when you shoot at them. If this was a real firefight, I'd want a round that offers good penetration. E.g., 7.62x39 or 7.62 NATO. I've witnessed multiple 5.56x45 bullets get stopped cold by a sapling which was maybe 3" in diameter. For home defense this may be an advantage. For combat, give me something that will turn cover into concealment.
2. Peering out from concealment is frequently enough to get you shot in the head. I think I got hit in the face/head 3 or 4 times yesterday.
2(a) Frequently, the only shot you may get on an opponent is of a head or other body part sticking out. For anything further than 20 yards, you're going to want a rifle, unless you have a shotgun with slugs and you can shoot it as well as a rifle. I hope to have a rifle if I ever get in a firefight.
3. Even when behind cover or concealment, frequently you will get shot by someone you didn't know was around.
4. That said, it's safer to stay hidden than to try closing with your enemy. Let him come to you and you'll survive longer.
5. When operating in thick woods or a built up area, there may be 40 people within an acre or two, and you may still not see anybody, friend or foe. The same applies if it isn't a paintball game. Some kind of short range radios for tactical commo would be *very* valuable.
6. Gloves are good. They allow you to drop to the ground without scraping your hands and provide limited protection against glancing blows. I wore Mechanix brand mechanic's gloves, which are thin enough to allow you to be reasonably dextrous. I wore these gloves in a practical carbine match back in December and they worked well for real shooting (I won the iron sight class, AAMOF). I got them at Lowe's.
7. Well-aimed suppressive fire can keep your opponent pinned down so he can't shoot you or your buddy. This is NOT "spray and pray." Rather, if you see an enemy behind cover, you can put rounds close to him, which will prevent him from poking out at you. Obviously, civilians don't usually have the luxury of using suppressive fire in defensive situations, since we need to be careful about not shooting innocent bystanders. Unfortunately, your opponent may not care. Keep this in mind so you can adapt your tactics to fit the situation.
8. Plain black iron sights won't be easy to see in the woods or inside a dimly lit building, especially when it's overcast or near dawn or dusk. At a minimum, your front sight should have a white or orange insert or paint. A (real) gold or ivory bead, or fiber optic front sight will be much better. A red dot sight is better yet. Fiber optic sight inserts and illuminated optics are two of the best innovations in the gun world ever, IMHO.
9. Even though I wasn't in any kind of danger, this kind of exercise made my adrenalin level skyrocket. Unless you are the kind of person who's unfazed by anything, expect your heart to be pounding. This is less of a factor if you're in good physical shape. Unfortunately, I'm a fat middle aged guy.
10. If you wear glasses or goggles, get some anti-fog coating if it's at all humid. Until I got some "Fog[Tech]" wipes from the pro shop I couldn't see much because my glasses and protective mask kept fogging up. If you can't see, you can't fight.
10(a) If you wear protective goggles, pick ones that wrap around so they don't limit your peripheral vision. The masks supplied by Skirmish USA eliminated peripheral vision, which exacerbated my inability to keep track of my surroundings. OTH, this helped simulate the tunnel vision many people report in the aftermath of a real encounter.
11. When involved in a force-on-force encounter (real or simulated), getting shot is a very real possibility. There's a good chance you won't even see who shoots you. Unlike the movies where the hero gets shot in the arm but goes on to prevail, expect to get shot in the hands, arms, face, head, chest, back, butt, and groin.
11(a). Yes, I got hit a two or three times in the crotch. Thankfully, I was wearing my spare ammo carrier so that it covered up my boys, so it didn't hurt. If you decide to practice force-on-force with airsoft or paintball, wear protection down there.
12. "Too much ammo" is an oxymoron.
Thursday, April 03, 2008
Listening to Katrina
Arfcom's ShaneS has started a new blog to share lessons he learned during the aftermath of Hurricane Katrina. I highly recommend it.
Pics of my New Yaesu FT-7800R Installation
I finally got my Yaesu FT-7800R 2M/70cm mobile installed in my 1997 Ford Expedition today. This is my second FT-7800R. I use another one as a base station.
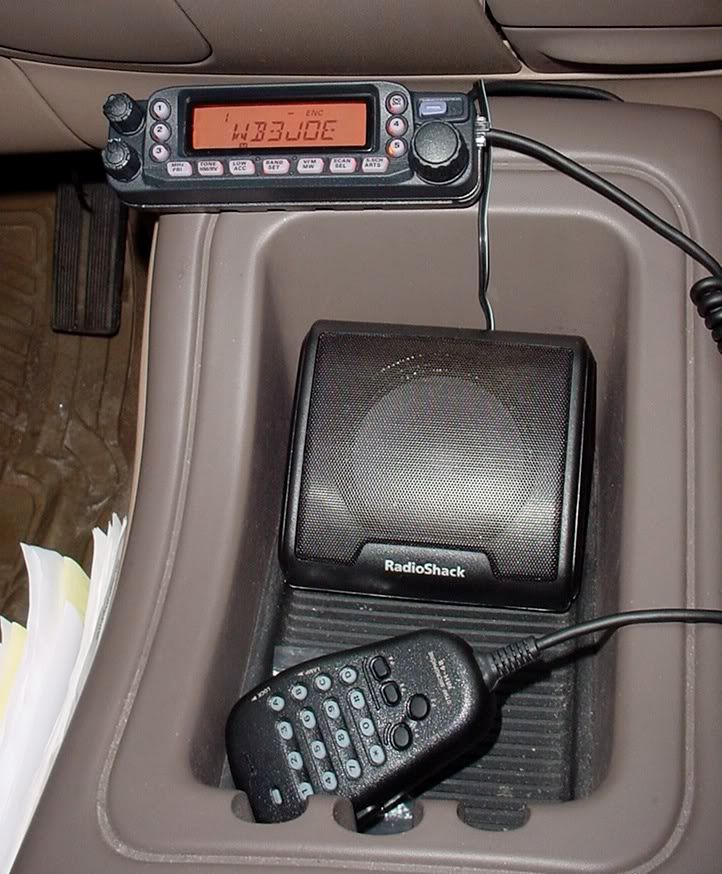
First, the control head mounted on the center console, mic, and Radio Shack speaker:
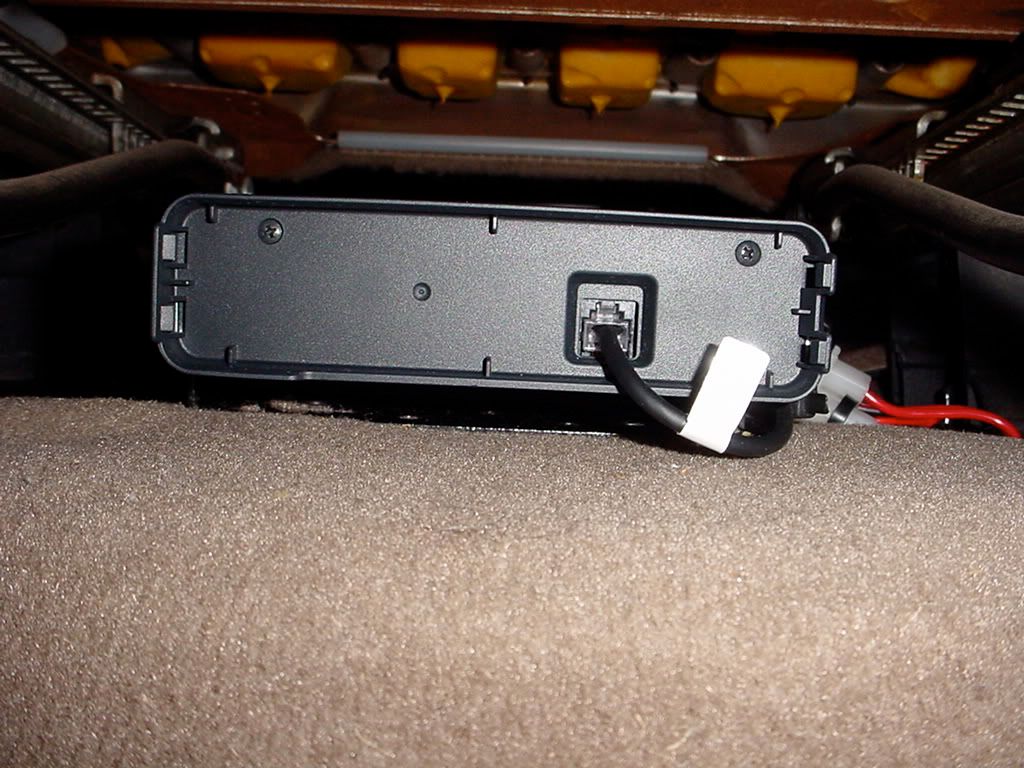
The body of the radio is mounted under the passenger side front seat. Front:
Back:
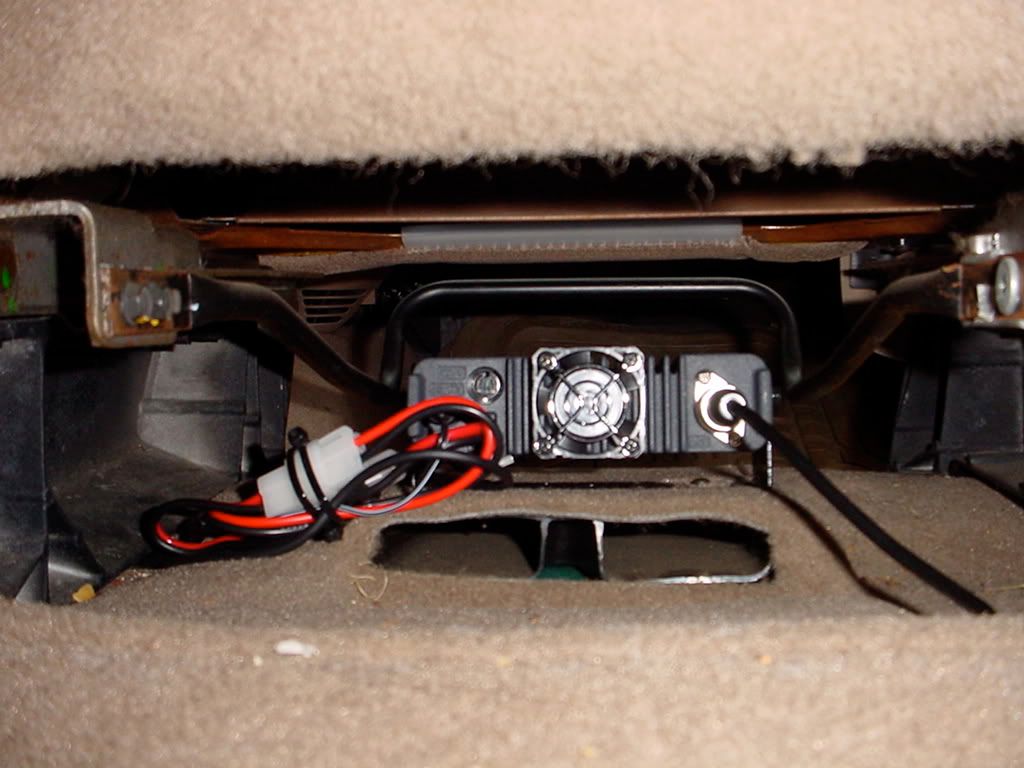
No antenna pics. I'm using a Diamond MR-77 mag mount, which I've had for awhile and used when I had my VX-5RS in the truck. It works great and allows me to tip it over in case I need to park in a garage. I've only used the new setup briefly but I've already received traffic on repeaters up to 50 miles away. Compared with the VX-5RS, this is going to give me greatly improved mobile communications capability.
I had Automotive Sound and Protection in Conshohocken, PA do the install. Cost was $80.
First, the control head mounted on the center console, mic, and Radio Shack speaker:
The body of the radio is mounted under the passenger side front seat. Front:
Back:
No antenna pics. I'm using a Diamond MR-77 mag mount, which I've had for awhile and used when I had my VX-5RS in the truck. It works great and allows me to tip it over in case I need to park in a garage. I've only used the new setup briefly but I've already received traffic on repeaters up to 50 miles away. Compared with the VX-5RS, this is going to give me greatly improved mobile communications capability.
I had Automotive Sound and Protection in Conshohocken, PA do the install. Cost was $80.
Monday, March 31, 2008
Getting my new radio installed
This morning I made an appointment for Thursday morning to drop off my truck at a local auto sound and alarm place to install my second Yaesu FT-7800R radio. I could probably do this myself but for under $100, it's worthwhile to me to pay someone else to handle it in an hour or so. It would probably take me quite a bit longer and no doubt I would wind up with a skinned knuckle or two.
Currently, I'm planning to have the main body of the radio installed underneath the passenger side front seat, connected to the control head on the dash via the Yaesu separation kit. Before I go buy an external speaker I want to see if the built-in speaker will be loud and clear enough. I suspect I'll wind up with an external speaker, though.
For the time being I'll still use my Diamond MR77 mag-mount antenna. It works quite well and I like the fact that I can easily remove it if I need to park in a garage, or just want to be a bit more stealthy. At some point, I may get an antenna installed on a mount near the lip of the hood. While not as stealthy as a mag mount that's removed, it will at least avoid the height problem of a roof-mounted antenna.
Tonight I'll putz around with how I have the various repeaters programmed in and try to group them logically in the FT-7800R's memory banks. E.g., one for Eastern PA, one for Central/Western PA, one for NJ, and one to cover the area between here and the DC metropolitan area. I have family in Arlington, VA, and we go there or visit my wife's family in MD a couple times each year, so I'd like to have those repeaters programmed in and ready.
Currently, I'm planning to have the main body of the radio installed underneath the passenger side front seat, connected to the control head on the dash via the Yaesu separation kit. Before I go buy an external speaker I want to see if the built-in speaker will be loud and clear enough. I suspect I'll wind up with an external speaker, though.
For the time being I'll still use my Diamond MR77 mag-mount antenna. It works quite well and I like the fact that I can easily remove it if I need to park in a garage, or just want to be a bit more stealthy. At some point, I may get an antenna installed on a mount near the lip of the hood. While not as stealthy as a mag mount that's removed, it will at least avoid the height problem of a roof-mounted antenna.
Tonight I'll putz around with how I have the various repeaters programmed in and try to group them logically in the FT-7800R's memory banks. E.g., one for Eastern PA, one for Central/Western PA, one for NJ, and one to cover the area between here and the DC metropolitan area. I have family in Arlington, VA, and we go there or visit my wife's family in MD a couple times each year, so I'd like to have those repeaters programmed in and ready.
Saturday, March 29, 2008
FTB7800 Radio Programming Software
Awhile ago I'd purchased Yaesu's programming kit for their FT-7800R radio. The kit consisted of ADMS programming software and a cable. The software works but it's clunky. Recently, I tried to install it on my MacBook Pro's Windows XP Parallels virtual machine, and it would not accept the serial number.
So, I decided to spring for G4HFQ's excellent FTB7800 programming app. I downloaded it, sent in my order, and received a license within minutes.
I was able to install FTB7800 inside the XP VM, but couldn't get it to talk to the radio. I'm using a Keyspan USA-19HS USB-to-serial adapter, since the Mace doesn't have a serial port. The VM sees the adapter but I'm not getting FTB7800 to see the COM port. (In contrast, I was able to get this working fine with Yaesu's software for the VX-5.)
As an interim measure until I get this working on the Mac, I installed FTB7800 on my old Compaq Presario 710US laptop, which I keep around for one of my kids to use. I still need to use the Keyspan adapter, since it too lacks any serial ports.
Initially, installation of the Keyspan failed with an error, but it was usable after a reboot. I was then able to read my FT-7800R's memory, and import a list of PA repeaters which I had created using the ARRL Travel Plus for Repeater software, which is installed in the Mac's VM. (I transferred the FTP7800R installer, along with several repeater lists from the Mac to the Compaq using a thumb drive.)
I now have over 200 repeaters plugged into the 7800R. Tomorrow, I'll fire up the second 7800R which I bought earlier this month, program it with the repeater list (and probably some more), then hopefully get it mounted in my truck in the coming week.
Compared with Yaesu's software, FTB7800 has a better user interface. Just as important, G4HFQ's customer support is simply outstanding. I had a question about importing repeater lists in the app yesterday, sent him an email, and got back a helpful reply in about an hour or so.
So, I decided to spring for G4HFQ's excellent FTB7800 programming app. I downloaded it, sent in my order, and received a license within minutes.
I was able to install FTB7800 inside the XP VM, but couldn't get it to talk to the radio. I'm using a Keyspan USA-19HS USB-to-serial adapter, since the Mace doesn't have a serial port. The VM sees the adapter but I'm not getting FTB7800 to see the COM port. (In contrast, I was able to get this working fine with Yaesu's software for the VX-5.)
As an interim measure until I get this working on the Mac, I installed FTB7800 on my old Compaq Presario 710US laptop, which I keep around for one of my kids to use. I still need to use the Keyspan adapter, since it too lacks any serial ports.
Initially, installation of the Keyspan failed with an error, but it was usable after a reboot. I was then able to read my FT-7800R's memory, and import a list of PA repeaters which I had created using the ARRL Travel Plus for Repeater software, which is installed in the Mac's VM. (I transferred the FTP7800R installer, along with several repeater lists from the Mac to the Compaq using a thumb drive.)
I now have over 200 repeaters plugged into the 7800R. Tomorrow, I'll fire up the second 7800R which I bought earlier this month, program it with the repeater list (and probably some more), then hopefully get it mounted in my truck in the coming week.
Compared with Yaesu's software, FTB7800 has a better user interface. Just as important, G4HFQ's customer support is simply outstanding. I had a question about importing repeater lists in the app yesterday, sent him an email, and got back a helpful reply in about an hour or so.
Thursday, March 27, 2008
Victorinox Explorer
Yesterday I received in the mail from Amazon a Victorinox Explorer Swiss Army Knife. It's a four-layer SAK with the following tools:
- Large blade
- Small blade
- Bottle opener with large screwdriver tip
- Can opener with small screwdriver tip
- Phillips head screwdriver
- Magnifier
- Scissors
- Corkscrew
- Awl with hole for sewing
- Multi-purpose hook
- Tweezers
- Toothpick
- Keyring
Sunday, March 23, 2008
Ontario RAT-3 Knife
Last week I picked up an Ontario RAT-3 knife from Knifecenter.com. I've posted a brief review with a couple of pictures over on The Rally Point.
Sunday, March 16, 2008
Marlin 336 Spare Parts Kit
In the past I've posted about the Marlin 336 as a good addition to your toolkit. It's rugged, reliable, and is chambered for rounds suitable for self protection or hunting medium-sized game.
One of the reasons that I prefer the Marlin over the Winchester 94, its main competitor, is that the Marlin is much easier to perform maintenance upon. For example, to field strip the Marlin all you need to do is remove the finger lever screw, remove the lever, then pull the bolt out the back of the receiver (watch for the ejector falling out when you do this). In contrast, the Winchester is not easily field stripped.
A possible downside to this ease of disassembly is that because you're more likely to have the gun apart, the likelihood that you'll lose a small part is increased. And even if you never lose any small pieces, it's possible for them to wear out or break. So, keeping some spares on hand is a very good idea if a Marlin 336 is part of your serious toolkit.
Last night I ordered from Brownells several parts to put up in an ammo can with spares for other guns in my collection. I ordered items 1 through 7, below.
I've listed the spare magazine spring and tube because it is possible to wear out the spring or dent the tube. Doing the latter might damage the spring as well. I regard this as less likely than losing other parts so I held off on these for now.
It is my opinion that you should have a spare parts kit for any firearm which you include as a "survival gun." Even if you're not expecting TEOTWAWKI, parts breakage may occur at the most inopportune time, rendering your gun inoperative.
Along with the spare parts, you need the proper tools to work on your guns. You don't need a complete gunsmith's toolkit, but the following items are a good start:
Marlin 336 Spare Parts List with Brownells Stock Numbers and Prices as of 3/15/08
1. Finger lever screw. #550-301-192 $2.73
2. Ejector w/spring #50-501-168 $10.18
3. Extractor. #550-301-169 $6.01
4. Firing pin, rear. #550-401-199 $6.64
5. Firing pin, front. #550-000-588. $11.33
6. Firing pin spring. #550-401-295 $2.73
7. Firing pin retaining pin. #550-420-299. $2.73.
Optional:
8. Spare mag spring. #550-401-395. $6.30
9. Spare mag tube. #550-000-042. $16.53
I've listed the spare magazine spring and tube because it is possible to wear out the spring or dent the tube. Doing the latter might damage the spring as well. I regard this as less likely than losing other parts so I held off on these for now.
It is my opinion that you should have a spare parts kit for any firearm which you include as a "survival gun." Even if you're not expecting TEOTWAWKI, parts breakage may occur at the most inopportune time, rendering your gun inoperative.
Along with the spare parts, you need the proper tools to work on your guns. You don't need a complete gunsmith's toolkit, but the following items are a good start:
- Screwdriver with interchangeable, replaceable bits which properly fit gun screws. Use hollow ground bits for flat screws. Don't forget hex and Torx bits, if you need them. I like the Lyman Mag Driver.
- A set of gunsmith's punches and a mallet with a brass head and a non-marking nylon head. Again, Lyman makes a good set.
- Non-making inserts for a vice, or some kind of a clamp to hold guns while you're working on them.
Wednesday, March 12, 2008
Mountain House Chicken & Rice
Tonight I tried out one of the freeze dried meals I bought last weekend at REI. I picked the Mountain House Chicken and Rice. This comes in a ziploc pouch. To prepare, you pour in 12 oz. of boiling water, seal the bag, and wait about 8 or 9 minutes.
To make the trial a bit more interesting, I boiled the water in an Olicamp Space Saver cup on an Esbit stove (both from my possibles bag). Based on past experience with the Esbit, I used two fuel tablets and also covered the cup with a piece of aluminum foil.
It took about 6 minutes for the water to boil. The Esbit tabs were still burning, lasting for about 10 minutes total.
I followed the directions by pouring in the boiling water, sealing the pouch, and waiting about 8 or 9 minutes. Then open, stir, and eat.
It was quite tasty. There wasn't a lot of chicken, rather, it was mostly rice. However, I found it to be pretty filling (the Newcastle I drank with it helped, I'm sure).
Freeze dried meals like this one have a few advantages: they are light, can be prepared in their containers by adding boiling water, and they have a long shelf life (at least 7 years).
On the downside, you need to be able to provide boiling water, which of course requires not only the water but a way to boil it. They are also high in sodium, which can be bad for those on restricted diets.
For me the good points outweigh the bad, so I'll probably pick up some more.
Sunday, March 09, 2008
New Toys With My REI Dividend
REI dividends are out and this year I managed to rack up $47 worth. I also had a 20% off one item coupon. Today I went over to the local store and spent it (and then some). Anyway, I bought:
I haven't tried the Mountain House meals yet, and I got the Space Pen just because I thought it was neat.
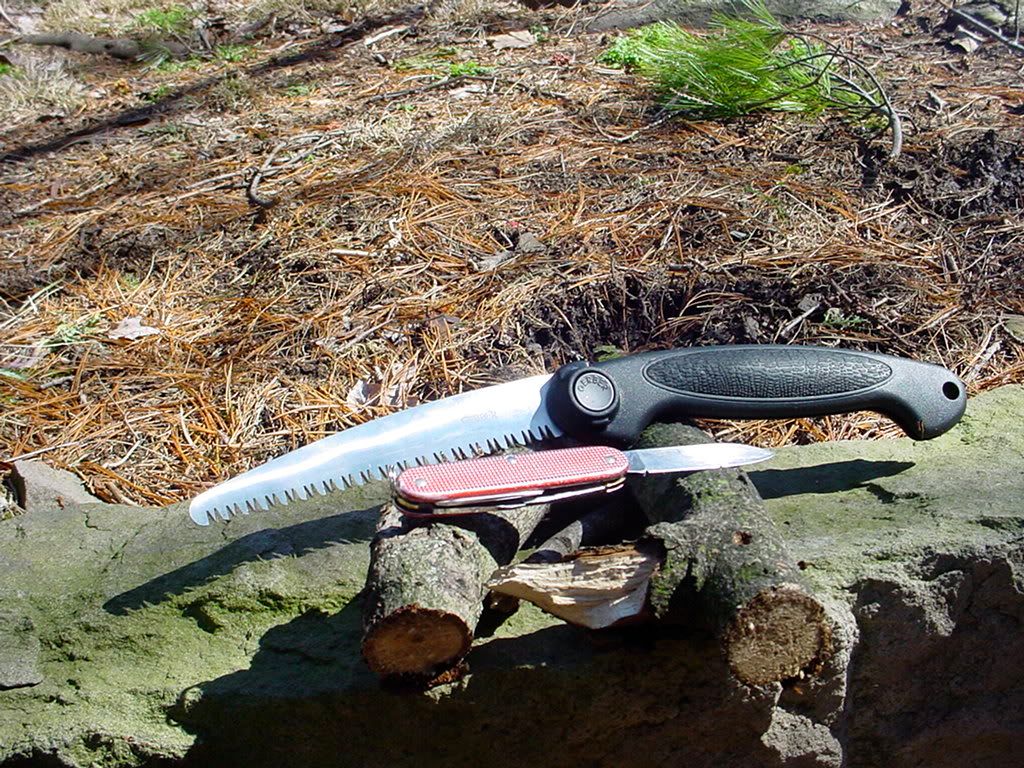
- A Gerber Gator folding saw
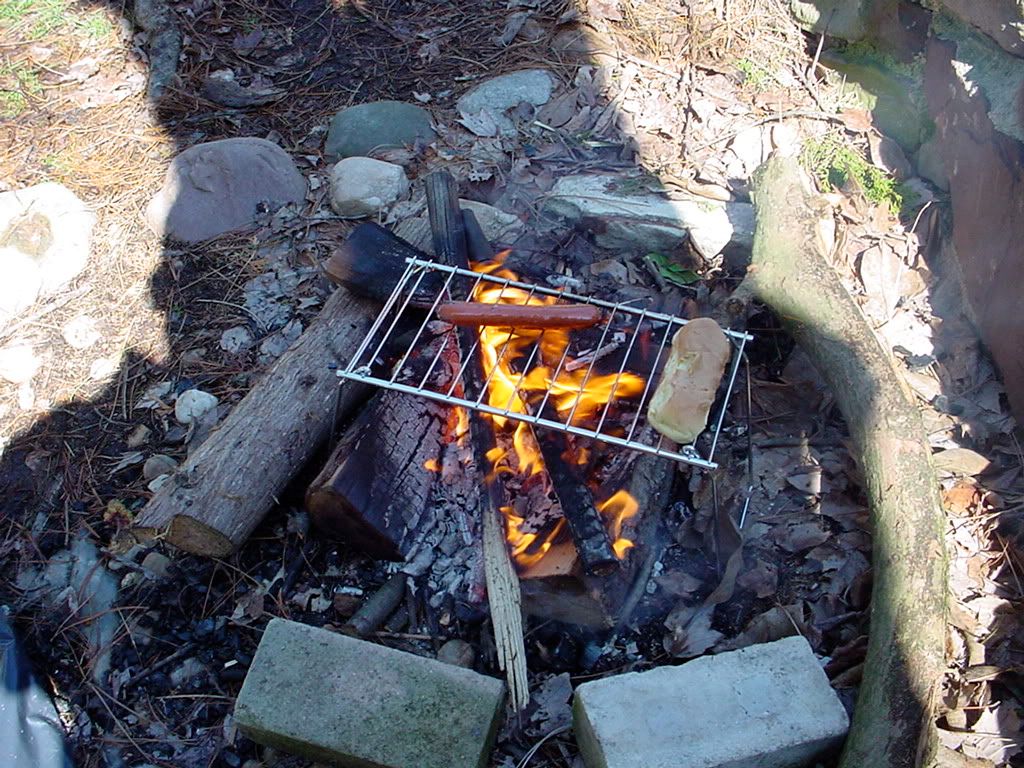
- An Open Country Explorer Grid 12" x 6" folding grill
- A box of Lightning Nugget fire starters
- A pack of REI Storm Proof matches
- A Fisher Space Pen (telescoping model)
- A couple Mountain House freezed dried meals
I've used the Storm Proof matches for awhile. They burn like mini-flares and will not go out even if you drop them into snow. I once tested this by dropping a lit one into about a foot of snow. It melted its way down to the ground without going out.
The Lightning Nugget fire starters appear to be pine chips that are soaked in paraffin, then formed into hemispheres. The manufacturer claims they'll burn for up to 15 minutes. To use, the instructions on the box tell you to place one on the ground, round side down. Then light it with a match and wait until its going well before placing your kindling on it. I used a bit of Coughlin's tinder (wax-impregnated cotton) ignited with a fire steel to light it. It worked well, and I plan to add two or three Nuggets to my kit, each one wrapped in some aluminum foil to protect them in storage and shield them from damp ground in use.
I've wanted to try one of the Gerber Gator folding saws for awhile now, having read many favorable reviews. (HERE is a pic I took, along with my Victorinox Pioneer for scale.) The blade is fairly thin, which when combined with the plastic handle, makes it very light weight. The teeth are pretty aggressive and designed to cut on the pull stroke. Some reviews I saw on REI's web page reported people breaking the saw. I think what may have happened was that those users tried to cut on the push stroke, bending the blade and wrecking the hinge. However, if used as designed, it looks like it should be fine.
In my brief testing, the Gator cut both hard and soft wood well, requiring less effort to do so than using a large knife would. Using a saw is also a bit safer than hacking away with a big knife. As one part of a modern "Nessmuk trio," one of these makes a lot of sense, in my opinion. Finally, at $15.95, the Gerber is cheaper than most large knives.
Another item which I've had my eye on for a little while is the Open Country folding grill (PIC). Even though it's small, it's easier to cook over an open fire by using a grill than by impaling the food on sticks or putting a vessel right in the fire. The OC Explorer Grid seems well made for the price (about $11) and strong enough to hold a kettle or small pan. It didn't come with any kind of a case, so I'm going to make something up with some scrap denim or muslin. A leg from an old pair of jeans might be big enough. That way, anything it gets packed with after being used will stay clean.
I haven't tried the Mountain House meals yet, and I got the Space Pen just because I thought it was neat.
Monday, February 04, 2008
A USB Thumb Drive for Emergencies
Like many people nowadays, my life involves dealing with a lot of data. Especially important items include the many usernames, logins, and account numbers for loans, credit cards, and various websites which I use. I keep a spreadsheet in an encrypted file on my laptop to keep track of them. But what happens if my laptop is stolen, lost, or destroyed?
For awhile I've carried a copy of the spreadsheet along with other important info in encrypted form on a USB flash drive on my keyring. This way, it's always with me even if the SHTF. The drive I've been using has been a Microcenter bulk 1 GB stick, and it's worked just fine.
The prices on USB thumb drives have plummeted over the past year. So, over the weekend I bought an 8 GB USB flash drive at Microcenter. Like my old stick, it's one of their bulk, house-brand units and the cost was only $29.99 + tax.
I keep only the most essential data on the USB stick, and I formatted the stick as FAT32 so that it can be read in any PC or Mac I may need to use. It's organized like so:
Root directory
-A plain text file with contact info, including next of kin and the number for my childrens' daycare.
Documents folder
-Backup of my Safari browser bookmarks
-Backup of my OS X Addressbook
-Backup of my iCal database
-Separate encrypted images for financial data, logins, client data
Installer files folder
-Contains installation files for several Windows programs (AVG Antivirus, Firefox, Foxit PDF reader, Spybot, and the anti-spyware hosts file from MVPS.org)
Mac Portable Apps folder (apps that can run directly from the USB stick when connected to a Mac running OS X)
-Portable Firefox
-Portable AdiumX instant messenger client
Windows Portable Apps folder (apps that can run directly from the USB stick when connected to a Windows PC)
-PuTTy (a telnet and SSH client)
-Portable Firefox
-Pidgin Portable instant messenger client
Over 6 GB are still free.
Running applications from the USB drive is quite a bit slower than from a hard disk, but this isn't for regular use. Since flash memory has a limited number of read/write cycles, and because I don't want potentially sensitive information saved in an unencrypted folder on the thumb drive, I configured both Firefox installations to not cache files locally.
The new thumb drive has replaced my old one in my pocket. It rides on a keyring along with a Victorinox Rambler SAK, a Countycomm.com Peanut Lighter, and a Countycomm.com SO-ARES LED light.
For awhile I've carried a copy of the spreadsheet along with other important info in encrypted form on a USB flash drive on my keyring. This way, it's always with me even if the SHTF. The drive I've been using has been a Microcenter bulk 1 GB stick, and it's worked just fine.
The prices on USB thumb drives have plummeted over the past year. So, over the weekend I bought an 8 GB USB flash drive at Microcenter. Like my old stick, it's one of their bulk, house-brand units and the cost was only $29.99 + tax.
I keep only the most essential data on the USB stick, and I formatted the stick as FAT32 so that it can be read in any PC or Mac I may need to use. It's organized like so:
Root directory
-A plain text file with contact info, including next of kin and the number for my childrens' daycare.
Documents folder
-Backup of my Safari browser bookmarks
-Backup of my OS X Addressbook
-Backup of my iCal database
-Separate encrypted images for financial data, logins, client data
Installer files folder
-Contains installation files for several Windows programs (AVG Antivirus, Firefox, Foxit PDF reader, Spybot, and the anti-spyware hosts file from MVPS.org)
Mac Portable Apps folder (apps that can run directly from the USB stick when connected to a Mac running OS X)
-Portable Firefox
-Portable AdiumX instant messenger client
Windows Portable Apps folder (apps that can run directly from the USB stick when connected to a Windows PC)
-PuTTy (a telnet and SSH client)
-Portable Firefox
-Pidgin Portable instant messenger client
Over 6 GB are still free.
Running applications from the USB drive is quite a bit slower than from a hard disk, but this isn't for regular use. Since flash memory has a limited number of read/write cycles, and because I don't want potentially sensitive information saved in an unencrypted folder on the thumb drive, I configured both Firefox installations to not cache files locally.
The new thumb drive has replaced my old one in my pocket. It rides on a keyring along with a Victorinox Rambler SAK, a Countycomm.com Peanut Lighter, and a Countycomm.com SO-ARES LED light.
Monday, January 14, 2008
Sunday, January 06, 2008
Follow up on Debris Shelter
We got a light rain last night which allowed me to see how good of a shelter I made yesterday. Pretty good as it turns out. I went out back this morning and checked the ground underneath the shelter to see how damp it was.
Near the entrance it was damper than it was yesterday, but back underneath it was about the same as yesterday afternoon. An "eve" extending over the entrance would've helped.
Another way to improve this kind of shelter is to use heavy duty contractor garbage bags or drum liners. Two or three of these weigh hardly anything and take up little room in your woods kit. You can use one as a tarp over the shelter frame for additional waterproofing and wind blocking, with another as a ground sheet. Arranged right, you could even use one as a door to keep rain and wind out of the entrance. I have one such bag tied to the outside of my possibles bag. I'll be adding a couple more.
Saturday, January 05, 2008
Backyard Bushcraft: Shelter Making
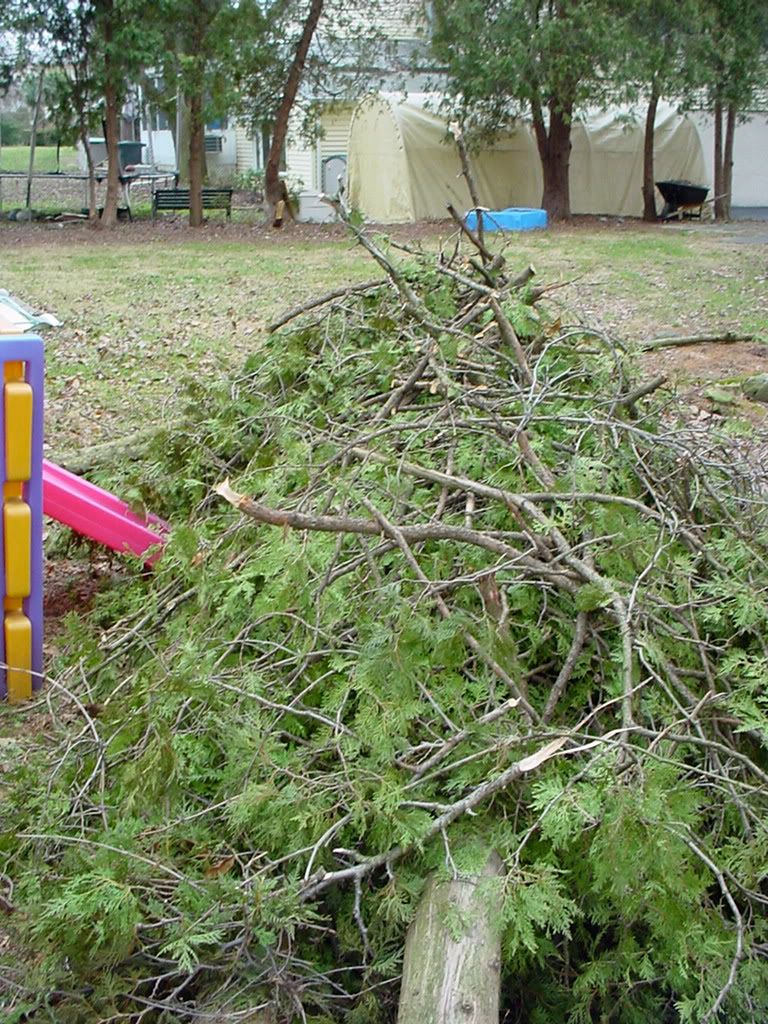
Last month, one of the arborviate trees in my yard blew down during a wind storm. Today I went out back to cut it up for disposal, when it occurred to me that I had the perfect opportunity to practice making a debris shelter. So, with golok and bow saw in hand, I made a debris shelter.
First, here's a picture of the tree after some cleanup, before I started making it into a shelter.

My daughters spent the morning out with their grandmother. When they got home they wanted to see what Daddy was doing in the backyard. They helped out a little before going inside for their nap. Here's a pic of them in the unfinished shelter.
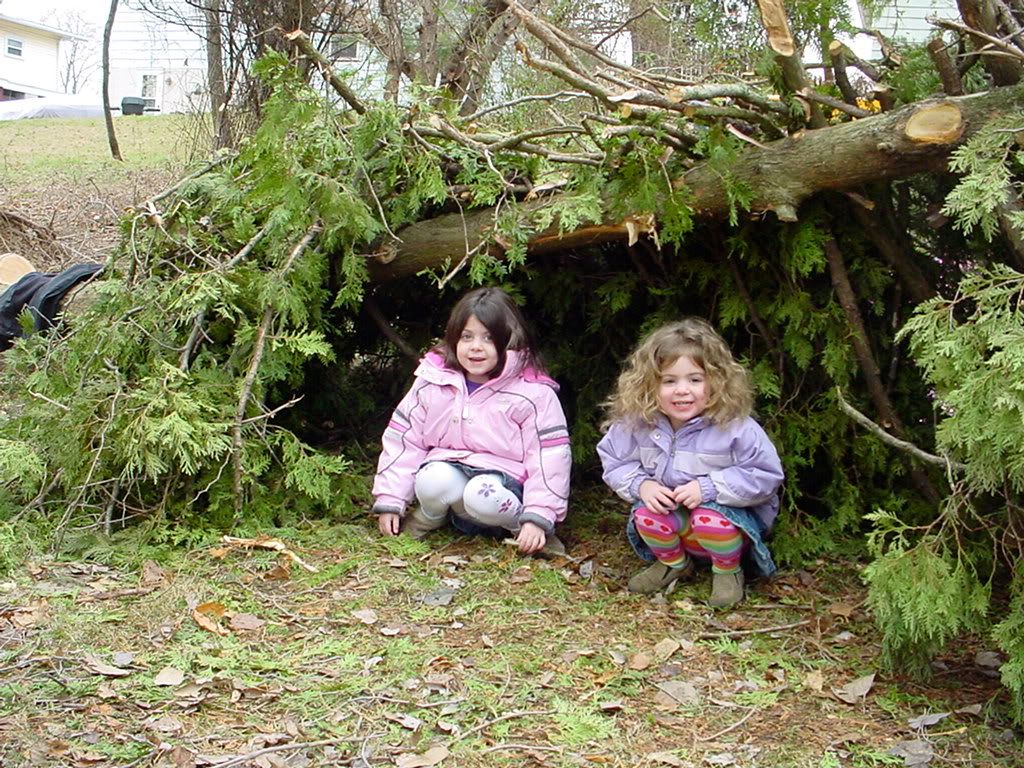
Finally, a few shots of the shelter from different angles.
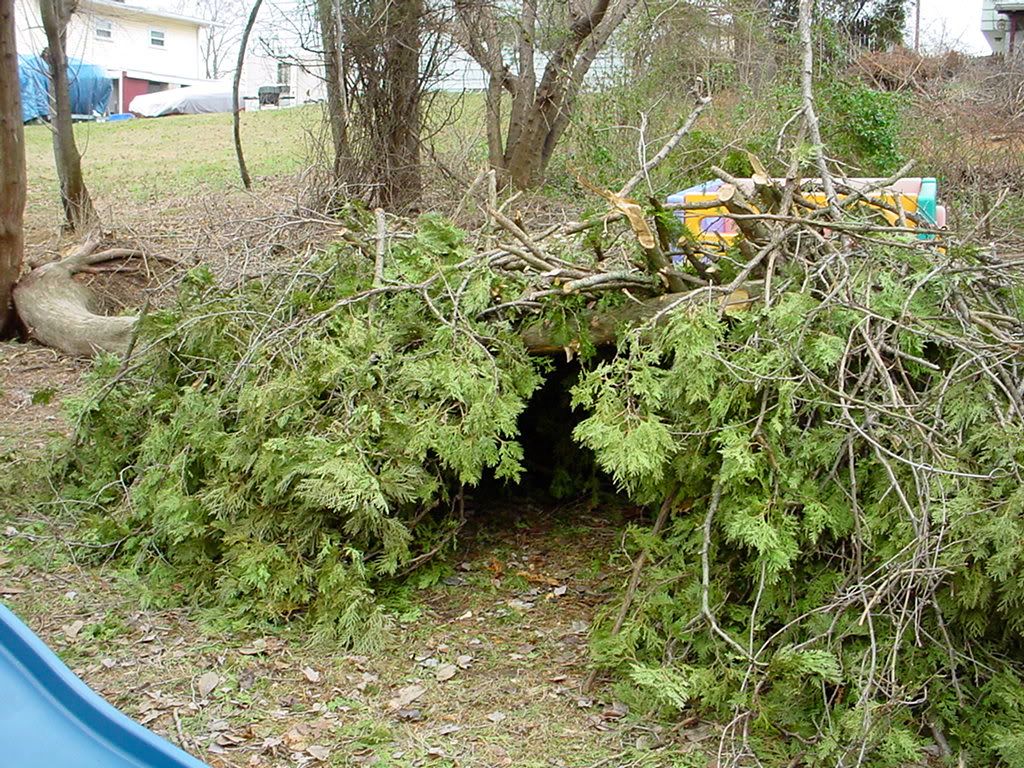
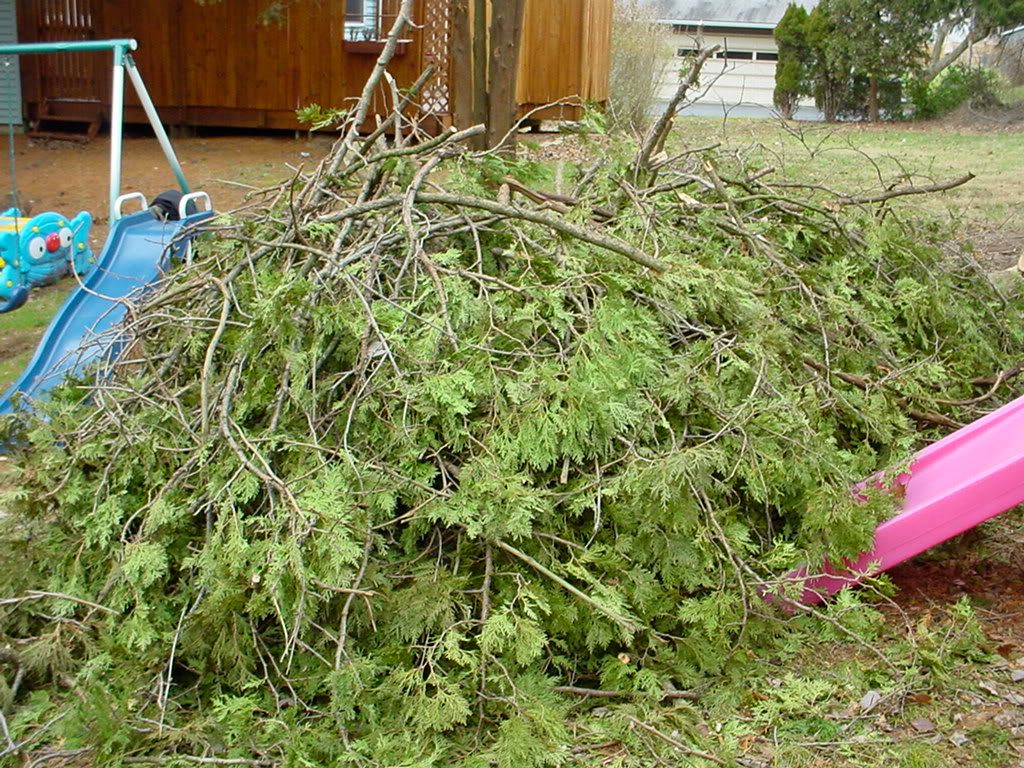
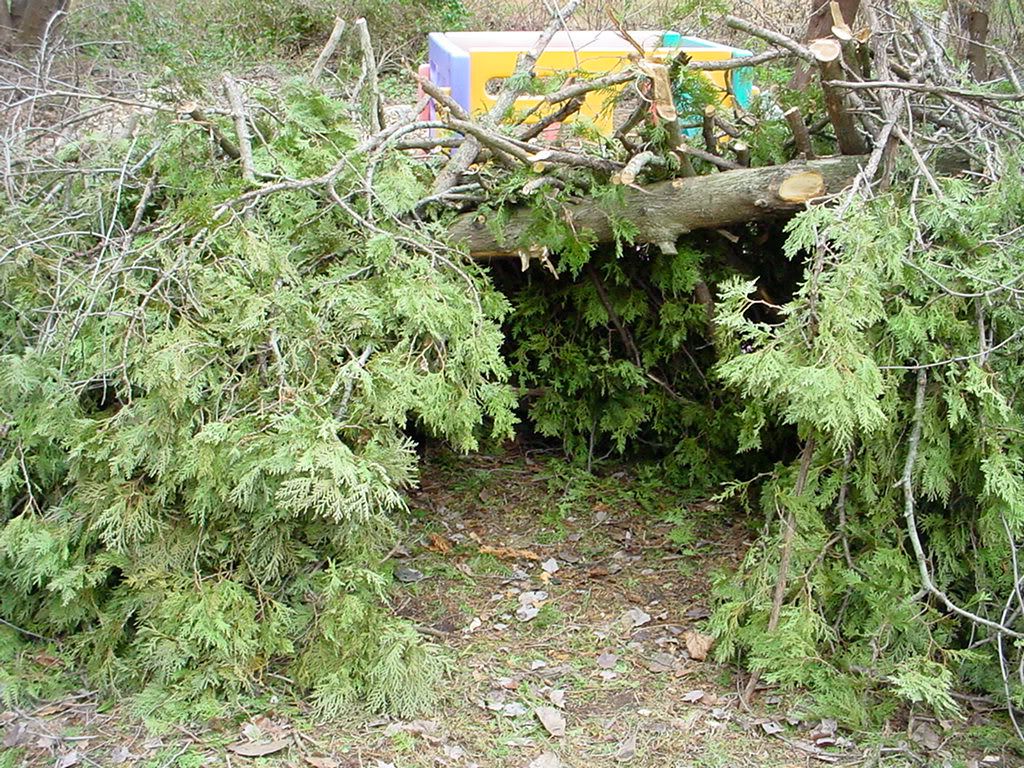
Finally, a few shots of the shelter from different angles.
If one got stuck out in the woods without a tent, e.g., due to a plane crash, car running off the road, loss of gear, etc., this kind of shelter can make the difference between making it and dying. It can provide insulation from the cold, if made thick enough can block rain and snow, and will help to block the wind. Just like I used a tree blown down in my backyard, you can often find trees in the woods that have blown down and which can be used as the basis of your shelter. For example, note how I used the tree as a ridge pole and leaned other branches against it.
Make sure that when covering the structure, you orient your thatch so that the twigs, leaves, or pine needles are pointed downwards. Also, start at the bottom then work your way up, overlapping the upper branches over the lower. Doing so encourages rain and meltwater to drain outside the shelter.
Don't make the shelter too large. Doing so will require more effort and will be harder to keep warm. On the other hand, as long as it's structurally sound it's probably impossible to put too much thatch on it. The more you use the more weather resistant it should be.
Make sure that when covering the structure, you orient your thatch so that the twigs, leaves, or pine needles are pointed downwards. Also, start at the bottom then work your way up, overlapping the upper branches over the lower. Doing so encourages rain and meltwater to drain outside the shelter.
Don't make the shelter too large. Doing so will require more effort and will be harder to keep warm. On the other hand, as long as it's structurally sound it's probably impossible to put too much thatch on it. The more you use the more weather resistant it should be.
Be careful about is locating the shelter where it'll have good drainage and where it's unlikely to have anything else fall on top of it.
Finally, this kind of shelter can be hard to see from afar. If you're trying to be found keep this in mind. If you're trying not to be found, so much the better.
Monday, December 24, 2007
Hexayurt Emergency Shelter
Now this is what I call innovative thinking. A hexayurt is a shelter that you can build out of 4'x8' insulation boards and some heavy duty tape. In the Arfcom thread linked below, another member posted a pic of a small hexayurt made from political campaign signs.
{H/T to EXPY37 at Arfcom for the heads up.}
Subscribe to:
Posts (Atom)

 Posts
Posts