(I wrote this up over a week ago and forgot to post it.)
December 9th and 10th I went deer hunting in Tioga County, PA, just south of the New York State line. Temperatures while we were there topped out at about 32*F/0*C, and dropped down to about 21*F/-6*C at night. There's usually a breeze blowing as well. We slept under a pavilion with two walls built but the ends open, temporarily covered with canvas tarps. At night we had a propane-fired patio heater to take the edge off the cold. In this post I want to offer some observations on how some of our gear worked.
STOVES
Don't trust old equipment, even if it's been tested recently, unless maintenance has been performed on it. My Coleman 425 camp stove made in 1979 was tested the previous weekend but failed on this trip. A seal blew so it wouldn't hold pressure, and leaked fuel.
One of my friends used an MSR Pocket Rocket canister stove with no problems. I keep a folding Esbit stove in my daypack for brewing tea or coffee when out in the field, but it didn't see any use on this trip. I've used it on past trips, however.
The Lixada wood gasifer stove I got in November worked OK for warming water. This is primarily a twig stove that is sold under various brand names on Amazon and eBay. Like all twig stoves it needs constant feeding to keep going. I wanted to try it this weekend with charcoal briquettes, since we always keep two or three bags up at our campsite.
Using briquettes, the Lixada stove was able to get water up to near-boiling but never to a full, rolling boil. This temp was good enough for filling the canteen I put in the bottom of my sleeping bag to keep warm, but not hot enough for oatmeal or coffee. Briquettes would work if you needed to simmer something in a pot or fry something in a pan. They burned for a long time.
I also tried the Lixada stove using fire starters made by filling a cardboard egg carton with oak shavings and paraffin wax. One of these would bring my MSR kettle to a rolling boil in only a few minutes. The main downside to these is that they'll leave your pot covered in so much soot it'll be darker than Spinal Tap's Black Album. These fire starters also burn out in about five minutes.
In one of his "longhouse" videos on YouTube, Evan Hill of Hill People Gear discusses your energy envelope. This pertinent because if you're backpacking, it may actually cost you less in energy to pack in a canister stove and fuel than a twig stove that you have to gather and prepare fuel for.
On future winter trips I'll make sure to have a functional Coleman stove and bring my Kovea Spider as a backup.
KEEPING WARM
SmartWool merino wool base layers are warm, help you manage moisture, and don't itch.
Windproof pants make a huge difference in staying warm. I continue to be pleased with my ORC Industries Level 5 PCU softshell trousers. I've had these for several years and they've been one of my best purchases, always keeping my legs warm and dry in snow, when worn over insulation.
When sleeping on a cot in drafty weather you cannot have too much insulation beneath you. I used a MidwayUSA shooting mat, a blue foam pad, a Thermarest Ridge Rest, and then two military surplus wool blankets folded in half lengthwise on top of my cot. This gave me a firm but warm and comfortable bed.
The old trick of putting a hot water bottle in the bottom of your sleeping bag works. I filled a Nalgene Oasis canteen with hot water, wrapped it in a shemagh, and put it in the footbox of my sleeping bag. It warmed the bag up nicely. It was still lukewarm in the morning. Being already warm, it boiled faster when it came time for breakfast, too.
Two or three disposable hand warmers activated and tossed into you bag before bed also help. I had a package of these coming up on their expiration date so I wanted to use them up, and this was a good way to do so.
The disposable hand warmers and toe warmers came in very handy while sitting out on my deer stand. If you're moving around in the temps we experienced keeping your hands and feet warm isn't a problem but once you're sitting still, you need either more insulation or an external heat source. The disposables worked well for me.
Some guys like to use an empty Gatorade or Nalgene bottle to pee in so that they don't have to get out of their bag in the middle of the night. Frankly, I don't think I could do that without pissing all over my sleeping bag, but YMMV.
The Hill People Gear Mountain Serape is an awesome piece of gear. I used it two ways last weekend. First, after being out for a few hours hunting, I used it in greatcoat mode over my Arc'Teryx LEAF Atom SV hoodie while hanging out back at camp before bed. It allowed me to shed the hooded sweatshirt I'd been wearing under the Atom SV, and also my ORC PCU Level 5 softshell trousers. As a greatcoat, the Mountain Serape provided a warm layer of insulation and blocked the wind when out around the campfire, and inside our drafty shelter.
If I hunted out west where you can do so without wearing blaze orange, I'd pack a Mountain Serape with me to my stand and put it on while glassing/waiting for game. Not only is it warm but it also helps to break up your outline, so you don't look like a human. If HPG made one in blaze orange or blaze camo, I'd order one for sure.
Later, I used the Mountain Serape in sleeping bag mode as an overbag around the footbox of my sleeping bag.
A Snugpak poncho liner may be a viable, less expensive alternative to the HPG Mountain Serape if you're on a budget, especially if you added snaps or bungies to hold it closed around yourself.
For use around a campfire something made from natural fibers would be better than the nylon shell of the Mountain Serape or Snugpak poncho liner. E.g., a wool blanket poncho or a South American alpaca poncho. OTH, they probably aren't as windproof as the modern insulated ponchos.
If you're car camping, having a vacuum flask of hot tea or coffee filled ahead of time is a great morale booster. It's really nice being able to immediately pour yourself a hot cup of tea when you come in from the cold, instead of having to wait for it to brew.
Tuesday, December 27, 2016
Canteen Cup Accessories
Many hikers and preppers like the old USGI canteen cup for use as a cooking vessel. I've had this old, L-handle style cup since the '80s, and it's seen a lot of use. It's so black on the outside I should call it "Ol' Crusty."
Sentiment aside, canteen cups have two drawbacks which can be remedied with products now on the market.
First is a lid. The US military never issued one. If you're heating something by putting your canteen cup in a campfire you don't really care too much about minimizing fuel consumption, but it's nice to reduce heating time and keep debris out of your meal. Previously I've used a piece of heavy duty aluminum foil but this needs to be periodically replaced, and it's prone to blowing away. Heavy Cover, Inc. sells a nice stainless steel boil lid, shown in the above pic. HC also sells one for the Crusader cup.
I've used the Heavy Cover lid a couple times now and it definitely reduces the time to boil water for a hot drink by a few minutes. If I have any criticism is that it's heavy. It could be made from a thinner gauge of stainless steel to reduce weight. Or better yet, make it from aluminum or titanium. E.g., Four Dog Stoves sells Ti lids for a variety of pot/cups, for $4 less than the HC stainless steel lid.
Second is something to prevent burning your lips on the hot rim of the cup. Snow Peak Hotlips happen to snap right onto the USGI cup like they were made for it. The yellow thing on the rim of my cup above is one. This is a major usability improvement when making coffee, tea, or hot chocolate.
Sentiment aside, canteen cups have two drawbacks which can be remedied with products now on the market.
 |
| Nothing like hot chocolate from your canteen cup. |
First is a lid. The US military never issued one. If you're heating something by putting your canteen cup in a campfire you don't really care too much about minimizing fuel consumption, but it's nice to reduce heating time and keep debris out of your meal. Previously I've used a piece of heavy duty aluminum foil but this needs to be periodically replaced, and it's prone to blowing away. Heavy Cover, Inc. sells a nice stainless steel boil lid, shown in the above pic. HC also sells one for the Crusader cup.
I've used the Heavy Cover lid a couple times now and it definitely reduces the time to boil water for a hot drink by a few minutes. If I have any criticism is that it's heavy. It could be made from a thinner gauge of stainless steel to reduce weight. Or better yet, make it from aluminum or titanium. E.g., Four Dog Stoves sells Ti lids for a variety of pot/cups, for $4 less than the HC stainless steel lid.
Second is something to prevent burning your lips on the hot rim of the cup. Snow Peak Hotlips happen to snap right onto the USGI cup like they were made for it. The yellow thing on the rim of my cup above is one. This is a major usability improvement when making coffee, tea, or hot chocolate.
Wednesday, November 30, 2016
Saturday, November 26, 2016
Lixada Wood Gas Stove
The other day I ordered a Lixada wood gas stove using an Amazon gift card. This stove is sold under a number of different brand names on Amazon and eBay, generally for a bit under $20. The stove is made from stainless steel and has the following components, which nest together:


- Base with air holes.
- Double-walled combustion chamber with holes on the inside near the top.
- A bottom part to hold the fuel off the ground. It also has air holes in it.
- A pot stand with folding arms.
- A bowl which can be placed in the combustion chamber to burn liquid or gelled alcohol fuel. If inverted it can be a platform for hexamine or trioxane tablets.
Along with the stove itself a nylon mesh bag was included for storage and transport.
Since I had some time this afternoon I decided to give it a try, using some sticks from my yard. The stove did not come with any instructions but I'd read up on them online. Supposedly, they work best with the combustion chamber filled with sticks oriented vertically, burning top-down.
I used a piece of dryer lint/paraffin wax fire starter to get it going.

After a few minutes the wood gas that's released by the burning wood gets flowing through the sidewall, comes out the interior holes and ignites.

Shortly after it got going I put my Olicamp Space Saver Cup with home made lid on top. I had 12 oz. of water in the cup to make some tea.

A couple things caused my boil time to be overly long (i.e., damn near a half hour):
- It was windy, which caused a lot of heat loss via convection. The next time I use the stove I'll use a wind screen.
- Some of my wood was damp. Also, I waited too long to refill the stove when the fuel burned down, which made it take longer to ignite. I should have fed it small pieces of wood before the flames died out.
As long as I kept it fed so that the wood gas was being burned it was pretty much smoke free. If I let it die down and then added fuel, it was smokey.
The idea of a stove for which you can forage fuel is very attractive for camping, hiking, and bugouts. I need to play around with it a bit more to get the knack of minimizing cook times. In particular, one fuel I want to try is charcoal briquettes, which we keep up at my friend's place where we camp a few times each year. Another fuel which other owners have reported works well are wood pellets, as used in pellet stoves.
I'm planning to follow this up with a video, once I get the raw footage edited.
Friday, November 25, 2016
Revised Olicamp Lid
I wasn't satisfied with using a screw and nut to secure the handle to the DIY lid I made for my hard anodized Olicamp cup, so I ordered a Tandy Leather rivet kit earlier this week. It was delivered today. The lid now looks like this:


The stud part of the rivet was longer than I needed, so I trimmed it with dykes before setting the head.
The rivet should be more secure in the long term than the screw and nut, and easier to clean if food gets on it.
I can see the rivet kit coming in handy for future projects.


The stud part of the rivet was longer than I needed, so I trimmed it with dykes before setting the head.
The rivet should be more secure in the long term than the screw and nut, and easier to clean if food gets on it.
I can see the rivet kit coming in handy for future projects.
Sunday, November 20, 2016
Olicamp Hard Anodized Cup and DIY Lid
The other day I ordered an Olicamp hard anodized aluminum Space Saver cup from Amazon using some points. It arrived today and I think it'll be a good piece of gear. It's lightweight and has graduations so that you can use it for measuring water.
One thing it lacks, however, is a lid, which means that if you use it as a pot to cook or boil water in, it'll take longer and use more fuel. I've used expedient lids made from aluminum foil in the past with my GSI stainless cups and USGI canteen cup. I wanted something better for this cup.
My first try was made from aluminum flashing. I traced the lip of the cup on a piece of scrap wood to create a form, and cut a piece of flashing a bit larger around than the cup. I then secured the flashing to the form and pressed it around.
It looked like ass.
In search of a better solution I ran across this video by IA Woodsman, in which he made a lid for a stainless GSI cup from the bottom of a 12 oz. coffee can. I had an empty can so I went back out to my shop and made a similar lid.

The lip of the aluminum Olicamp cup is a little larger in diameter than the stainless GSI cups, so I cut eight small slits around the edge of the lid so I could spread it out to better fit on the cup. Instead of IA Woodsman's copper D-ring, I used a stainless steel split ring from my scrap box. Click on the picture to see the full sized version which shows how it can be set so that it doesn't flop over.
The ring is secured using a similar tab to IA Woodsman's. However, I used a stainless screw and nut instead of a rivet.
I'll probably carry the cup nested over the bottom of a 32 oz. Nalgene or 40 oz. Kleen Kanteen bottle, with the lid in the bottom of the pouch.
Friday, November 11, 2016
Baofeng Digital Interface Cable
Like a lot of hams and preppers, I own a Baofeng HT. Last week on Facebook, Baofeng Tech announced the APRS-K2 digital interface cable for their radios. Note that while BF advertises it as an APRS cable, in reality it's not limited to that. Other owners have reported that it works with DroidPSK, for example.
At $18.79 on Amazon Prime I had to order one to give it whirl. I have a 2012 Google Nexus 7 tablet that I can use for Android apps, but I'm primarily an iPhone/iPad user. So, after I got the cable I grabbed the aprs.fi app from iTunes and loaded it on my iPad Mini 2.
The BF APRS-K2 cable is like the KF5INZ Easy Digi interface for iPads, in that it relies on VOX to key the rig to transmit. I programmed UV-5RA with the 144.39 MHz APRS frequency, enabled VOX, and connected everything. Aprs.fi had no problems keying the rig with VOX sensitivity set to 2.
Unfortunately I don't seem to be within range of an I-Gate, so although the setup was beaconing, there was no way to port it to the aprs.fi website, other than the app's web connection.
I intend to try the cable with other modes and apps, for example PSKer on the iPad and Fldigi on the Nexus. I'm thinking it might work with the speaker/mic port on my later 2013 MacBook Pro, as well.
Finally, the APRS-K2 is not just useful for Baofeng owners. Since Baofeng radios use the same cables as Kenwood, HTs, the APRS-K2 cable can be used with those as well.
New Bike
I wound up not getting that old Nishiki, but I did get something. See post here. Unfortunately, it looks like that the seller of the old bike is trying to stiff me, so I had to open a case with eBay.
Grrr.
Grrr.
Saturday, October 15, 2016
New Bike on the Way, and a Ride
Since getting back into cycling a few months ago, I've been kicking myself for putting my old Nishiki road bike out by the curb last year. Although my Trek 820 mountain bike with 1.5" wide slicks is good for the local multi-use paths, even Forbidden Drive, a road bike would allow me to ride further and faster. So, I started looking around on Craigslist and eBay for older road bikes with steel frames.
Lo and behold, after a couple weeks of looking, this popped up on eBay:

(Picture from the eBay auction.)
It's a mid-80s (probably an '86) Nishiki Olympic with the same frame size and color scheme of my HS graduation present. The Mavic wheelset isn't original, however. After a few minutes hemming and hawing, I bought it.
The 1986 Nishiki Olympic was a 4130 chrome-moly steel framed bike with Araya aluminum wheels, Diacompe brakes, Shimano derailleurs, downtube shifters, and a Sugino VP crankset. Assuming the Mavics on this bike weigh about the same as the originals, it'll come in at about 23 pounds. It should be a fast bike. While riding my old one with a friend who's Trek 520 tourer was fitted with a cycle computer, he clocked us going about 50 MPH on one extended downhill run.
Unfortunately, I'm still waiting for it. I got a message from the seller who found that one of the crank arms was stripped, where the pedal is attached. He discovered this when he began to prep it for shipping. He offered to either knock $25 off the price, or replace it with an original part. I opted for the latter, so I'm hoping it'll ship early next week.
After I get it I plan to rewrap the handlebars, replace the toe clips (one is broken), and of course verify that the derailleurs and brakes work properly.
In the meantime, I picked up a couple items to help me maintain my family's bikes. First, a copy of Zinn and the Art of Road Bike Maintenance. In conjunction with YouTube videos, this should help me learn how to work on them. The second item was a Bikehand Pro Mechanic Bicycle Repair Rack Stand.
I tried out the repair stand for the first time this morning, before I went on a ride. I used it to hold the Trek while I cleaned the chain. It worked well. The stand feels fairly robust and folds up, so that it doesn't take up too much space in my shed.
After cleaning and lubing the chain, I went on my longest ride this year, 12.23 miles, at an average speed of 10.9 MPH and a max speed of 16.1 MPH. Considering I'm riding a mountain bike with aerodynamics slightly better than a brick, I'm happy.
Thursday, September 15, 2016
Bike Ride at Dusk
After work tonight I took a ~6 mile ride, which reinforced why it's prudent to wear bright clothing, have reflectors, and lights on your bike.
My ride was on the Schuykill River Trail between Miquon and Shawmont and by the time I got there it was dusk. There was some group run going on so that trail was crowded. A lot of runners were wearing dark clothing and as it got near 7:00 PM they got increasingly hard to see. Those wearing a safety yellow/green shirt were a lot more visible.
Likewise, only about half the other cyclists had lights and many of them didn't have any kind of reflectors.
Something the younger folks need to be aware of is that while you may be able to see just fine around dusk, those of us over 40 often start losing our night vision. (I noticed mine starting to go when I was 35.)
When I got back into cycling this summer I picked up these lights. They are cheap and at least in dry weather, work well. I put a set on my daughter's bike and with the rear set to alternately light one of the three LEDs, I was able to see her from over 200 yards away.
I also encourage the use of reflectors. Yeah, they're uncool. They are less uncool than getting hit by a car or another cyclist because they couldn't see you. Incidentally, I tested the supposedly-reflective sidewall lettering on my Bontrager H2 tires after getting home and was not impressed.
Finally, brightly colored clothes help make you more visible. I wore a bright orange Champion Powertrain T-shirt and I also have one in "reflector green." These shirts are lightweight, wick away moisture, and dry quickly. I have a few others in more subdued colors that I wear in the woods or in colder weather as a base layer, so they are multi-purpose.
Added a Mirror to the Bike
One of the things I've noticed riding on the local bike paths is how easily a faster cyclist can come up from behind without being heard. It would also be nice to check on following riders in a group ride, so, I decided that adding a rear view mirror would be a good idea. The one I chose is a Mirrycle MTB Bar End Mountain Bike Mirror. Amazon also lists a two-mirror set if you want one for both sides.


The mirror mounts via a split post much like older handlebar stems. It requires you to remove the end plug or cut a hole in the grip. I had conveniently lost the plug from the left end of my handlebar when I crashed earlier this summer, so that was already take care of for me. Doh.
The unit is mostly plastic so I'm hoping it'll hold up. As long as I don't clip it on something or crash on the left side it should be OK.

A closeup:

The mirror mounts via a split post much like older handlebar stems. It requires you to remove the end plug or cut a hole in the grip. I had conveniently lost the plug from the left end of my handlebar when I crashed earlier this summer, so that was already take care of for me. Doh.
The unit is mostly plastic so I'm hoping it'll hold up. As long as I don't clip it on something or crash on the left side it should be OK.
Tuesday, September 13, 2016
Bushcraft USA Silnylon MEST Poncho
Last week I noticed the Bushcraft Outfitters got some more of their silnylon MEST (Multipurpose Emergency Survival Tarp) ponchos in stock. I ordered one of Friday and it came yesterday.
Along with the poncho I ordered a tube of McNett seam sealer to prevent leaks on the hood seams. I sealed the seams last night. The sealant was a little tacky, so per the instructions on the packaging I dusted them with some talcum powder, which can be seen in the pictures below.
I took some pictures of the MEST poncho with the Chinese-made USGI-style poncho that I've been carrying strapped to the bottom of my HPG Tarahumara day pack.
The MEST is about 1.5" longer and 1.5" narrower than the old poncho.


Notice that the MEST has nylon webbing loops sewn on, rather than grommets. This allows you to make field repairs with a needle and thread.
The old poncho came with a stuff sack but I generally rolled it up. I took pics of it both ways to show how much smaller the MEST is when stowed.


Aside from being much smaller, the MEST is maybe half the weight of the rubberized nylon GI-style poncho. The MEST could easily be carried in a cargo pocket. Combined with some utility cord or 550 cord, and some lightweight tent stakes, it'll make for a light, compact shelter.
Now all I need is some rain to test it out.
Monday, September 05, 2016
Back on the Bike
August in SE PA was so hot and unpleasant that I haven't been on my bike for a month, until today. Before leaving I checked over the bike and inflated the Bontrager H2s up to 80 PSI. I'd been riding with them at about 65 PSI and wanted to try out higher pressure for less rolling resistance. I also played around with my seat adjustment because the last time I rode I had some discomfort down below.
The difference in how the bike rides with higher tire pressure was immediately noticeable. Rolling resistance was much less at the cost of a harsher ride on Forbidden Drive's packed gravel surface.
My ride was cut short after only a little more than a mile, by two trees that had fallen across the trail. I didn't want to try climbing over them because there's a good chance that there would be poison ivy mixed in.

It looked like the half rotted out tree on the right feel and took out the other tree on the way down.

I wasn't ready to go home yet so after getting back to my truck I drove over to the Spring Mill train station and hopped onto the Schuykill River trail, where I had a pleasant ride. The section I was on is paved so compared with the packed gravel in Valley Green I was flying. The extra 15 PSI of course helped quite a bit and I seem to have got my seat adjusted correctly, too.
The difference in how the bike rides with higher tire pressure was immediately noticeable. Rolling resistance was much less at the cost of a harsher ride on Forbidden Drive's packed gravel surface.
My ride was cut short after only a little more than a mile, by two trees that had fallen across the trail. I didn't want to try climbing over them because there's a good chance that there would be poison ivy mixed in.


I wasn't ready to go home yet so after getting back to my truck I drove over to the Spring Mill train station and hopped onto the Schuykill River trail, where I had a pleasant ride. The section I was on is paved so compared with the packed gravel in Valley Green I was flying. The extra 15 PSI of course helped quite a bit and I seem to have got my seat adjusted correctly, too.
Sunday, September 04, 2016
Dinner on the Mountain
Yesterday Amanda and I went up to the Conrad Weiser State Forest for a few hours, and had dinner on the mountain. (It's not much of a mountain, but hey, we're in southeast Pennsylvania.)
We used my Esbit CS985HA cookset to boil the water for our noodle soup and heat up some Vienna sausages.


It's a versatile cookset. The 33.3 oz./985ml main pot has volume graduations stamped into it, which can be read from the inside. The 15.9 oz./470ml smaller pot can be used as a lid, or as shown above, as a saucepan. Both have folding rubber-covered folding stainless steel handles.
The pot stand/windscreen has four rubber feet on the bottom which would keep it slightly elevated off a table.
The set allows you to cook with either the included brass, Trangia-style alcohol burner or using Esbit hexamine fuel tablets. A small platform to put inside the pot stand when using the tablets is included. The pots, tablet platform, and pot stand are made from hard anodized aluminum.
You could burn sticks and twigs in the pot stand but it's not really designed for that. E.g., the bottom has a large opening so you'd want to sit it on a rock or cleared dirt.
For use with the alcohol burner, a simmer cap/snuffer is included. There isn't enough room in the pot stand to use it as a simmer cap but it works well to extinguish the stove. You want to use it instead of the screw-on cap for the stove. If you use the cap to put out the stove you'll damage its O-ring, which will let the stove leak if you carry it fueled and ready to go.
All the parts nest together and can be stored in an included mesh bag. I line the pot with a plastic bag before nesting everyting else inside to keep it clean. Also, if I use hexamine tablets the outside of the pot will get a coated wth soot. The plastic bag allows me to keep that off the rest of my gear.
The total weight of the Esbit cookset is 15 oz., not including fuel. I keep the brass burner filled with denatured alcohol, three or four Esbit tablets, a bandana, and a small box of matches packed in the kit.
Our campsite is not near a water source so all of our water had to be packed in. Amanda used an Osprey water bladder in her pack, while I used three one-quart canteens. One is a 1945-vintage aluminum USGI canteen that I found several years ago at a gun show. The other two were Nalgene Oasis canteens, which have the same exterior dimensions as US military issue canteens, but which are made of a better plastic, weigh a little less, and don't impart any taste to the water.
Sunday, August 28, 2016
Further Seasoning of the Bromwell Frying Pan
I cooked breakfast in my Bromwell this morning. The bacon didn't stick but my eggs did. So, this afternoon I seasoned it more with flax seed oil (food grade linseed oil). I gave it a very light coat and heated it on the stove until it smoked, then let it cool down. Repeated this for a total of about 5 or 6 coats until I got tired of doing it.

The pan should only get better with use.

The pan should only get better with use.
Saturday, August 27, 2016
Bromwell 7" Pressed Steel Frying Pan
Something I'd been looking for was a lightweight, pressed steel frying pan to take camping. After reading a thread on Bushcraft USA with a link to eBay, I ordered a 7" Bromwell pan last Sunday. It arrived on Wednesday for $16.95 shipped. Note that 7" is the diameter across the top, not the base. The seller also lists some 6" Bromwell pans but that's a bit on the small side for my taste.
The pan is plain pressed carbon steel with a handle similar to the old "Cold Handle" type that you can frequently find a garage sales. Whatever rust preventative Bromwell used worked well but required a lot of scrubbing and soaking to remove.
I seasoned it today by first giving it a coat of canola oil then cooking up some bacon for lunch.

Mmmm. Bacon.

It'll need more seasoning, which of course gives me an excuse to cook more bacon.
This was my first time using a skillet with this kind of handle. It stayed cooler than I'd expected but I still used a pot holder. A bandana or shemagh would work in the field.
The small size allowed a lot of splatter outside onto my stove. The next time I use it I might do so outside, perhaps over my Emberlit stove.
It's a heck of a lot lighter than a same-sized cast iron pan would be. It's definitely back-packable.
Sunday, August 21, 2016
Digital QRP with a Mac and SignaLink USB
Operating QRP PSK31 using a Mac, Fldigi, and a SignaLink USB interface. In the video I provide details on my antenna, physical connections between the radio and rig, and about configuring Fldigi.
More info on the antenna can be found in this older post.
More info on the antenna can be found in this older post.
Tap-O-Cap Reborn
It looks like the same folks who came out a couple years ago with a .22LR reloading tool set have introduced a tool to make #11 caps.
http://sharpshooter-22lr-reloader.myshopify.com/products/11-percussion-cap-maker
Thought I'd pass this along since every so often somebody brings up the old Tap-O-Cap. I have no connection with the company.
http://sharpshooter-22lr-reloader.myshopify.com/products/11-percussion-cap-maker
Thought I'd pass this along since every so often somebody brings up the old Tap-O-Cap. I have no connection with the company.
Saturday, August 20, 2016
WSPR on a Mac
I did some WSPR work out back today using my MacBook Pro, WSJT-X, Yaesu FT-817ND, SignalinkUSB, and my 20M vertical antenna.
Hopefully you find this useful.
Hopefully you find this useful.
Monday, August 15, 2016
Adding Capacity to a Hill People Gear Tarahumara Pack
The Tarahumara pack from Hill People Gear is a great daypack but some folks find it a little small. On my last outing, I needed to add a bit of capacity, so I strapped a MOLLE II Sustainment Pouch to the compression straps, to add ~430 cubic inches of carrying capacity.

This worked well for me but if you need a more secure solution, the MOLLE II Waist Pack is better because it will actually clip on, but is slightly smaller at 390 cubic inches.


Another option would be to attach the waist pack to the bottom of the Tara, with the paracord I used to strap my poncho to the bottom. This would allow you to use the waist pack's belt. You could then also attach the sustainment pouch to the back of the Tara for even more capacity.
My waist pack is in Multicam and was made by Propper; it's brand new. They can also be found in woodland, UCP, and desert camo patterns. I've been using a woodland one to hold a poncho liner thantI keep in the back of my truck. It fits the woobie perfectly.
Credit for this idea belongs to "Creaky Bones" at BCUSA. After taking the two pictures above and going back to Creaky's post, I noticed that he has his MOLLE II waist pack attached with the zipper towards the Tara, rather than on the outside. It might flop around less during strenuous activity if you do it his way, but on the other hand, you'd need to unclip it to access anything inside.
You may notice in today's pictures that instead of the bicycle water bottles in the wand pockets, I have Nalgene Oasis canteens, which are the same size and shape as USGI 1 quart canteens. They hold a bit more (32 oz. vs. 25 oz. for the bike bottles) and don't take up as much room inside the pack as the round bottles do. HPG specifically designed the wand pockets to accept the Nalgene Oasis and either these, or USGI canteens, are probably the best way to carry water in them. With two of these and two bike water bottles on the shoulder strap shock cords, you can carry almost 1 gallon of water with the Tarahumara pack.
Adding an additional pouch or two to the Tara potentially allows you to do an ultralight, warm weather overnighter, rather than relegating it to strictly daypack duty.
Sunday, August 07, 2016
How to Remove the Cylinder and Side Plate from a Smith & Wesson Double Action Revolver
In this video I demonstrate how to properly remove the cylinder and side plate from a S&W revolver, including a discussion of the tools required. Using the proper technique when removing the side plate will prevent damage to the gun and preserve its value.
The demonstration piece is a S&W Model 10-5 chambered for the .38 Special cartridge.
The Weaver Deluxe Gunsmith Tool Kit I used in the video can be seen and purchased here.
The demonstration piece is a S&W Model 10-5 chambered for the .38 Special cartridge.
The Weaver Deluxe Gunsmith Tool Kit I used in the video can be seen and purchased here.
Day Camp and Gear Discussion Video
On Friday I took a day trip up to the Conrad Weiser State Forest near Port Clinton, PA. In the video I demonstrate making a poncho lean-to shelter, discuss knife selection, provide a brief overview of the Hill People Gear Recon Kit Bag and Tarahumara pack, and make some coffee in an Esbit cookset.
I am trying to make and post more videos to my YouTube channel as I have time. Please hit the Like button and subscribe.
I am trying to make and post more videos to my YouTube channel as I have time. Please hit the Like button and subscribe.
Saturday, August 06, 2016
Day Trip to Conrad Weiser
I took today off for a dentist appointment this morning, then a day trip to the Port Clinton Tract of the Conrad Weiser State Forest in the afternoon. I had a few goals on today's trip, the first of which was to locate the campsite where I did an aborted overnighter back in January, and locate a spot close to it on a trail. I succeeded in both, and marked the trail spot on both my phone in Spyglass and in my Garmin GPS.
The second goal was to practice putting up a shelter, which I did in the form of a poncho hooch.


I used my trekking poles in combination with a USGI-style poncho, a couple bungie cords, and some orange utility cord to build the lean-to. If I'd used a more subdued cord, it would have been very stealthy in these woods.
My next goal was to try out the Esbit cookset seen sitting in front of the hooch in the first picture. I bought it a few months ago but this was the first time I got a chance to try it. I like it. It's well made and lightweight. I used it with the included Trangia-style alcohol burner, using denatured alcohol from Lowe's. It can also be used with Esbit hexamine fuel tablets. Today I used it to boil water for coffee.
The final goal was to shoot some video with the Panasonic HC-W580K video camera I got in May. It, too can be seen sitting in the top picture, aimed at the Esbit set. I took over an hour of video which I need to edit down, but it looks good on my Mac.
Between the Esbit cookset and the video camera, I needed a bit more space than my Hill People Gear Tarahumara daypack had available. So, I attached a USGI surplus MOLLE sustainment pouch to the Tara's compression straps. This worked out fine.

Once I get the video edited and uploaded to YouTube, I'll post a link.
Edit 8/7/16: The video is up here.
The second goal was to practice putting up a shelter, which I did in the form of a poncho hooch.


I used my trekking poles in combination with a USGI-style poncho, a couple bungie cords, and some orange utility cord to build the lean-to. If I'd used a more subdued cord, it would have been very stealthy in these woods.
My next goal was to try out the Esbit cookset seen sitting in front of the hooch in the first picture. I bought it a few months ago but this was the first time I got a chance to try it. I like it. It's well made and lightweight. I used it with the included Trangia-style alcohol burner, using denatured alcohol from Lowe's. It can also be used with Esbit hexamine fuel tablets. Today I used it to boil water for coffee.
The final goal was to shoot some video with the Panasonic HC-W580K video camera I got in May. It, too can be seen sitting in the top picture, aimed at the Esbit set. I took over an hour of video which I need to edit down, but it looks good on my Mac.
Between the Esbit cookset and the video camera, I needed a bit more space than my Hill People Gear Tarahumara daypack had available. So, I attached a USGI surplus MOLLE sustainment pouch to the Tara's compression straps. This worked out fine.

Edit 8/7/16: The video is up here.
Monday, July 11, 2016
Bike Inner Tube Fire Starter
A couple weeks ago I came home from REI with a shopping bag full of old bicycle inner tubes. The bike department's manager gave them to me for free when I told him I'd like some to make ranger bands (heavy duty rubber bands). And recently, I read on the Hill People Gear website that their preferred fire starter in the field is a 1.5" square of inner tube ignited with a lighter.
Tonight, my 12 year old daughter and I were hanging out when the idea to give the Hill brothers' method a try. So we rounded up a Bic lighter and a piece of inner tube about 1.5 to 2" square, and went out to our back patio where we have a fire pit.
I had the kiddo try it out. After a few seconds of exposure to the Bic's flame the piece of rubber ignited and burned with a hot flame for several minutes. We had no problems starting a fire with this and some small twigs.
I'm going to add a few ranger bands to my fire kit now. When cut as bands the pieces of rubber are multipurpose. They weigh next to nothing and being made from rubber are waterproof.
Scraps from an old bike inner tube may not be a bushcrafty fire starter, but they are a good addition to your emergency fire kit.
I'll have to do a video on this. Stay tuned....
Sunday, July 10, 2016
New Version of the Harbor Freight 3-In-1 Power Pack
A couple years ago I posted about the Cen-Tech (Harbor Freight) 3-in-1 power pack for portable power. The one I have has served me well on camping trips to power radios and charge cell phones.
The old model looks like it's been discontinued and replaced with an improved version. Improvements include replacing the incandescent work light with an LED, two 12V ports instead of one, and adds a 2.1A USB port for charging cell phones, etc. I'm not going to rush out and replace my old model, but if you're looking for an additional or new portable power source, this looks like a good one.
The old model looks like it's been discontinued and replaced with an improved version. Improvements include replacing the incandescent work light with an LED, two 12V ports instead of one, and adds a 2.1A USB port for charging cell phones, etc. I'm not going to rush out and replace my old model, but if you're looking for an additional or new portable power source, this looks like a good one.
Friday, July 08, 2016
The $9 Expedient Tritium Night Sight
Over on Arfcom we find this example of out-of-the-box thinking:
http://www.ar15.com/forums/t_10_17/686350_Make_EXPEDIENT_TRITIUM_Night_Sights_for_the_Survivalist_for_abt__9.html
The OP, "EXPY37," took the tritium vial from a bivy marker sold on eBay and installed it in a hole drilled in the front sight of his pistol. This gives him the equivalent of Trijicon night sight for about $9 plus his time. In contrast, a Trijicon front night sight will run you over $60 from Brownells.
Unfortunately, the tritium bivy markers are not legal to sell in the US, but can be procured from overseas vendors on eBay.
Thursday, July 07, 2016
More on Cycling as a Fitness Prep
In my last post I mentioned how I've gotten back into cycling to improve my fitness. I noticed improved stamina after only one week. It's continued to get better as time goes on.
One improvement I made to my 1999 Trek 820 mountain bike yesterday was to replace the old, knobby off road tires with a set of Bontrager H2 semi-slicks, which are better suited to the kind of riding that I'm doing now. I.e., pavement and packed gravel.


Bicycle tires with an aggressive tread pattern are better for off road use on dirt, grass, loose gravel, or similar surfaces. In contrast, smooth tires offer better traction with less rolling resistance on pavement or hard packed gravel, even when it's wet.
This morning I took the bike for a short ride with the new tires. I did 6.13 miles* along Forbidden Drive in the Valley Green section of Philadelphia's Fairmount Park. These have noticeably less rolling resistance than the knobbies, so much so that I found myself riding one or two gears higher and improved my average speed by a couple MPH, compared with previous rides on the same trail. The improved rolling speed in my case is due not only to the smooth tread but also that these are 1.5" wide, vs. the 1.95" width of my old tires.
I'm also able to run these at higher pressure, between 60 to 90 PSI, vs. 65 PSI max for the old rubber. Since a lot of my riding is on gravel I have them inflated at about 65 to 70 PSI, to provide a little cushioning. Were I to take a long ride on pavement I'd pump them up to 90 PSI.
If you have an old mountain bike laying around or pick one up cheap from a yard sale or Craigslist, you can greatly improve its rideability on hard surfaces merely by swapping out the old tubes and tires for something like the Bontragers. If you envision mixed use, there are a variety of hybrid tires available with a smooth center flanked by more aggressive knobbies that will bite when you take it off road. If you're setting up a bike as a bugout vehicle, then such hybrid tires make a lot of sense.
Another option (and one I'm still considering) is getting a second set of wheels. Most mountain bikes from good manufacturers made in the past 25 years have quick-detach wheels. So, you could have a bike setup for dirt use, and another setup for road and packed gravel riding.
* I wanted to do at least 8 miles today but it was humid and hot as balls. That just sucks the energy right out of you.
Tuesday, June 28, 2016
Cycling as a Prep
In my last post on this blog I mentioned my recent purchase of a hitch-mount bike rack, and over on Blog O'Stuff, I have several posts about my renewed interest in cycling. My current bike is a late-90s vintage Trek 820 mountain bike on which I've recently added a few accessories.

Aside from replacing the original hand grips, which were deteriorating, I added the rack, trunk, kickstand, front and rear LED lights, and a RAM mount to hold my Garmin 62 GPS. For a prepper there are several things attractive about an older steel mountain bike like my Trek:

Aside from replacing the original hand grips, which were deteriorating, I added the rack, trunk, kickstand, front and rear LED lights, and a RAM mount to hold my Garmin 62 GPS. For a prepper there are several things attractive about an older steel mountain bike like my Trek:
- They can frequently be obtained at low cost. I paid over $300 for it in the late 90s, but nowadays you may be able to find a similar bike in good condition for $75 to $100.
- The lack of a front suspension means the bike is mechanically simpler and easier to maintain.
- The steel frame absorbs vibrations and shock from the road better than an aluminum frame.
- Many of these older bikes have threaded eyelets for mounting racks.
Mountain bikes in general tend to be more rugged than road bikes, especially the wheels. They are a lot more versatile, allowing you to ride on pavement, dirt, or gravel. Everything else being equal, mountain bike tires are more resistant to flats than high pressure road bike tires.
For preppers, bicycles offer low cost transportation that doesn't require fuel and can help you get and stay fit. Cycling on a bike that fits you is great, low impact cardio exercise. The "rails to trails" movement is converting many old rail beds to multi-purpose trails, all across the US. These trail networks not only provide a place to ride without having to deal with distracted drivers, they may also create less-used paths for cyclists and pedestrians to bugout in an emergency. Getting a bike now and exploring them is a useful way to combine recon with recreation.
Sunday, June 12, 2016
Trailer Hitch and Accessories
Last summer I bought a Curt Class III receiver hitch for my 2007 Nissan Xterra. With the help of a friend with a garage and air tools, installation was easy. The primary reason for the hitch wasn't for towing anything. Rather, I wanted to be able to expand the carrying capacity of the truck by using a hitch mount cargo carrier.
The cargo carrier I got was this one from Harbor Freight. If you catch it during one of their sales and use a 20% coupon, you can probably snag it for about $70 - $80. I found it to be pretty well designed but at some point I might replace the screws holding it together with stainless steel screws. Assembly was pretty straightforward with a screwdriver and nutdriver.
As a compact/mid-sized SUV, the Xterra has enough room for a long weekend camping for two people. When I bring both kids, though, I need to leave the back seats up and lose about half my cargo capacity. Before I got the external cargo carrier I used a bag strapped to my roof rack. This is OK for duffle bags but is a major pain to access and kills gas mileage. In contrast, the hitch mount carrier is easy to mount and has enough space to hold a cooler, Rubbermaid Action Packer box full of stuff, a Coleman stove, and a roll up aluminum table from REI.
The major downside of the hitch mount carriers is that if you leave them unattended whatever is on them is vulnerable to theft. Also, you don't want to overload them because doing so will change the balance of your vehicle, affecting its handling.
The secondary reason for the hitch was for a bike rack. I finally ordered one this week. My girls have been after me to get one so I can take them to local trails for cycling. Now that they are beyond the little kid stage they'll be able to bike for long enough to make such trips worthwhile. I used to be into cycling but it's been years since I did more than a couple laps around my subdivision. It's a good, low impact way to get some exercise.
Sunday, May 22, 2016
Camping Trip AAR
This weekend a couple friends and I went on a camping trip to Tioga County, PA. The main activity this time was ham radio. We went up on Friday and came home today.
I had to work on Friday but was able to cut out a little early. By the time I got on the road it was rush hour, so it took me a full four hours to get to my friend's land. By the time I arrived it was 9:30 PM. Before I got there, he'd put up an 80M dipole antenna made from aluminum welding wire, electric fence insulators, and some electric fence posts from Tractor Supply. The feed line was the welding wire, formed into an open ladder line held apart with pink duct tape.

This dipole worked well and pulling in signals on 20M, 40M, and 80M. A number of the calls we logged were from within Pennsylvania, demonstrating the viability of NVIS communications.
We're fans of the digital modes. He has an Icom 718 with which he uses a Donner Digital Interface at home. Since he's not going to schlepp a desktop PC with him, he used PSKdroid running on an LG Android tablet, using audio coupling. I also setup my Apple iPad Mini 2 running PSKer to try and pull some signals from the aether.

We were able to copy quite a few transmissions even without a digital interface between the tablets and the rig. We probably would've copied some more, but for the bourbon. ;)
On Saturday I setup my portable vertical antenna, Yaesu FT-817ND, and iPad.

As you can see, we setup inside his 16' x 24' pavilion, which was a godsend this weekend due to the weather. It rained on and off all weekend. There was little to no wind, so the open ends weren't a problem. We even setup my tent underneath the roof so it stayed mostly dry.

As you can see, I have my antenna feedline connected via the FT-817ND's front, BNC connector. As I understand it, using this instead of the SO-239 on the back reduces power consumption. Also note that the feedline is connected straight to the rig, with no tuner. The vertical is resonant on 20M. Using a resonant antenna instead of one connected through a tuner increases your effective radiated power, and when operating QRP, every little bit helps.
The iPad is connected to the rig with one of KF5INZ's Easy Digi interfaces.
Pic of my vertical antenna:

The objects to the right of the antenna are steel gong targets set out at about 25 yards.
I mostly operated PSK31 and using the antenna above was able to reach the west coast.

I grabbed the above from pskreporter.info using my iPhone. Later, my signal was also reported in Washington state, but I forgot to get a screen shot.
After doing PSK31 for awhile I changed over to WSPR, using iWSPR. This was my first time trying this digital mode and it's amazing. The signal reports below are after transmitting for awhile on 5 watts.

Numerous hits in Great Britain, Western Europe, and Germany. WSPR basically acts like a beacon, transmitting your callsign so that other hams with Internet-connected rigs can upload signal reports. With some creativity I think it could have other applications.
We took time off from the radio to have a nice lunch of venison sausage and onions, sauteed in a red wine reduction. Yeah, we eat good when we go camping.

Saturday night's dinner was venison chili washed down with Yuengling Lager or Guiness Stout.
I also took a break from radio in the afternoon to do a little shooting. I first shot my Cowboy Pimp Gun, AKA a Ruger Single Six in .32 H&R Magnum which has a color case hardened frame and faux ivory grips. It's a fun little blaster but needs a trigger job. I put a bunch of Prvi Partizan .32 S&W Longs through it, which made a nice little tink when they hit our steel gongs.
I also put 70 rounds of .44-40 through my Cimarron 1873 Sporting Rifle.

Fifty of those were black powder loads with 35 grains of Goex 3Fg under a bullet cast in my Accurate Molds 43-215C bullet mold, and they really smacked the gongs around. If you click on the picture to view the full sized version, you can see some smoke coming out of the rifle's ejection port. I was doing an 1870s-style mag dump. Off to the left, you can also see the gong that I just shot swinging from the impact.
After I finished shooting my other friend put up about 500 feet of aluminum welding wire in a loop, all around our campsite. We got back to radio after nightfall and the loop turned out to work well for receiving 80M and 160M, and they both wound up getting 160M phone QSOs. Because the antenna height ranged from only a couple feet to a max of 5 feet, they were NVIS to other hams in northern PA and southern NY.
Finally, I took this picture of my iPad which looked like it was detecting Space Invaders on the waterfall.

Even though the weather this weekend was crappy we had a great trip. We got some good field radio practice in, plus a bit of fun shooting.
Monday, April 18, 2016
Old School Shooting and Reloading
Over on Blog O'Stuff, I've been writing about a Cimarron Firearms Uberti 1873 Sporting Rifle that I bought in March, along with handloading .44-40 ammunition for it. The gun is a replica of the Winchester 1873, "The gun that won the West."
Although it's a 19th Century design and by modern standards it's considered an obsolete weapon, one advantage these old guns and replicas thereof is that they can be kept going with low tech reloading methods. Ammunition can be loaded for these cartridges on modern equipment or with simple hand tools.
Although it's a 19th Century design and by modern standards it's considered an obsolete weapon, one advantage these old guns and replicas thereof is that they can be kept going with low tech reloading methods. Ammunition can be loaded for these cartridges on modern equipment or with simple hand tools.
A modern reloading press like my Lee Classic Turret press is a lot more efficient than the hand tools. The hand tools are slow and don't allow you to resize fired brass, so it can be used only in the same gun in which it was first fired. That said, with a hand tool you can put together a portable, complete reloading kit that will fit in a toolbox. Perhaps the best of both worlds would be a Lee hand press, which uses standard reloading dies.
If chambered in one of the original centerfire rounds -- .44-40, .38-40, or .32-20 -- they are ideally suited for use with black powder or black powder substitutes like Pyrodex or Triple 7 and cast bullets. (Modern replicas are also available in .45 Colt, .357 Magnum, and .44 Magnum, all of which work great with cast bullets but don't seal the chamber as well when used with black powder, because of their thicker brass.)
Other lever action models have been chambered for the WCF cartridges, including replicas of the Henry, Winchester 1866, and original and replicas of the Winchester 1892.
This is an original Winchester Model 1882 reloading tool that I got off eBay, along with the original matching bullet mold. (The mold isn't pictured.)

This tool can perform the following functions without any adjustments:
Under the tool, from left to right are a 200 grain bullet cast from the original mold, a charged case with bullet pressed in ready to be seated and crimped, and a complete cartridge. Above the tool are some cases charged with 35 grains of Swiss 3Fg black powder. The bullet was cast from reclaimed plumber's lead and lubed with a mix of beeswax, mutton tallow, and canning paraffin. There are other black powder compatible lubes you can make at home, e.g., a 50/50 mix of beeswax and Crisco.
The Ideal Tool Company (bought by Lyman in the early 1900s) offered similar tools, some with built-in bullet molds, and some with adjustable seating chambers to allow different bullets to be used. The Lyman 310 tool remains in production and can neck size spent brass, and has an adjustable seating chamber.
During the panics of the past eight years, black powder and BP substitutes remained largely available. In extremis, black powder can be made. There is plenty of info available online on how to do so, just be careful.
Primers are one component that tends to disappear quickly when panics hit, and cannot be easily made or reloaded, so it would be wise to stock up ahead of time.
Likewise, if you are setup to cast your own bullets, if you can obtain a suitable lead alloy and make some kind of bullet lube, all you need to worry about stocking up on are cases and primers. As of the time this was written (April 2016) cases for these "obsolete" rounds are easily available in quantity online. The primer supply is good now, too, either online, in stores, and at gun shows.
As a side note, the capacity of these leverguns is 14 + 1 for the 24" barreled rifles, or 12 + 1 for the 20" carbines. Either one has more firepower than a pump shotgun, with a lot less recoil, and a longer effective range.
The .32-20 is suitable for small game and varmints up to coyotes, but the .38-40 (really a .40 caliber) and the .44-40 are good on deer out to about 100 yards. The latter two also work well for defense, but when shot from a rifle, even the .32-20 is comparable to a 9mm handgun, so it's no slouch. The black powder WCF rounds may be "obsolete," but they are just as effective today as they were in the 19th Century.
In my opinion, the ability to load cartridges using components that you can get in times of scarcity or make yourself has value for preppers. It's something to consider if the rest of your preps are squared away.
If chambered in one of the original centerfire rounds -- .44-40, .38-40, or .32-20 -- they are ideally suited for use with black powder or black powder substitutes like Pyrodex or Triple 7 and cast bullets. (Modern replicas are also available in .45 Colt, .357 Magnum, and .44 Magnum, all of which work great with cast bullets but don't seal the chamber as well when used with black powder, because of their thicker brass.)
Other lever action models have been chambered for the WCF cartridges, including replicas of the Henry, Winchester 1866, and original and replicas of the Winchester 1892.
This is an original Winchester Model 1882 reloading tool that I got off eBay, along with the original matching bullet mold. (The mold isn't pictured.)

This tool can perform the following functions without any adjustments:
- Deprime fired cases, if you have the original decapping pin, or can substitute a Lee Precision case length gauge in the right caliber.
- Seat a fresh primer.
- Seat and crimp a bullet cast from the original mold, or a bullet design with the same overall length (since it's not adjustable).
Under the tool, from left to right are a 200 grain bullet cast from the original mold, a charged case with bullet pressed in ready to be seated and crimped, and a complete cartridge. Above the tool are some cases charged with 35 grains of Swiss 3Fg black powder. The bullet was cast from reclaimed plumber's lead and lubed with a mix of beeswax, mutton tallow, and canning paraffin. There are other black powder compatible lubes you can make at home, e.g., a 50/50 mix of beeswax and Crisco.
The Ideal Tool Company (bought by Lyman in the early 1900s) offered similar tools, some with built-in bullet molds, and some with adjustable seating chambers to allow different bullets to be used. The Lyman 310 tool remains in production and can neck size spent brass, and has an adjustable seating chamber.
During the panics of the past eight years, black powder and BP substitutes remained largely available. In extremis, black powder can be made. There is plenty of info available online on how to do so, just be careful.
Primers are one component that tends to disappear quickly when panics hit, and cannot be easily made or reloaded, so it would be wise to stock up ahead of time.
Likewise, if you are setup to cast your own bullets, if you can obtain a suitable lead alloy and make some kind of bullet lube, all you need to worry about stocking up on are cases and primers. As of the time this was written (April 2016) cases for these "obsolete" rounds are easily available in quantity online. The primer supply is good now, too, either online, in stores, and at gun shows.
As a side note, the capacity of these leverguns is 14 + 1 for the 24" barreled rifles, or 12 + 1 for the 20" carbines. Either one has more firepower than a pump shotgun, with a lot less recoil, and a longer effective range.
The .32-20 is suitable for small game and varmints up to coyotes, but the .38-40 (really a .40 caliber) and the .44-40 are good on deer out to about 100 yards. The latter two also work well for defense, but when shot from a rifle, even the .32-20 is comparable to a 9mm handgun, so it's no slouch. The black powder WCF rounds may be "obsolete," but they are just as effective today as they were in the 19th Century.
In my opinion, the ability to load cartridges using components that you can get in times of scarcity or make yourself has value for preppers. It's something to consider if the rest of your preps are squared away.
Saturday, April 09, 2016
SignalLink USB
This morning a friend and I drove down to the Newcastle, DE Ham Radio Outlet, where I bought a Signalink USB, the jumper module to configure it for my Yaesu FT-817ND, a Diamond RH-707 folding HT antenna, a BNC-to-SO-239 jumper cable, and an MFJ-4103 A/C adapter for the FT-817ND. After getting home I set everything up in my den. Please ignore the clutter.

The antenna is a 7 to 30 Mhz AlexLoop. A lot of QRP operators favor one. I haven't used it enough to decide if I like it or not.
Setup of the SignaLink was pretty straightforward.


The antenna is a 7 to 30 Mhz AlexLoop. A lot of QRP operators favor one. I haven't used it enough to decide if I like it or not.
Setup of the SignaLink was pretty straightforward.
- Using the Allen wrench supplied, remove the front and back panels from the aluminum enclosure.
- Carefully align the jumper module and insert it.
- Reassemble the case.
- Connect a 6 pin mini-DIN to RJ45 cable from the SignaLink to the rig's DATA port.
- Connect an audio cable from the SignaLink to the rig's speaker jack.
- Connect the USB cable between the SignaLink and laptop.
- Since I want rig control, I connected my Valley Enterprises USB CT-62 cable between my MacBook Pro and the rig's ACC port.

Once everything was hooked up I changed the rig from VOX to PSK31-U data mode, and in Fldigi, selected the USB AUDIO CODEC for sound input and output.
Below, I'm monitoring a PSK31 QSO in Fldigi.
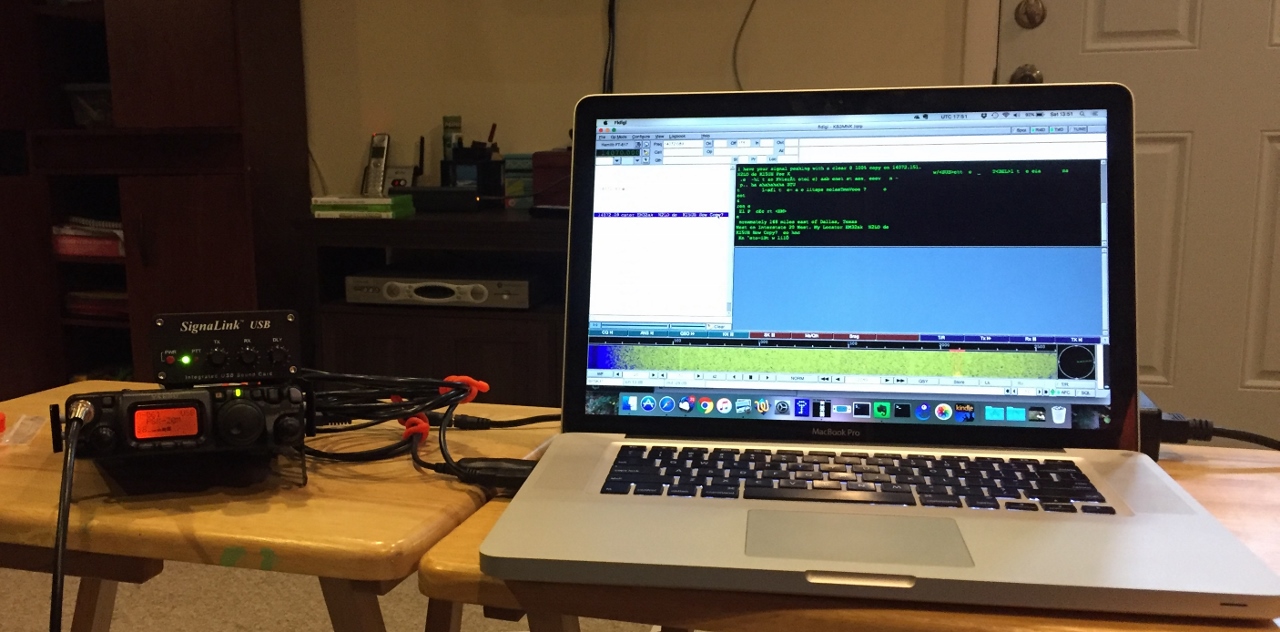
I played around with this setup for about an hour and was able to receive several signals. I called CQ but did not make any contacts. I gave up when 20M died.
I was impressed with the ease of setting up the SignaLink and wish that I'd bought one awhile ago. It's easier to adjust than the internal sound card.
The MFJ-4103 power supply looks like a good buy, also. It looks like a laptop power supply and would be a good choice for anyone traveling with an FT-817ND or using one as a base station where there is 120VAC power.
Friday, April 08, 2016
Valley Enterprises Yaesu Programming Cable
Last week I got a Valley Enterprises FTDI chipset-based programming cable for my Yaesu FT-817ND. This is a USB version of the Yaesu CT-62 serial cable used for rig control and programming.
I took today off to finish my income taxes and after I was done I decided to play with the cable. I already had an FTDI driver on my MacBook Pro, so I was able to just plug it in, connect it to the radio, and use it to program the rig using CHIRP. I also tried it with Fldigi and once I selected the correct driver in the config screen, it worked. If I put the rig into memory mode and manually selected the frequency it immediately showed up in Fldigi. Likewise, if I used Fldigi to change the frequency it worked on the radio.
Tomorrow I'm planning to head down to Ham Radio Outlet and pick up a Signalink USB, among a few other things. The Easy Digi interface I have now works but it's a rat's nest of cabling. The Signalink USB should reduce the clutter and simplify setup and teardown. Combined with the Valley Enterprises cable I tested today, it should make digital mode operation a lot easier.
Saturday, March 19, 2016
Kelty Cosmic Down 20 Sleeping Bag
After my last overnighter back in January I decided that I needed a better sleeping bag rated down to about 20 degrees F. I got some good feedback from posts on THR, the Hill People Gear forum, and BCUSA, but held off on buying anything until today.
I used my REI dividend and 20% off coupon today to get a Kelty Cosmic Down 20 19*F rated bag (REI link to bag. Amazon link to bag.) It weighs 2 lbs. 9 oz., and is filled with 600 fill moisture-resistant DriDown. It came with a stuff sack but no storage bag so I also bought an REI-brand cotton bag to store it in uncompressed.
If I'm expecting colder weather I can use my HPG Mountain Serape as an overbag. The combination should get me down into the teens and still be a lot lighter than my USGI Military Sleep System.
While at REI I also grabbed a couple packs of Nite Ize Gear Ties, which are very handy for organizing cables that go with electronics. Between my dividend and the coupon, I was only out about $50.
Once I get the chance to use the Kelty bag I'll post a report, but it may be awhile.
Sunday, February 14, 2016
Arc'Teryx LEAF Atom SV Hoody Review
A couple years ago I bought my first article of clothing by Arc'Teryx, an Atom LT Hoody. I've been incredibly happy with it. It weighs about one pound but keeps me warm down into the low 40s, and makes a great mid-layer when combined with an outer shell. It's also super packable, which is very handy when adding it to a bag for a trip, or when I wear it to work on a cool morning but want to shove it in my laptop bag for the trip home.
However, I wanted a warmer jacket that would still be packable. Last Fall I picked up an Eddie Bauer 700 fill power down jacket that is pretty nice, but the hood bugs me when I try to wear it over a ball cap. It simply isn't large enough. So, back in January I ordered an Arc'Teryx LEAF Atom SV Hoody in Wolf grey from SKD Tactical. It got to PA from MO in two days. SKD is probably going to get more of my business.

Arc'Teryx calls this jacket a hoody but don't compare it with a sweatshirt. This is an insulated technical jacket that is filled with 100gsm Coreloft with a wind and water resistant shell. The jacket weighs a little more than a pound.

"LEAF" is Arc's Law Enforcement and Armed Forces line. Arc LEAF items are built with a bit more durable material and have a fuller cut, which is good for me since I'm not exactly athletic. I ordered my normal t-shirt size, XL, and I find it pretty true to size.
As with my other pieces of Arc'Teryx gear, the workmanship is top-notch. The stitching is exceptionally well done, there were no loose threads, and it looks sharp.
The LEAF Atom LT has a generously-sized hood that can be cinched down with a shock cord accessible from the back, and one on either side of your face. The shock cords and cord locks are concealed by fleece panels that prevent them from rubbing your face. This keeps them neat but does make it more difficult to adjust with just one hand. When not in use the hood can be rolled up and secured with a loop and toggle.


Likewise, the bottom hem can be tightened against wind via shock cords. These are also captured in tunnels, unlike in every other jacket I've seen. This prevents them from snagging on items on your belt, like a holster, or on things you brush against. Simply brilliant.


The jacket has three pockets -- two large handwarmer pockets and one internal left chest pocket. All are zippered.
There are inside ports on both handwarmer pockets that allow you to route earbud or microphone cables from a device up through the inside of the jacket.
Since the LEAF line is marketed towards law enforcement and the military, the upper sleeves have Velcro patches. While I'm neither, I figured that I'd adorn the jacket with a couple -- an American flag that I bought with the jacket, and a Gadsen patch in Hebrew that I got from Zahal.org.
The cuffs are a light, stretchy material that seals out drafts but is light and dries quickly. They are the same as on the Atom LT.
I've had the Atom SV now for about a month am very pleased with it. I've been wearing it as my winter coat during my daily commute with temps down into the teens. When it dips down to 20*F or below I'll add a light fleece underneath. (I'd expect to get too warm with the fleece if I were active, but my commute consists of a two mile drive to a train station, then a half hour ride on a commuter train into town. I.e., pretty sedentary.)
The outer shell is more robust than the shell of the Atom LT. It's highly wind resistant and the DWR finish shrugs off light snow and rain. Despite the light weight of its outer layer, it's durable. I wore it on a January overnighter in a Pennsylvania State Forest, when I had to abort in the middle of the night due to unrelated gear issues. While walking out to my truck I had to do some bushwhacking, which included going through some thorns. I thought for sure that I'd just trashed a $270 jacket, but nope. Remarkably, the Atom SV showed no signs of wear when I was able to inspect it in daylight.
For cold, dry conditions, the Atom SV works well as an insulating layer under a German surplus flecktarn parka. I tried this combination while getting my snow blower ready for Winter Storm Jonas. The temp was 23* F. with a wind chill of about 11*. That's pretty cold for those of us living in SE Pennsylvania. The inexpensive German parka adds further protection against stains and tears, while extending a windproof layer down to your thighs, and has a good camo pattern if you need it. Underneath I wore jeans, a t-shirt, and a Duluth cotton flannel shirt. After being outside for about 20 minutes and mildly exterting myself I started needing to vent. It's a good combination.
As good as the Atom SV's shell is, it's is still a synthetic. Care is warranted if you'll be spending time around a campfire, and an outer layer like the German parka, a British smock, or similar cotton or wool shell would be a good idea to prevent the Arc hoody getting holes from sparks.
The only changes I'd make would be to add a left side Napolean pocket on the outside of the coat and move the inside pocket to the right. I like stashing my phone in a Napolean pocket since it's easier to access while seated in my truck or on the train.
Overall, I am extremely pleased with both SKD Tactical's fast service and the Arc'Teryx Atom SV Hoody. It's a light but warm jacket that will serve for the vast majority of my winter coat needs.
Subscribe to:
Posts (Atom)


