Showing posts with label black powder. Show all posts

Sunday, July 09, 2023

Follow up on the homemade percussion caps

We've been having some unpleasant weather here in SE PA recently. Hot, humid, and rainy with thunderstorms. However, yesterday I managed to sneak out for a couple hours to Boulder Valley Sportsmen's Association and shoot some targets on the woods walk course.

I took the Slotter-style plains rifle (which has become my favorite rifle) and aside from a capper full of CCI No.11s, a also brought along 6 of the homemade percussion caps from last month, in a 3D-printed star capper.

When shooting a caplock rifle it's always good to make sure the flash channel is clear before loading. This is most commonly done by popping a cap while holding the muzzle near a blade of grass or a leaf. If it moves you know the channel is clear.

Note that if I'm loading the rifle prior to a hunt, rather that popping a cap I'll use some rubbing alcohol and compressed air to ensure the channel is clear, especially since I may be loading (but not priming) the rifle at home. This is not a bad idea nowadays anyway, since No. 11 caps are hard to buy.

I did that with one of the homemade caps and it moved a blade of grass. However, when I loaded the rifle I found that the homebrew caps would not ignite the main charge unless I primed the nipple with 4Fg black powder first. That slowed the lock time down so that it was comparable with a flintlock.

(I keep a nipple primer in my shooting pouch in case I encounter ignition problems. This was the first time I actually needed it.)

Having tried them and found them wanting for use in sidelock rifles, I plan to make up another batch but add more priming compound.

Friday, June 09, 2023

Homemade Percussion Caps

Last week while I was on a staycation I prepared a batch of homemade No.11 percussion caps, using the tool from 22lrreloader.com and their Prime-All priming compound. I tried them out a couple days later.

I left out the tan/off-white component, which is either dextrin or gelatin intended to be a binder. By most accounts it works poorly as suck. Instead, I took a 1 oz. plastic bottle with a needle oiler tip, put a few millimeters of Duco cement in the bottom, then filled the rest with acetone to make a saturated solution.

Using a CCI Large pistol primer tray as a loading block I filled about 20 caps at a time with the mixed Prime-All compound and then put a drop or two of the Duco/acetone solution in it. Using a small piece of bamboo cut from a chop stick I gently tamped down the wet mixture.

After the caps were visibly dry I put another drop or two of the solution in the caps and let them dry in the open air overnight. I wanted to ensure that enough Duco cement was deposited in them to keep the priming compound in place. Duco is a nitrocellulose based glue so it's flammable even when dry.

For safety's sake make sure that you crush any lumps in the components before mixing them. Crushing lumps after the components are mixed can cause detonation.

Note that I did not have luck punching caps out of beverage cans, even doubled. I keep punching right through the material. Rather, I used 0.005" thick copper foil which is a more durable material.

I tried them in my Pietta 1860 Sheriff which has Slixshot nipples installed.

  • 6 caps to clear the nipples: All popped. I noticed they make less noise than CCI, Remington, or RWS caps.
  • 6 shots loaded from paper cartridges with 25 grains of Scheutzen 3Fg BP: The first 3 went off OK but the next 3 popped but failed to set off the BP. I recapped those cylinder and none set off the powder. I recapped once more using RWS 1075+ caps and all 3 chambers went off. They may work better with paper cartridges if I increase the amount of priming compound.
  • 6 shots with 25 grains of Scheutzen loaded from a flask: All 6 went off properly.
  • 6 shots with 25 grains of Triple 7 3Fg BP substitute, which has a higher ignition temp: All 6 went off properly.


The caps on shots with 25 grains of BP held together but flowed a little back into the safety notch in the hammer nose.

The caps on the Triple 7 loads all perforated but the skirts held together.

None of the caps fragmented and I had no jams. Some came off easily while others had to be pried off either with my fingers or pocketknife. All 27 caps I dropped the hammer on ignited properly.

Since the Prime-All fouling is corrosive I cleaned the gun with water and MPro 7 after getting home, and oiled everything with FP-10. I left it disassembled overnight to confirm I'm not going to get any rust and everything looks fine.

Overall, I consider the home made caps using the Prime-All compound a success for use in percussion revolvers and I'm sure they'd work fine in an underhammer. I need to test them in a sidelock rifle or pistol.

Loading and Shooting a Muzzleloading Black Powder Patched Round Ball Rifle

I made this video last week but forgot to link to it from here.


If you like it please hit that Like button and subscribe.

Sunday, May 21, 2023

Goex Update

Yesterday I got an email from Maine Powder House stating the following:

Yes, in case you have not heard, GOEX production date was pushed back again.

GOEX dealers were informed the new projected production date is end of June. If they are able to make this happen, this means they will not start shipping product out to dealers until earliest August. GOEX has also informed us prices will be going up, but they have yet to give us a new price list.

Schuetzen and Swiss containers are here in the US, however their prices have gone up 17% and 22% respectively. This price increase was a surprise to all of us...including the distributor. Current prices listed as of the date of this email DO NOT reflect the 17% & 22% increases.

Maine Powder House current inventory on black powder is very low. I will be working with the Schuetzen/Swiss distributor on a new order, however it will be a limited order due to the anticipation of GOEX getting back in business sometime this fall.

Check the website for details as I will keep that up-to-date for everyone.

Sigh.

My $0.02:

With Goex availability pushed back yet again, if you need black powder I recommend buying Scheutzen, Swiss, or Graf's house brand (made by Scheutzen) from MPH, Powder Inc., Grafs, or whoever else might have it in stock. If you shoot a gun that works reliably with it, don't turn your nose up at Pyrodex or Triple 7, either. 

Tuesday, April 18, 2023

Update on Percussion Cap Availability

Here's a video update on the availability of percussion caps, from the NRA convention.


Key points:

  • Per Ethan, CCI produces caps in seasonal runs. Next run is in June, reaching shelves in July/August.
  • No real updates on Remington or RWS caps.

My $0.02 is that I recommended stocking up after they become available this summer.


Wednesday, September 14, 2022

A Canoe Gun by Jackie Brown, and Muzzleloaders for Survival

Over on Blog O'Stuff I've already posted about this, but this post will have a different slant.

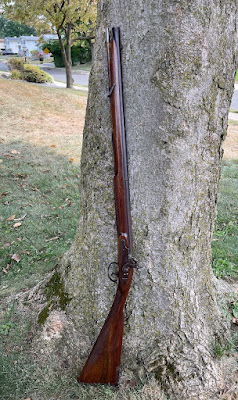
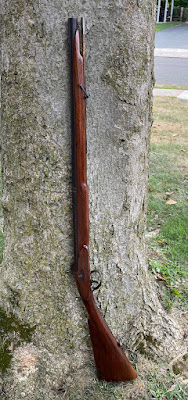
I bought this "Canoe Gun" (really just a short version of the Indian Trade Gun) at Dixon's Muzzleloading Shop last weekend. It's a 20 gauge percussion smoothbore. It was built by Jackie Brown. As a southpaw I could not pass it up.


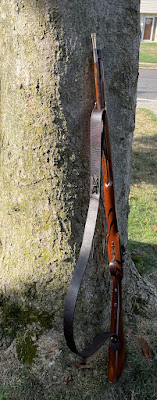
I made a sling for it from a cowhide shoulder I had.


Some measurements I took:

  • Overall length 40"
  • Barrel: 24.5"
  • Length of pull 13.5"
  • Weight 6.5 lbs.
  • Width of buttplate 2"


The lock is a large Siler. The barrel has a slight flare at the muzzle end. It may be slightly coned on the inside. The front and only sight is a trade gun-style turtle. It has a large Siler lock and the nipple is sized for No.11 caps. A .580" ball will drop freely down a clean barrel all the way to the breech.

I got a chance to shoot itthe next day over at a friend's place. He has some land and we can shoot safely in his yard. Unfortunately it was raining and the only place I could load while under overhead cover was his patio. I'd then step out to shoot and some tin cans we placed on a hillside.

My load of 1 oz. of #5 shot on top of 65 grains of Scheutzen 3Fg black powder penetrated both side of a #10 can from about 20 yards, so it's got enough power for hunting.

I also tried a couple varieties of ball loads. I shot a half dozen .570 balls loaded in paper cartridges on top of 65 grains of powder. I also tried a few shots with .575 balls loaded on top of a tow wad, with another tow wad over the ball to hold it in place. The balls loads shot high with how I was holding the gun.

Recoil with both the shot and ball loads was very mild. I plan to try some heavier charges.

I absolutely need to put both shot and ball loads on paper.

Everything went mostly well until the gun fell over onto the brick patio, landing on the hammer which was set to half cock. That broke the half cock notch on the tumbler. (Insert vast amounts of profanity here.)

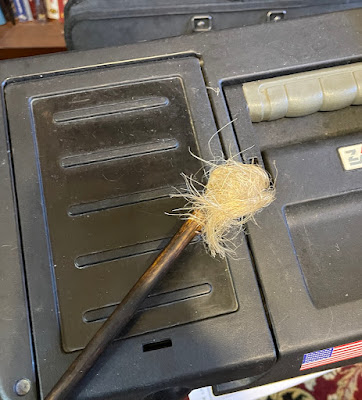
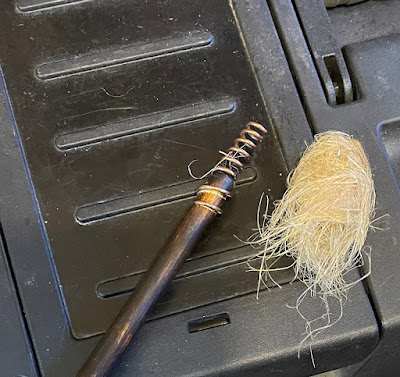
When I was done I used tow wrapped around a worm to scrub the bore. This was the first time I've tried using tow for cleaning and it works pretty well, much like a bore brush. I'll be using it at least for my smoothbores in the future. This is what tow looks like when wrapped around the worm. There's no reason you can't use it in a modern shotgun. It can even be washed and reused. Once it's worn out you can use it as tinder. You can make the equivalent by cutting a 4" to 6" length of hemp, sisal, or jute rope and unraveling it.


The primitive worm I use is just a coil of wire that winds onto the end of my ramrod. It works like a Chinese finger trap and doesn't easily come off.


After getting home I ordered a replacement tumbler from Track of the Wolf and I paid extra for 2 day delivery. My order arrived today and I repaired the lock after work. It took about a half hour with some needle files to fit the new tumbler to the hammer. I also cleaned up the side of the tumbler that rubs against the lock plate, using a stone. The hammer now clicks solidly into both the half and full cock notches.

I may be going upstate next weekend and if so I should be able to pattern shot loads and figure out how to hold it when shooting ball.

OK, Dave, I know you're saying. Why consider a muzzleloader for a survival gun? Sure, when these guns were originally made they were used for real as survival guns, but it's 2022 now.

For a long term/TEOTWAWKI survival gun a muzzleloader has some advantages, IMO:

  • No paperwork in most states.
  • You can make your own black powder and projectiles.
  • You can shoot birdshot, buckshot, ball, or buck and ball in it. In extremis you can shoot rocks or sticks.
  • It can use modern plastic shot cups for better shot patterns, or traditional materials for wads like felt, tow (flax or hemp fiber), or wasp's nest.
  • You can make percussion caps if you have the correct tool, thin sheet aluminum, copper, or brass, and the chemicals which are freely available now.
  • If it's a flintlock, each flint should be good for at least 30 shots and it's possible to make your own if you live in the right area and know how to do it. (For me, making caps is actually easier.)
  • If the gun is constructed like mine with a nipple and drum, the gun can easily be converted to a flintlock by replacing the drum with a vent liner and the lock with a large Siler flint lock.

I'll have to do a separate, more detailed post on the caplock vs. flintlock for a survival gun.

Of course it's nowhere near as good as even a single shot breech loader for defense but it still beats a sharp stick or harsh language. You are far from unarmed with one of these.


Sunday, April 04, 2021

The Gun Culture of the Konyak Naga

I recently learned of the Konyak Naga hill tribe of northern India and Mynamar (Burma). Apparently, guns are a big part of their culture and they make them themselves.

The Konyaks' guns seem all to be single or double-barreled muzzleloading shotguns with percussion locks. They make their own powder and caps.

There are a couple Youtube channels with information about the Konyak Naga gun culture that I've been watching lately.

This video has an overview of their gun culture:


Target shooting at a pig's skull suspended from a tall pole (apparently the object is to cut the string holding the skull):


And this one shows how they make percussion caps:


Finally, this video shows how they make gun powder:


I find this fascinating just because I am into black powder and muzzleloaders, but it also gives a glimpse of what's possible with primitive tools, a lot of skill, and patience.

Homemade Percussion Caps

 The current crazy ammo supply situation has even extended to black powder shooting supplies, including percussion caps. Although I was able to pick up a 1200 count sleeve of RWS 1075+ caps from MidwayUSA earlier this year, I wanted a fallback option as well.  So, in early January I ordered a #11 cap maker and a packet of Prime All from 22lrreloader.com. It took about a month to come in due to their backlog.

To go with the cap maker I bought a 12" x 30" roll of .005" thick copper foil at Amazon. This is a bit thicker than the beverage cans recommended by the cap maker's manufacturer.

After the cap maker came in I punched out about 100 cups. I am able to do so by hand but it's much easier using a mallet.


Anyway, the cups sat until yesterday. Instead of using the Prime All compound, I charged about a dozen with some Scheutzen 3Fg black powder topped with two toy caps, secured in place with a drop of Duco cement. It's a nitrocellulose laquer that acts as a binder, waterproofing agent, and is flammable.

I used a scoop made from a large pistol primer cup glued to a piece of bamboo from a chopstick to put the black powder in the caps.


Last night I tried the caps in my Euroarms Rogers & Spencer. I used them with Triple 7 as the main charge. I wanted to see how they'd do with a propellant that has a higher ignition temperature than black powder.

They worked pretty well. The first cylinder was charged with 20 grains by volume of Triple 7 3Fg, a lubricated wad, and .454 ball. All chambers ignited easily and the caps didn't fragment.

I then tried some paper cartridges with the same powder charge and ball but with 0.5cc of cornmeal filler. These must develop a higher chamber pressure, because I noticed that the gun was harder to recock due to the caps deforming more. Also, in this cylinder I had one misfire where the cap popped off but the main charge failed to ignite. It went off with a second cap but there was a noticeable delay. I think the nipple was clogged.

The Rogers & Spencer with my homemade caps on the nipples. I used a Delrin punch that I use for pushing out the wedges on Colt-style guns to seat the caps on the nipples. They are tighter than RWS 1075+ or Remington No.10 caps on these nipples.


I also shot two more cylinders tonight with 20 grains of Scheutzen 3Fg BP and RWS caps.

I regard this experiment as a success. I'm getting a 1/8" hole punch so I can more easily get the toy caps off the paper roll, which will speed production. I also need to try the Prime All compound.

Making percussion caps is tedious. I don't expect to make a whole bunch but I want to have the capability, just in case.


Sunday, March 14, 2021

Cap and Ball Revolver: Round Ball vs Conical Bullet

  This video from Paul Harrell provides a good comparison between round balls and conicals in percussion revolvers (in this case fired from a Ruger Old Army).


A few comments:

The conicals he used appear to have been cast from a Lee mold. They are similar in form to modern round nosed bullets that have been loaded in cartridges since the late 19th Century.

Conical bullets used in cap and ball revolvers in the 1850s and 1860s were generally more pointed. This would increase penetration but reduce terminal effectiveness because the bullet would be more prone to slip through tissue rather than punching a larger diameter hole.

Nowadays, more effective conical designs are available, intended for hunting, e.g. Kaido Ojaama's design, which has a wide, flat meplat.

In his book Sixguns, Elmer Keith recounted that Civil War veterans that he knew as a boy stated that round balls were more effective for antipersonnel use than the pointed conicals of the period.

Wednesday, January 20, 2021

Black Powder Shooting Supplies Now Getting Scarce

Last week I ordered 5 boxes of Hornady .454 round balls from Track of the Wolf. I got my order today, but only 1 box, with the rest cancelled, with a note that they cannot backorder balls.

So I checked out Midway. Hornady .454s are gone, no backorder. They did have Speer in stock so I ordered 10 boxes at $9.99 each.

That should keep me set for a while. I have a Lee .454 ball mold but it's either oversize or the alloy I used last time has some tin in it, because the balls dropped at .456 - .457. That's OK for my Ruger Old Army but unnecessarily hard to load in my Remingtons and Rogers & Spencer.

The online sources for black powder that I've checked have been depleted. I still have a decent supply from a bulk order from several years back.

Percussion caps have also been difficult to buy in the past couple of months. I was able to get a 2,500 count box of RWS #107+ caps last week from Midway, so I'm set for a while. Midway is now out of stock for all caps.

I'm still waiting to receive the percussion cap maker that I ordered at the start of the month from 22LRreloader.com.

Saturday, January 16, 2021

Combustible Paper Cartridges for Cap and Ball Revolvers

I have a sneaking suspicion that more than a few preppers have added a cap and ball revolver or two to their arsenals. Although obsolete since the 19th Century, they are still deadly weapons and when setup and loaded correctly, they are a reliable for six shots. On top of that, in most states they are available legally without completing any paperwork or submitting to a background check.

Most contemporary shooters load their cap and ball revolvers with cap and ball. However, in the 19th Century, especially in the Civil War, they were commonly loaded with combustible paper cartridges. These allow you to load them a lot faster and reduce the amount of gear required for you to take to the range or the field for a shooting session.


Over on Blog O-Stuff, I put up a post about making combustible paper cartridges for cap and ball revolvers. Check it out.


Friday, September 18, 2020

Loaded Some Black Powder Shotgun Shells

 Last weekend I primed 25 Magtech brass 12 gauge shotgun shells and on my lunch break today I finished loading them. The details:

  • Magtech 2.5" all brass hull
  • CCI Large Pistol Primer
  • 80 grains of 2Fg Goex black powder
  • 11 gauge nitro card (over powder card)
  • 11 gauge fiber cushion wad
  • Lubricated felt wad
  • 1 1/8 oz. of mixed No.7.5 shot
  • 10 gauge overshot card
  • Sealed with Duco cement


Magtech hulls require the use of oversized components because the case walls are thinner than 12 gauge plastic or paper hulls.

The felt wads were punched out of 1/8" thick wool felt with a .75" punch, then soaked in a mixture of 50/50 beeswax/mutton tallow. This is to help keep powder fouling soft.

The shot is a mix of plated that I bought from Rotometals, along with some unplated shot scavenged from miscellaneous promo loads. No. 7.5 shot is primarily for clay busting but it will work on doves, as well. Otherwise I'd load No. 5s for small game hunting.

I'll let the Duco cement cure overnight before boxing them up.

These will be good for informal clay target shooting. They shoot well in my Russian-made Baikal MP-310 over/under. Cleanup in a chrome-lined smoothbore isn't bad.

Monday, July 27, 2020

Black Powder Shotgun Go Boom!

A few years ago I loaded up some black powder 12 gauge shotshells in Magtech all-brass hulls, that I bought from Ballistic Products. This exercise was inspired by a video on the Survival Russia YouTube channel, which has since been taken down in accordance with their rule prohibiting videos that show how to load ammunition.


(The picture is a frame grab from an iPhone video.)

I did a few variants:

1-1/4 oz. of #7.5 shot on top of a compressed column of sawdust (in lieu of a cushion wad)
1-1/4 oz. of #5 shot on top of sawdust.

Also, some of the same payloads on top of lubricated wool felt wads. (I have a supply of such homemade wads for use in my Euroarms Magnum Cape Gun percussion 12 bore.)

And a patched .690 round ball on top a couple lubricated felt wads. All were loaded on top of 80 grains of 3Fg.

I tested one each of the #7.5 and #5s, and 3 of the PRB loads.

From 10 yards the #7.5 penetrated one wall of an empty soup can. The #5s went through both sides. Patterning seemed OK for a cylinder bore gun.

Accuracy with the PRB would be good enough to take a deer out to 40 - 50 yards or so.

Because these shells were loaded with black powder, I ran a couple patches wet with a Ballistol/water emulsion through the bore when we finished shooting. I repeated this at home and left the bore with a good coat of Ballistol.

The empty shells got put into a soapy water bath overnight. I found that a 12 gauge tornado brush was perfect for brushing out the inside of the cases to remove residue left from the glue I used to hold the over-shot cards in place.

Tomorrow I'll punch the primers out of the spent shells and clean the primer pockets. I'll also use some acetone to remove the load info I'd written on the side of the shells with a Sharpie marker.

Shooting these BP shells was a lot of fun and the cases should be reusable more or less indefinitely.

One thing I like about the Magtech brass shells is that they use large pistol primers rather than 209 shotshell primers. I use LPPs for .38 WCF and .44 WCF, so that's one less component I need to stock. Also, in normal times, pistol primers are less expensive than 209 primers. (All bets are off in this election/pandemic/civil unrest year, however.)

Monday, April 08, 2019

Running Ball

(In this post, I used the word "balls" a lot. Huh, huh.)

This past weekend I'd planned to shoot my Rogers & Spencer percussion revolver but couldn't. When getting my shooting gear together, I found that I had only two .454 balls left. I wound up shooting my Pedersoli Brown Bess and Polymer 80 Not-A-Glock, which I'll write up in a separate post.

Something I've preached about on my blogs has been bullet casting for self sufficiency, resistance to government guns bans, and panics induced by fear of them. I recently picked up Lee molds for .454 and .490 balls, and a Lyman cast iron lead pot. This weekend I ordered a Lee .690 ball mold for use in the Brown Bess and my Euroarms Magnum Cape Gun.

I took a long weekend to decompress from bullshit at work, so with today's weather being decent I setup one of my Coleman stoves out in my shop to run some .454 balls.

Here I have the mold warming while the lead pot comes up to temp. The foil trays are for me to dump the sprues and dross when I flux.


It took awhile for the pot to come up to temperature. I'm finding that keeping a good constant casting temp is an acquired skill that I've yet to master. My balls were coming out either wrinkled or frosted. Wrinkly balls mean that the cast was too cold while frosty balls are a sign that it's too hot. I put the wrinkliest balls back into the pot but I'm keeping some that aren't too bad. These will be fired at a maximum of 25 yards at targets the size of a paper plate or larger, so minor imperfections won't be an issue.

I haven't counted yet, but I should have at least 50 shooters here. I called it quits when I ran out of gas in the stove.


Aside from the Rogers & Spencer, these will also work in my 1858 Remingtons. One could load them into .45 Colt cartridges, as well.

It is possible to keep even percussion guns going without buying factory supplies. Aside from casting your own bullets, it's possible to make black powder and even percussion caps at home. The latter especially is potentially extremely dangerous, so proceed with caution. My plan to deal with future shortages is to stock up ahead of time.

Edit: I wound up with 97 shootable balls from my first batch. After the stove cooled and I was able to refuel it, I ran another batch and came out with another 126 usable balls. That's a decent run and will last me awhile.

Sunday, January 06, 2019

The Twelve Apostles of Musketry

In the pre-flintlock era, before the invention of paper cartridges, it became common for musketeers to carry pre-measured powder charges in wooden bottles hanging from a bandoleer. They have come to be known as the "12 apostles," after the Apostles of Jesus. (In my quick research, the term may actually be more modern and not in use in the 17th Century. Regardless, it's in use today.)

Regardless, many modern muzzleloading shooters like to pre-measure their powder charges before heading afield or to the shooting range. There are numerous "quick loaders" available from the usual black powder shooting suppliers, but I found a cheaper alternative:


The modern apostles in the picture are 10ml centrifuge sample tubes with snap caps. Each has 70 grains of Goex FFg black powder in them, which occupies about 5.5ml. So, there is plenty of space in them for hunting loads in my rifles, which will be under 100 grains. I bought a bag of 50 of the tubes from Amazon for $10.39 on Prime. 15ml tubes should handle hunting loads for almost any muzzleloader.

Tuesday, January 01, 2019

Zeroed the Hawken

Today I took advantage of unusually warm weather for January 1st and got the Cabela's Hawken out to the range and got it zeroed with its new sights.


It was shooting about 18" low and a little left at 50 yards with my initial load of 60 grains of 2Fg Goex, a .490 round ball, a 0.018" ticking patch lubed with Track of the Wolf's mink oil tallow, and a CCI No.11 cap.

Grouping with the 60 grain load was 3 to 4" from the bench. IOW, not very good. So, I increased the charge to 70 grains and the rifle started grouping nicely. My last three shot group is below. It's the one hole in the center.


That's 2 in the X-ring and one just outside it in the 10. I can certainly live with that. (The target is full of .22 holes from taking my daughter to the range.)

I still want to experiment with different charges, patch thicknesses, and ball size.

Monday, December 31, 2018

New Rear Sight for my Hawken Rifle

Several years ago I bought a Cabela's Traditional Hawken rifle in .50 caliber. It isn't a faithful copy of the real Hawken rifles of the 19th Century, but nevertheless, it's a well made and nice shooting gun. It's more or less a variant of the Lyman Trade Rifle, but fitted with a cap box on the stock and double set trigger. Also, unlike the Lyman, it was available with a left handed stock and lock. Both the Lyman and Cabela's rifles were made by Investarms in Italy.

One thing I did not like about the rifle was the sights. The rear sight, in particular, was a poor design. The adjustable rear notch was a wide open "V". IIRC, the Lymans's have rear sights that are dovetailed in, which makes replacement with a fixed but better sight easy. Unfortunately, the Cabela's rear sight was held on with two screws and nobody made a good replacement.

So, I decided to install a Lyman Model 66SML aperture sight, made for the Lyman Great Plains Rifle, Trade Rifle, sidelock Thompson-Centers, and similar rifles.

The Model 66SML is mounted on the tang with two screws. It uses the rear wood screw which goes through the tang into the stock, plus an 8-32 screw into the metal of the tang. The tang on my rifle wasn't drilled and tapped so I did that today.

Using a #29 drill on the tang:


Before drilling the hole, I located it by mounting the sight on the tang and marking the spot with a transfer punch. I then dismounted the tang from the rifle and used a pilot drill to ensure the #29 drill wouldn't skip. Only then did I put the twist bit in the chuck.

I then tapped the hole with 8-32 threads. I used #3 Morse taper lathe center held in the mill's head to guide the tap so it started off straight:


I used a little Tap Magic on the tap, but I could probably have done it dry with no problems. OTH, there's no reason not to use a lube and save a little wear on the tap.

A closeup of the newly mounted sight:


And finally, the whole rifle:


This rifle has a 1:48 twist, so it can shoot either patched round balls or conicals like a Hornady Great Plains Bullet or T/C Maxi balls. So far, I've just shot it with PRB and it did well.

Simple work like this is a main reason I bought a small lathe and mill back in 2013. It took me about 45 minutes to do this, which included digging out the rifle and rear sight, schlepping them out to my shop, and doing the work. In contrast, to have a gunsmith mount the sight it would require locating a 'smith locally or shipping the rifle, getting onto his wait list, and probably paying about $75 to $100. Since shooting is my hobby, I will eventually do enough jobs like this to largely offset the cost of the tools.

Of course, that doesn't even account for the satisfaction of doing it myself.

Sunday, February 18, 2018

Self Sufficiency

Today I cast up about 10 pounds worth of bullets for .44-40, using my Accurate Molds 43-215C mold. I got at least a couple hundred usable projectiles.


You know damn well that the next time the Dems get into power, there will be another panic. How are you preparing against that inevitability?

Sunday, November 19, 2017

Black Powder Shotgun Shells in Brass Cases

Note/Disclaimer: This post contains loading data believed to be safe in my guns. It may not be safe in yours. Do your own research before you try this. I'm not responsible if you get hurt or your gun gets damaged.

A couple of weeks ago on Survival Russia, Lars posted a video about loading brass 16 gauge cases using minimal tools. He followed up with a second video in which he shot his reload and got what I considered pretty good results.

In the past I have experimented with hot glue slugs* using minimal tools, and as I've posted about before, I have muzzleloading smoothbores. I also have a few break open shotguns that I've been wanting to try black powder loads in, since I have a good stock of black powder and you can reload brass cases with minimal tools that you can make at home.

So, I put in an order with Ballistic Products, Inc. for a few items, including:
  • Two boxes of Magtech empty 2.5" 12 gauge brass shotshell cases, and
  • A 500 count bag of 10 gauge over shot cards.
Magtech brass cases have a larger internal diameter than the equivalent gauge plastic hulls, so they recommend using 11 gauge nitro cards and fiber cushion wads, and 10 gauge over shot cards.

I use home made cards and felt wads in my 12 gauge Euroarms Magnum Cape Gun, cut with a 3/4" punch, which is about 11 gauge. So, I decided to save a few bucks and use these in the brass cases. As it turned out, I would have gotten a better fit with 10 gauge components all around.

Most references I've seen indicate that one should use FFg when loading 12 gauge black powder shotgun shells. However, Goex's load data specifies FFFg (PDF), so that's what I used. (Goex recommends FFg in muzzleloading shotguns.)

Yesterday, I took one box of the Magtech hulls and loaded a few different recipes, as follows:

  • 1 oz. #7.5 shot using sawdust in lieu of a fiber cushion wad (a la the Survival Russia video).
    1-1/8 oz. #7.5 shot using a sawdust "wad."
  • 1-1/8 oz. #7.5 shot using the same 1/8" thick lubricated felt wad that I use in my 12 gauge muzzleloader.1-1/4 oz. #5 shot with sawdust.
  • 1-1/4 oz. #5 shot with felt wad.
  • Patched .690 round ball.

All shot loads were primed with Federal No.150 large pistol primers and charged with 80 grains of FFFg Goex black powder, and a home made cardboard over powder wad.

The round balls have two over powder cards, a lubricated felt wad, and a lubricated 0.020" patch, and 90 grains of FFFg.

All shot loads are sealed in place using one of the BPI 10 gauge over shot cards held in place with silicone RTV sealant. I used Gorilla Glue gel super glue for the ball loads because I ran out of RTV.

Some pictures:

The 3/4" oak dowel I used for seating components. I drilled a hole in one end to fit over the primer pocket that protrudes into the case. Yes, the Magtech hulls are balloon head cases. I used my lathe to slightly turn down the dowel so it would go all the way into the case, and to drill the hole.


 Some cases waiting to be primed, a case with the dowel inserted, and a primer sitting on a 1/8" piece of aluminum. To prime the cases, I placed the primer down on the aluminum, centered the case with the dowel in it over the primer, and gave it a few good whacks to press the case down over the primer.

If this makes you cringe, consider that it is exactly how you prime cases in a Lee Loader.


A primed and unprimed case:


Make sure the primers are seated flush with the case head. You don't want to accidentally set off a high primer by closing your shotgun.

Next up I poured a powder charge into the case and topped it with a card. For the sawdust shells, I then filled each case to the top with sawdust. I have a No.10 can filled with it that I've been saving to make fire starters.


Then I used the flat end of the dowel to compress the sawdust.


This was topped with another card and then the load of shot poured in.


And here's one of the patched round balls in place:


By using the drilled end of the dowel I was able to keep the sprue centered, facing up.

Finally, it's topped off with an over shot card and glued in place. (This one hasn't been glued yet.)


Advantages of this method include that you don't need any tools you can't find or make at home, and the shells should be reloadable pretty much indefinitely, especially since the case mouths aren't being crimped. Because I'm using black powder, small variations in powder charge aren't dangerous the way they would be with smokeless powder, especially when shooting them through nitro-proofed shotguns.

The main downside compared with loading shotshells with modern components is inferior performance. Modern shotcup wads that protect the shot from deformation in the bore result in better, more even patterns.


Special safety note about the round balls: Before Foster slugs became widely available in the 1930s, "pumpkin balls" were the most common type of single projectile load in shotgun ammo in the US. After the introduction of choke barrels, they were generally loaded with balls significantly under bore size so that if they were fired through a choked barrel, the barrel would not be damaged. They don't compress as easily as Foster slugs. For this reason, I would not fire a patched .690 ball through anything tighter than improved cylinder.

For example, I have an H&R Model 1905 made sometime between 1906 and 1915 with the barrel marked "12 GUAGE CHOKED." I measured the muzzle last night with calipers and it came out at about .695, which is extra-full, or even a turkey choke. I'll shoot the balls through my chopped, cylinder bore H&R Topper.

Hopefully, I'll get to try out these loads in the next few weeks, and will post a follow up.


*Hot glue slug: A field-expedient slug which you cut the crimp off a bird shot load, pour out the shot, then add the shot back after mixing it with hot glue. When the glue hardens you have a slug that's useful at short range. Very similar to wax slugs. Do a lot of research before you make and shoot any, so you don't do anything dangerous.

Sunday, August 21, 2016

Tap-O-Cap Reborn

It looks like the same folks who came out a couple years ago with a .22LR reloading tool set have introduced a tool to make #11 caps.

http://sharpshooter-22lr-reloader.myshopify.com/products/11-percussion-cap-maker

Thought I'd pass this along since every so often somebody brings up the old Tap-O-Cap. I have no connection with the company.