Showing posts with label food. Show all posts

Tuesday, December 02, 2025

Backpacking Food

This video came up on my YouTube playlist and IMO it's very well thought out, and worth sharing because it's applicable to building a bugout bag or get home bag.


(Blogger is acting wonky. If the video isn't embedded, click here.)

Dylan uses gallon Ziploc bags for his meals. For a BOB or GHB vacuum sealing each meal with a Foodsaver might potentially preserve them a bit longer and also compact them so they take less room in your pack.

Sure, you could just take dehydrated meals from Mountain House, etc., but these meals are likely to be less expensive although they won't have the same shelf life as MH.

Tuesday, August 06, 2024

Kosher Meal Review 2

Continuing my post from yesterday, tonight I had another one of the KJ Poultry kosher long-term shelf-stable meals I got from Amazon. Tonight's entree was Chicken Meatballs with Rice and Mushrooms.


After heating in the microwave for about 2.5 minutes:


There were five of these meatballs in the dish:


Like the Beef Stuffed Cabbage I had last night, this was very tasty. I found this meal more filling since there was more solid food in the form of rice and mushrooms, compared with the gravy in with the beef.

So far, KJ Poultry is hitting it out of the park.

Monday, August 05, 2024

Kosher Meal Review 1

Something I'm trying to do is get more prepping info out to my fellow Members of the Tribe. Observant Jews will follow the laws of kashrut and only consume kosher foods. So, I decided to order some shelf-stable kosher meals and try them out.

I bought a six pack of Kosher meals by KJ Poultry from Amazon:

  • Beef stuffed cabbage
  • Beef rib steak
  • Chicken meat balls
  • Stuffed chicken
  • Chicken soup
  • Chicken chow mein
One of the meals has an sell-by date of October 2027, while the other five were November 2027. Note that those are sell-by dates, not expiration dates. If you keep them in a cool, dry place out of the light they should last a few years past that.

Tonight I tried the beef stuffed cabbage for dinner. Pics of the box, front and back:


You should be able to click on the images to view them larger. The ingredients and prep instructions are on the back. I warmed it in my microwave.

The sealed meal you'll see when you remove it from the box:


After heating and opening:


Lots of sauce with two lumps of beef and rice stuffing. One of them had come unwrapped. The other was still wrapped in cabbage.

A closeup:


It tasted excellent. The portion size was small for me. I could've eaten two of these meals for dinner. Alternatively, a side would have been nice. It would probably make a decent lunch.

Is it worth it? By itself this is not a full meal. But it's kosher, shelf stable, and can be heated a few different ways. If necessary it could be consumed cold. In my opinion they are a good option for including in a long-term kosher food supply.

I'll post reviews of other meals as I eat them.


Monday, January 01, 2024

Making Pemmican Part 3 - Taste Test

Last week a friend and I went to his camp in Tioga County for Pennsylvania's late flintlock deer season. While we did not get any deer, we did get a chance to try the pemmican I made earlier in the week, as described previously on this blog.

To prepare the pemmican for a meal, we made a rubaboo, AKA stew with it. Along with three of the pemmican pucks, we used dried, mixed vegetables from Turkey Foot Trading and Forge, a can of diced tomatoes, garlic, salt, and black pepper.

Cooking it up on the wood stove:


And ready to eat:


(Styrofoam bowls reduce the dishes we need to wash in a completely off-grid, no-running water camp site.)

The verdict: As a meal for someone who has been out in the cold all day it's pretty good. It was very filling and although we each had three bowls about half was leftover, which I brought home in a Ziploc back and reheated for dinner last night.

I may try making pemmican again but I'll try to get the jerky ground more finely.

There's a package with two pucks left in my freezer so I'll have to come up with another way to try it, maybe a rechaud.


Monday, December 25, 2023

Making Pemmican - 2

Today I finished up my first batch of pemmican. I let the dehydrator run overnight at around 115 degrees. Nowadays, it's generally recommended to make jerky at around 170 degrees but this will destroy more nutrients. I figure that a bit lower and slower will be safe. Jerky was originally made by drying for a few days in the wind over a low, smoky fire.


Then I shredded it in my food processor.


I probably would have gotten better results if I did it in smaller batches rather than all at once. I didn't get it as fine as I wanted.

Next I melted some beef tallow over a low heat, poured it into the bowl and mixed it thoroughly. After that I spooned it into the muffin tin to make pucks.


The tallow was fully melted in the pic. When it's melted it's a clear, slightly amber liquid.


In preparation for sealing the pucks I took them out of the muffin papers. They are pretty soft. I think I could have used a little less tallow.


Vacuum sealing:


And all done, ready for the freezer:


I decided to put two pucks in three of the packs to reduce waste.

Later this week I'll be heading upstate for Pennsylvania's late flintlock season. We'll try making a stew or rubaboo with one of the packages. I'll post a review after I get home.

Sunday, December 24, 2023

Making Pemmican - 1

A survival food I've wanted to try is pemmican. I've watched several videos about it on YouTube and decided to give it a whirl. Wikipedia provides a good overview of what it is:

Pemmican (also pemican in older sources[1][2]) is a mixture of tallow, dried meat, and sometimes dried berries. A calorie-rich food, it can be used as a key component in prepared meals or eaten raw. Historically, it was an important part of indigenous cuisine in certain parts of North America and it is still prepared today.[3][4] The word comes from the Cree word ᐱᒦᐦᑳᓐ (pimîhkân), which is derived from the word ᐱᒥᕀ (pimî), "fat, grease".[5] The Lakota (or Sioux) word is wasná, originally meaning "grease derived from marrow bones", with the wa- creating a noun, and sná referring to small pieces that adhere to something.[6][7] It was invented by the Indigenous peoples of North America.[8][9]

Pemmican was widely adopted as a high-energy food by Europeans involved in the fur trade and later by Arctic and Antarctic explorers, such as Captain Robert Bartlett, Ernest Shackleton, Richard E. Byrd, Fridtjof Nansen, Robert Falcon Scott, George W. DeLong, and Roald Amundsen.

Link.

I'm using the simplest recipe possible: meat and fat. I bought a couple packages of thinly sliced top round steaks and a couple jars of Epic beef tallow at my local supermarket.

The first step is to turn the beef into jerky:


I'm using my Nesco FD-75A dehydrator.

After the meat is dried to the point where I can crumble it with my fingers, I'll put it in a food processor to powder it.

Once the dried meat is powdered it will be combined with melted tallow, poured or scooped into a container, and allowed to set up.

Finally, I plan to vacuum seal each brick or puck of pemmican using my Foodsaver vacuum sealer. Thus prepared the pemmican should last for years if not decades, especially if I put the sealed packages in my freezer.

I will post follow-ups tomorrow showing the next steps.


Sunday, April 09, 2023

Alpineaire Black Bart Chili Review

 Back in the fall I bought two packages of Alpineaire Black Bart Chili from Amazon Prime. Today I decided to try one for lunch.


To prepared it, pour two cups of boiling water into the bag, mix, and then let sit for 10 - 12 minutes. Then mix it again before eating.

I let it sit for at least 12 minutes, mixed it up, and it looked like this:


It came out a bit soupier than I'd like. The texture was typical for reconstituted freeze dried meals. It was fairly spicy.

Because it was so soupy, after I ate half I tried adding some parched corn flour to it to thicken it a bit. Not recommended. I didn't care for the resulting texture.


Overall, I'd recommend it and will probably buy some more for my camping/emergency prep food stash.

Thursday, June 16, 2022

Morning Call: Record Diesel Prices Crushing Pennsylvania Farmers

Warning, doomer post:

The Morning Call is the third largest newspaper in Pennsylvania. It's not what anyone would consider to be "fringe." So, the fact that it ran this should get your attention.

HARRISBURG — A Lehigh County farmer recently called Kyle Kotzmoyer and said something like “I’ve got a tractor hooked up to my corn planter out here, no diesel fuel, and I can’t afford to get any.”

...

After the hearing — in a phone interview — Kotzmoyer made clear that food may not be as available because of the fuel price surge.

“One, if they can’t afford to put it in the ground,” he said of farming using diesel-thirsty machinery. “Or, two, if they can’t afford to take it out.”

Average diesel fuel prices Tuesday in Pennsylvania were $6.19 a gallon, about 75% higher than a year ago, according to AAA.

...

Asked if food shortages were a possibility, Kotzmoyer said, “If the farmers cannot get crops out of the ground, then there is not food on the shelves.”

Kotzmoyer said he has already heard of farmers selling seed corn or beans back to dealers so they can plant hay, which has “more return on investment.”

...

Full article.

Of course, the problem is not limited to Pennsylvania. This is nationwide.

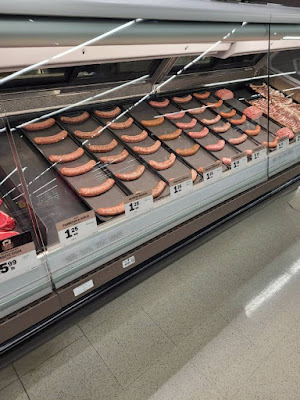
This picture was posted by "Lorax" from Wisconsin on AR15.com yesterday:


They are spacing out bratwurst in a Wisconsin supermarket like they are cars at a dealer with low inventory.

On top of the disruptions in global food supplies due to the Russo-Ukrainian War, none of this bodes well.

Continue to stock up.

Thursday, June 24, 2021

Electrolytes and Hydration

My renewed interest in cycling has me looking at electrolytes and hydration. A post in a private forum in which the author suffered the effects of dehydration offered some additional encouragement in this area. 

Also, I experienced the beginning stages of heatstroke once when I was a teen. I actually went blind for a few minutes until I got inside, cooled down, and rehydrated. (Incidentally, everything went white, not black. One of the two times I really came close to dying.)

I did some searching and ran across this article, Ask the Coach: Which Electrolytes Does a Cyclist Need? Another good article is from Blue Collar Prepping: Electrolytes Revisited.

The key takeaway from both articles is that if you'll be exerting yourself and sweating a lot in warm weather you need to replenish not only with water but also with salts your body needs.

On my hot weather rides, I've mostly been using Gatorade made from powder mix at 50% strength. I'll generally mix it in one bottle then split it between two, and then fill each bottle up from the tap to dilute it.

At the suggestion of the author of the private forum post I mentioned, I also bought some Liquid I.V. Hydration Multiplier. I tried the lemon lime and found that it's much sweeter than I like, when mixed full strength, but more palatable when mixed half strength.

Another option is SaltStick electrolyte chewable tablets. I bought a pack of these but haven't tried them yet.

Anyway, something to be aware of.


Saturday, November 23, 2019

Making Some Beef Jerky Today

Making some beef jerky this weekend. Weis had a 2-fer special on London Broil, so that's what I bought. It came out to a bit more than three pounds of meat. This is half.


The knife is a Terävä Jääkäripuukko 110 carbon steel model from Varusteleka. It came EXTREMELY sharp. I'll do a follow up post on the knife after I get the chance to use it some more.

I put the meat in the freezer for about a half hour before slicing, which made it firm, which in turn helped in cutting uniform slices about 1/8" thick. The puukko went through it like a hot knife through butter.

After slicing the meat I added the Nesco cure and spices, and now it's marinating in the fridge until tomorrow morning.

It should take about 10 - 12 hours in my Nesco dehydrator tomorrow. Gonna be good.

My plan is to freeze about half the jerky to bring with us when we go upstate for deer hunting in a few weeks. The rest will be for snacks until then.

Sunday, July 21, 2019

Bumblebee Canned Smoked Trout

I tried a tin of Bumblebee smoked boneless, skinless trout today for lunch.


More of these cans will be getting added to my larder. It'll make a good addition to my daypack or for overnighters. It was good right out of the can. I bet this would be really good on the FDF rye bread crisps from Varusteleka, but I like that it can be consumed with no preparation.

I'd picked this up at my local supermarket a few weeks ago. If you can't find it locally it -- along with other brands -- can be bought from Amazon. I'd like to find some packed in olive oil rather than canola but this will do for now.

Sunday, July 15, 2018

Homemade Apple Chips and Beef Jerky


We've had a Nesco food dehydrator gathering dust in the kitchen since last year. Yesterday, Amanda and I finally put it to use.

We first made a batch of apple chips. To make them, we cored a half dozen apples, sliced them about 1/4" to 3/8" thick, and then dipped them in lemon juice to prevent browning. Then they went into the dehydrator at about 140 degrees F. for 4.5 hours.

I should have gotten picture of the apple chips, but they lasted all of 10 minutes after coming out of the machine. They were awesome.

While the apples were drying we sliced up 6 chuck steaks and marinated them with seasoning that came with the dehydrator. After the apples were done we put the beef in and let it run overnight, about 12 hours at about 160 degrees F.


I took it out this morning. It's really damn good and a lot cheaper than store-bought beef jerky. For around $16 worth of beef I probably got about $50 worth of jerky, had I bought it at the supermarket.


The dehydrator came with 5 trays and will work with up to 12. This morning I ordered two more trays along with a package of the Nesco jerky seasoning.

As an aside, the dehydrator is not too noisy. It was audible from the next room but was basically a low-level white noise.

Making the apple chips and jerky was time-consuming but worth it. I'd like to see us get into using the machine a lot more because the home made dehydrated items are a lot cheaper than those bought in the store.

Tuesday, March 13, 2018

Korean Beef Bibim Bap MRE

While checking out foreign MREs on eBay, I ran across the vendor "magnetic1" selling dehydrated beef bibim bap entrees, which are supposed to be Korean-issue. Since I'm always interested in stuff to eat while camping, and I love Korean food, I ordered a 3-pack to try.

Here's the front and back of the package along with the included spoon.


Upon opening, you can see that it's mostly rice with some vegetables. The little brown nuggets are pieces of dehydrated beef. Also shown are the packet of sesame oil and gojang (Korean BBQ) sauce that were inside.


To cook it, you add hot water to the black line inside the bag, seal it, and let it sit for 10 minutes. Or, you can use cold water but you'll need to wait twice as long.

And here's what it looks like after rehydrating and mixing in the oil and sauce packets.


I liked it, it was damn tasty. I used all of the gojang sauce and while it was spicy, it wasn't mouth-burning. That said, I eat Korean food fairly often and eat it full strength, so YMMV. Compared with a couple different Mountain House meals that I've tried, this isn't nearly as salty.

For me, this entree would be enough for lunch but not dinner.

I have two more left that I'm going to save for the field.

Monday, May 29, 2017

Kalakalle Fish Cock

Today for lunch I tried out some Kalakelle Fish Cock, from Finland's Varusteleka military surplus store. There's no way I could come up with a a product description as vibrant as Varusteleka's, so I'll do a bit of copy-paste:

A traditional Finnish delicacy in canned version, 5 years of shelf life and does not contain cock! If "Fish Cock" doesn't automatically mean food to you, it's a Finnish speciality - fish baked inside rye bread. This is a perfect snack or trekking food, always ready to eat and contains enough energy to keep you going and enough high quality protein to keep you in shape.

The food is much like a mix of hamburger and pie, made out of rye bread and filled with smoked salmon. The funny part is that because of the hermetically sealed tin can, no preservatives are needed, and the ingredients are the superfoods they always tell you you should eat. Because it's healthy AND it tastes good, this food resembles much like a situation where you are enjoying your beer in a bar and a pretty young girl comes up to you and asks if you would like to go to her place and assfuck her. A deal too good to be true. Except with this food delicacy there is no hidden cock included.

Read the whole description here. (Parts NSFW.)


What you see upon opening the can:


And after digging in. You can clearly see the layer of salmon between two layers of rye bread.


As you can see, there is apparently no cock in the can.

I'd eaten a banana and a snack bar before opening the can. I found it rather dense and filling, so I only finished about half, then stuck the rest in the refrigerator for later.

The fish cock was pretty good for a canned good sold as survival rations. It tasted like a good dark rye bread with salmon (which is of course, what it is). It was on the dry side, however, so you'll definitely want some water to go along with it.

IMO, it would make a good choice for a field lunch or dinner that doesn't require any preparation.

Varusteleka also sells a ham cock version, which I haven't tried. I have tried a few other food items from them:

The chocolates are really good. The whole milk has a definite coffee taste, while the coffee taste is more subdued in dark chocolate, which is more bitter. The salmon groats are good spread on dark bread. It would also be good on pasta.

As of this writing the red tins are out of stock, but they regularly get restocked.

I've placed a few orders from Varusteleka and they've always shipped my stuff quickly. However, getting it cleared through US Customs at JFK Airport always seems to take at least a week. So, if you need something from them allow at least a couple weeks for transit.


Wednesday, November 30, 2016

Sunday, September 04, 2016

Dinner on the Mountain

Yesterday Amanda and I went up to the Conrad Weiser State Forest for a few hours, and had dinner on the mountain. (It's not much of a mountain, but hey, we're in southeast Pennsylvania.)

We used my Esbit CS985HA cookset to boil the water for our noodle soup and heat up some Vienna sausages.


It's a versatile cookset. The 33.3 oz./985ml main pot has volume graduations stamped into it, which can be read from the inside. The 15.9 oz./470ml smaller pot can be used as a lid, or as shown above, as a saucepan. Both have folding rubber-covered folding stainless steel handles.

The pot stand/windscreen has four rubber feet on the bottom which would keep it slightly elevated off a table.

The set allows you to cook with either the included brass, Trangia-style alcohol burner or using Esbit hexamine fuel tablets. A small platform to put inside the pot stand when using the tablets is included. The pots, tablet platform, and pot stand are made from hard anodized aluminum.

You could burn sticks and twigs in the pot stand but it's not really designed for that. E.g., the bottom has a large opening so you'd want to sit it on a rock or cleared dirt.

For use with the alcohol burner, a simmer cap/snuffer is included. There isn't enough room in the pot stand to use it as a simmer cap but it works well to extinguish the stove. You want to use it instead of the screw-on cap for the stove. If you use the cap to put out the stove you'll damage its O-ring, which will let the stove leak if you carry it fueled and ready to go.

All the parts nest together and can be stored in an included mesh bag. I line the pot with a plastic bag before nesting everyting else inside to keep it clean. Also, if I use hexamine tablets the outside of the pot will get a coated wth soot. The plastic bag allows me to keep that off the rest of my gear.

The total weight of the Esbit cookset is 15 oz., not including fuel. I keep the brass burner filled with denatured alcohol, three or four Esbit tablets, a bandana, and a small box of matches packed in the kit.

Our campsite is not near a water source so all of our water had to be packed in. Amanda used an Osprey water bladder in her pack, while I used three one-quart canteens. One is a 1945-vintage aluminum USGI canteen that I found several years ago at a gun show.  The other two were Nalgene Oasis canteens, which have the same exterior dimensions as US military issue canteens, but which are made of a better plastic, weigh a little less, and don't impart any taste to the water.


Sunday, August 28, 2016

Further Seasoning of the Bromwell Frying Pan

I cooked breakfast in my Bromwell this morning. The bacon didn't stick but my eggs did. So, this afternoon I seasoned it more with flax seed oil (food grade linseed oil). I gave it a very light coat and heated it on the stove until it smoked, then let it cool down. Repeated this for a total of about 5 or 6 coats until I got tired of doing it.


The pan should only get better with use.

Saturday, August 27, 2016

Bromwell 7" Pressed Steel Frying Pan

Something I'd been looking for was a lightweight, pressed steel frying pan to take camping. After reading a thread on Bushcraft USA with a link to eBay, I ordered a 7" Bromwell pan last Sunday. It arrived on Wednesday for $16.95 shipped. Note that 7" is the diameter across the top, not the base. The seller also lists some 6" Bromwell pans but that's a bit on the small side for my taste.

The pan is plain pressed carbon steel with a handle similar to the old "Cold Handle" type that you can frequently find a garage sales. Whatever rust preventative Bromwell used worked well but required a lot of scrubbing and soaking to remove.

I seasoned it today by first giving it a coat of canola oil then cooking up some bacon for lunch.


Mmmm. Bacon.


It'll need more seasoning, which of course gives me an excuse to cook more bacon.

This was my first time using a skillet with this kind of handle. It stayed cooler than I'd expected but I still used a pot holder. A bandana or shemagh would work in the field.

The small size allowed a lot of splatter outside onto my stove. The next time I use it I might do so outside, perhaps over my Emberlit stove.

It's a heck of a lot lighter than a same-sized cast iron pan would be. It's definitely back-packable.

Wednesday, September 23, 2015

Emberlit Wood Burning Camp Stove

Earlier this month I posted about camping stoves, including the Emberlit wood burning stove which I bought last winter, but didn’t get a chance to use it until Labor Day weekend. This is a follow up.

The stainless Emberlit weighs 11.45 oz., has a footprint of about 4.5” inches square, and is 6 inches tall. The stove walls taper so that the top is a little smaller than the bottom. I think the earliest production models did not come with the cross bars for the top, which allow you to use smaller cups on it. They also add rigidity.

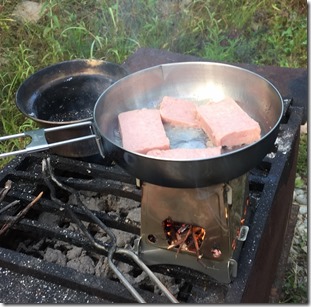
On the Labor Day camping trip I used it to make coffee in my percolator and fry up some Spam.

emberlit-percolator

It worked to get the coffee boiling but really isn’t ideal for use with this percolator. It really needs a wider footprint for better stability. (That’s my friend’s modified Kelly Kettle in the background. Both are sitting on top of a park-type grill he has at his place in the mountains.)

On the other hand, it worked well to fry up some Spam to go with our breakfast.
emberlit-spam

Today I decided to give it another try, this time to make some Lipton chicken noodle soup.

Here’s what it looks like unpacked, ready for assembly. As you can see, it’s still has some soot on from the camping trip but the case kept it off the rest of my gear.

emberlit-unpacked

And put together, loaded, ready to be lit. I wasn’t sure how much fuel I’d need to get a cup of water boiling so I prepped a good amount, which turned out to be more than required. To get the sticks going I used some dried out flower stalks from my garden, lit with a match.

emberlit-assembled

Until the flower stalks burned off and the sticks ignited the Emberlit gave off quite a smoke cloud. But once the flower stalks were gone it burned cleanly with little smoke.

emberlit-burning

(This picture was actually from the second burn of the day. For the second burn I moved the stove into the shade so I could get better pictures.)

I used a 750 ml Toaks titanium pot with lid and bail to make the soup. The dimensions of the pot are 3.75” in diameter at the base by 4.375” tall, not including the lid or bail.

emberlit-cooking

I’ve used this Toaks pot a few times on my last couple of camping trips, and like it a lot. It weighs only 4.7 oz. and holds a decent amount of water. If you remove the lid it’ll fit over the bottom of a 32 oz. Nalgene bottle. The bail stays upright on its own and allows you to either hang it over a fire or pick it up. The handles are robust. The lid fits well and has a little loop handle on it that can be set to stand up, so you can easily grab it, yet still folds flat.

The one cup of water took only a few minutes to start boiling.

boiling

So, I added the soup mix and in a minute or so it boiled over, even though I only had one cup of water in the pot. I took the pot off for a few seconds then set it back on the stove but off to the side a little so the soup could simmer.

boiling-over

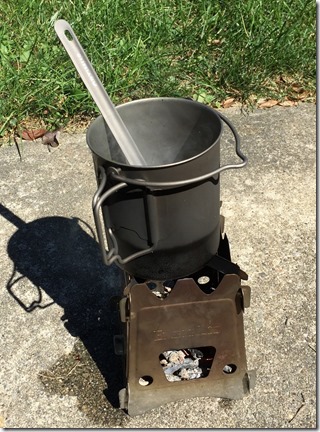
I used an 8.5” long Optimus titanium spoon to stir the soup and later eat it. The long spoon is also handy for eating from Mountain House pouches.
optimus-spoon

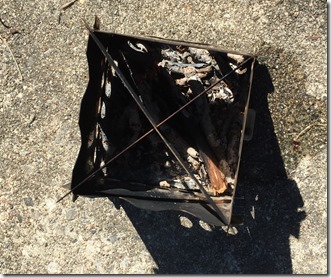
After a few more minutes the soup was done and I had lunch. Afterwards, there were a few coals leftover in the stove. It had burned the sticks very efficiently.
leftover-ash

As I was eating lunch my daughter wandered out and asked me to make her a cup. After finishing I was able to rekindle the flame from the coals, using some more of the dried flower stalks, some sticks, and a lot of blowing on the coals.

Compared with my first time using the stove I now have a better impression of it, based on:

  1. Using a more suitably sized cooking vessel.
  2. Having an adequate supply of fuel prepped and ready to go.

However, compared with my Kovea Spider canister stove, it’s:

  1. Dirtier (not just the stove, but the soot left on your pot).
  2. Requires more attention while you’re cooking something.
  3. Generally less convenient.

That said, it’s a very viable option for backpacking and even for emergency use. For example, charcoal briquettes are a fuel commonly found in urban and suburban areas, and for which it’s cheap and easy to store a large amount. For use in an emergency, an Emberlit would be make more efficient use of briquettes than a typical grill. I need to give this a try.

Emberlit also sells a titanium version of this model which weighs only 5.8 oz., making it even more attractive to backpackers.