Showing posts with label camping. Show all posts

Sunday, April 09, 2023

Alpineaire Black Bart Chili Review

 Back in the fall I bought two packages of Alpineaire Black Bart Chili from Amazon Prime. Today I decided to try one for lunch.


To prepared it, pour two cups of boiling water into the bag, mix, and then let sit for 10 - 12 minutes. Then mix it again before eating.

I let it sit for at least 12 minutes, mixed it up, and it looked like this:


It came out a bit soupier than I'd like. The texture was typical for reconstituted freeze dried meals. It was fairly spicy.

Because it was so soupy, after I ate half I tried adding some parched corn flour to it to thicken it a bit. Not recommended. I didn't care for the resulting texture.


Overall, I'd recommend it and will probably buy some more for my camping/emergency prep food stash.

Monday, June 20, 2022

Some new pocketknives

Every so often I go through a knife buying binge.

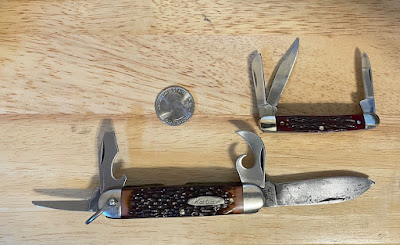
I had a MidwayUSA gift card and put it towards a large Case Trapper. This one has yellow Delrin scales and the blades are Case's chrome vanadium (CV) steel, which is a high carbon steel rather than stainless. I've found it to have good edge holding properties while being easy to resharpen. The Victorinox Pioneer is for scale.


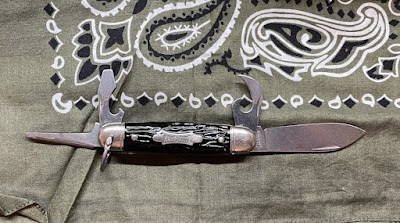
Next up was an old Imperial Kamp King. One of these was the second knife I ever owned, back in the late 1970s. It was an inexpensive Boy Scout-type knife and to be honest, was pretty cheaply made. The blades are carbon steel and will develop a patina with use. Somewhere along the line I lost my original. They are easy to find on eBay but most are well used. I found this one that looks like it spent most of its life in a drawer. I put an edge on the blade and it'll find its way into my carry rotation.


Next up were a new Hen & Rooster mini-stockman and an old Kabar 1152 camp knife. The H&R was made in Germany and has stainless blades. From what I've read about the Kabar, it was actually manufactured by Camillus for Kabar. 1152s in fine condition list for $90 - $100 on eBay. This cost about half that due to the pitting on the blade. Someone didn't care for it properly and the pitting is the result. However, that puts it into the user category for me.


When I got it the top of the screwdriver blade rubbed against the knife blade, making the screwdriver almost impossible to open without first opening the knife blade. I filed a slight bevel on it for clearance and now it opens normally.

The blades were a bit rough when opening, so I lubricated them with Sentry Solutions Tuf-Glide. (Amazon affiliate link.) I've found this to work really well on pocketknife pivots. After the carrier dries it leaves behind a lubricant that doesn't collect lint and dirt.

This past weekend I brought the Kabar with me on a camping trip to Tioga County. The can opener worked great on a can of corned beef hash we had with breakfast one day.

If you like Swiss Army Knives but are in the mood for something different there are plenty of affordable old scout knives to be found on sites like eBay and Etsy.


Wednesday, December 15, 2021

Särmä TST Thermal Cloak

Jess on Endurance Room has a really nice review of the Särmä TST thermal cloak. This is a shelter/poncho/bivy/sleeping bag inspired by the Jerven bag. Check it out.


I have a Jerven Original and a Jerven Hunter (insulated). These things just plain work and I'd expect the Särmä version to work just as well. A few years ago I used the Original on an overnighter as my shelter.


Incidentally, this pitch worked for the clear night I had, but the trekking pole in the middle was annoying when I had to get up in the middle of the night to pee. It protected me nicely from the wind, however.

One improvement I see on the Särmä is that it has loops for tie-outs instead of the grommets on the Jervens.

The one thing you need to be aware of when using these as a bivy or sleeping bag is condensation. They are waterproof and not at all breathable, so you'll get condensation. You'll want to air them out after a night's sleep.

A less expensive alternative for those on a budge is the USGI casualty evacuation blanket, or a heavy duty space blanket. I've used one many times as a "taco" around a sleeping bag or poncho liner. The downside is that they are smaller than the Särmä cloak.

Saturday, February 09, 2019

The Original Real Man's Coffee Cup


It is a USGI canteen cup made by Ingersoll Products sometime in the early 1970s. I got in around 1985 after I joined Civil Air Patrol. The outside is black from heating many meals in campfires.

American servicemen have been using canteen cups since the introduction of the M-1910 over a century ago. It's one of the best pieces of gear ever. The main thing it really needs is some kind of a lid. I have an older Heavy Cover brand stainless steel lid that I modified a bit to make it lighter, but for a couple decades I just relied on a piece of aluminum foil.

Newer USGI canteen cups have folding butterfly-style wire handles. I prefer the older L-style cups like this one. It's one feature of the Keith Titanium set that I would change. (OTH, the Keith sets come with a nice lid for the cup, so there's that.)

The horizontal slot in the handle is to allow you to put a fork from the M-1926 fork into it as an extension for when you're cooking on a fire. The vertical slot is to allow it to be slipped over the handle of the mess kit (AKA "meat can") so the whole ensemble can be dunked in boiling water for field sterilization.

Survival Resources has a nice article on useful mods to this style cup, including how to make a lid, adding D-rings to the handle so you can use a stick for an extension, and adding a bail. Check it out. (Incidentally, I recently ordered a few things from Survival Resources including a haversack. I plan to do a post and/or video on that as soon as I can get to it. No problems at all with my order and I got it quickly.)

Monday, December 10, 2018

Jämä Blanket Shirt from Varusteleka

A clothing item you see on a lot of bushcraft-oriented sites is a blanket shirt. Basically, they are hoodies made from old wool blankets. They are favored for a few reasons: wool retains warmth even when wet, wool is safer around an open campfire than synthetic fabric, when hunting it's very quiet if it brushes up against something, and if in muted colors blends in with the woods well. And let's face it, blanket shirts fit the bushcraft aesthetic well.

Blanket shirts can be homemade or purchased. YouTube has numerous videos on making your own.

Perhaps the best known commercially available blanket shirt is the Boreal Shirt from Empire Canvas Works or Lester River Bushcraft. They are premium pieces of clothing and priced accordingly.

If your budget doesn't permit spending the money for a Boreal Shirt, or if you want to try out a less expensive factory-sewn option check out the Jämä Blanket Shirt from Varusteleka. They are sewn in Varusteleka's factory in Helsinki, Finland.

Varusteleka currently lists two variants, one made from H.R. Co. blankets, while the other is made from Finnish suplus wool cloth that was used for their M/65 uniforms.

A couple weeks ago I bought one in the Finnish wool, and I used it for the first time on my recent deer hunting trip while hanging out in our cold cabin. I wore it over a Hill People Gear long sleeve base layer, a flannel shirt, and an Orvis fleece and wool vest. I was warm in the cabin where the temps were in the low 30s. It wasn't very windy outside and the Jämä shirt kept me warm when I stepped outside for a few minutes to take a leak. If you're going to wear this in windy conditions, you're going to want a shell over top of it, however. A suitably sized windproof smock would be just the ticket.

For size reference, I am about 5'5" with an 18" neck, 32" sleeves, a 45" chest, 48" gut (ugh), and normally wear an XL or 2XL, depending on the item of clothing or a brand's sizing. The Jämä Blanket Shirt that I bought is a 3XL. (Pay attention to Varusteleka's sizing guidelines.) Since the garment does not stretch and you need to pull it on, it needs to be big, especially if you have any layers on.


The sleeves are 35" long, so they cover up my hands. I can roll them up if I am working.


Obviously, this is not something I'd wear about town. If I'm out in the woods I don't care if I look like a wannabe Jedi or I'm on my way to Mordor.


The hood is a bit floppy. In the picture I am wearing a ball cap under it, which keeps it out of my eyes. It's deep enough to provide protection against wind from the side and to help create a warm air bubble in front of your face.

As shown in the pictures, it has a kangaroo pocket, hood, and the back is longer than the front. I like the vertical placement of the front pocket, which is large enough to comfortably hold my keys, a pair of rag wool gloves, and my iPhone 7 Plus.

There is a smaller pocket inside the kangaroo pocket. You could put a folding knife in there but I don't see myself getting much use out of it. It's not large enough for the iPhone 7 Plus.


The stitching is good quality. There were no loose threads. The wool fabric is a bit nicer than an old military surplus blanket, which makes sense since it was actually intended for use in making clothing. It's about the same weight as the old USGI M-1951 wool field shirts but not as scratchy.

It's a good, basic hoodie. Compared with the Boreal Shirt it lacks some features. E.g., a draw cord on the hood, an adjustable collar, and snaps or straps to cinch down the wrists. However, the Jämä shirt also about 1/3 the cost. If you have moderate tailoring skills you could customize it.

Do I recommend the Jämä wool blanket shirt? Yes, if the sizing and feature set work for you. IMO it would be great for bow hunting with temps in the 30s or 40s.

Cold Weather Camping and Equipment Failure

Last weekend my daughter and I, along with a friend went up to Tioga County to catch the last two days of Pennsylvania's rifle deer hunting season. My friend's land is about 12 miles south of the New York line. Our plan was to go up Friday, get a couple hours of hunting in that afternoon, then hunt Saturday, and then come home Sunday. For shelter we'd be using my friend's primitive cabin.

The cabin has no utilities and the off-grid solar project is not yet complete. For heat, we planned to rely on my Dyna-Glo 23,000 BTU kerosene heater and my friend's propane-fired patio heater. We've used the latter in the past and it's worked well.

My previous use of the kerosene heater was at home for space heating and for that it worked great. We haven't used it in a few years so I made sure to replace the two C batteries that power the igniter before we left. After we got onsite I filled the tank and let it sit for about an hour for the wick to soak up some fuel. It fired right up on the first try. Note that the K-1 kerosene I had was a few years old but still in the original, sealed 4 gallon can. When stored properly, K-1 has a long shelf life.

Unfortunately, this time the propane heater was not working, due to a failed or clogged regulator. My friend is a mechanical engineer by profession and no matter how we tried to clean, defrost, or clear it, we could not get sufficient gas to flow to the burner element of the heater.

The cabin is 16' x 24' with an uninsulated metal roof with a ridge vent. The kerosene heater was able to take the edge off but inside it still hovered around freezing, even before dark.

Friday night the temp was forecast to get down to about 20F (-6.7C). We all had sleeping bags up to the task but being out and about in the shelter wasn't so great.

We borrowed a Big Buddy propane heater from a neighbor, which we used while sleeping.

Overnight, the temp inside the cabin got down to about 30F (-1C). I was warm enough in my Kelty Cosmic Down 20 bag, which was inside my Jerven Thermo Hunter, but I couldn't get a good night's sleep. I found the Kelty mummy bag too constraining.

The forecast for Saturday night was 15F (-9.4C). We decided to hunt Saturday morning but pack up and head home after lunch. These temps may seem mild to my more Northern readers, but when you live in Southeast PA and are not acclimated, they are draining when you can't get inside and warm up.

Lessons learned:


  • The kerosene heater was awesome, easy to use, and took off the edge. Unfortunately, it was not enough to make the cabin comfortable.
  • The regulator on the patio heater may have been clogged. It may have helped had it been wrapped in a plastic bag and taped shut to keep bugs out.
  • It would have been a good idea to test it the last time someone was upstate, in warmer weather.
  • We really need to get a wood stove installed. My friend has one but it's not there, it's still at his house downstate.
  • We need to work on sealing up some of the drafts in the cabin and maybe rigging a tarp across it inside, to keep warm air lower, instead of escaping through the ridge vent.
  • I need a different cold weather sleeping bag. The Kelty is warm enough but to constricting. My daughter used my USGI MSS and was happy as a clam with it. I may pick up another one but I am also considering something like a 0-degree down backpacking quilt from Enlightened Equipment. I could throw it on top of my Hill People Gear Mountain Serape or Wilderness Innovation Osni Cloak, either of which can be used as a quilt or rectangular bag. Reader input is welcome.


Tuesday, March 13, 2018

Korean Beef Bibim Bap MRE

While checking out foreign MREs on eBay, I ran across the vendor "magnetic1" selling dehydrated beef bibim bap entrees, which are supposed to be Korean-issue. Since I'm always interested in stuff to eat while camping, and I love Korean food, I ordered a 3-pack to try.

Here's the front and back of the package along with the included spoon.


Upon opening, you can see that it's mostly rice with some vegetables. The little brown nuggets are pieces of dehydrated beef. Also shown are the packet of sesame oil and gojang (Korean BBQ) sauce that were inside.


To cook it, you add hot water to the black line inside the bag, seal it, and let it sit for 10 minutes. Or, you can use cold water but you'll need to wait twice as long.

And here's what it looks like after rehydrating and mixing in the oil and sauce packets.


I liked it, it was damn tasty. I used all of the gojang sauce and while it was spicy, it wasn't mouth-burning. That said, I eat Korean food fairly often and eat it full strength, so YMMV. Compared with a couple different Mountain House meals that I've tried, this isn't nearly as salty.

For me, this entree would be enough for lunch but not dinner.

I have two more left that I'm going to save for the field.

Friday, February 24, 2017

New Order From Varusteleka

Varusteleka is a military surplus store in Helsinki, Finland. I've ordered a few items from them, most notably a Jerven bag. Service from them has always been fast but over the holiday season getting my package through Customs at JFK has taken a week or more. It looks like the Customs backlog is finally speeding up. This shipment cleared customs in only a couple days.

This order came in a cool bag.


Finns channeling Rhodesians, huh?

Inside, two of the hard to get in the US Bundewehr sleeping mats, and one 10-pack each of SCHO-KA-KOLA milk (blue) and dark (red) chocolates.


The chocolates are very good. They are fortified with caffeine and have been used by the German military as iron rations. The dark is somewhat bitter but I like it.

The Bundeswehr mats measure 74" long by 21" wide, and aren't very thick, maybe 3/8". That's pretty thin so they don't doesn't provide a lot of padding or insulation. I could have used one of these by itself back when I was in my early 20s, but I need a lot more padding nowadays. However, they appear to be well made of closed cell foam that would provide a good layer underneath an air mattress to protect it from things that might cause a puncture.

I do think that the BW mats could make decent shooting mats. With a 16" AR-15 for scale:


The two mats I received were made in 1990.


They appear to be new old stock. One had a bit of dirt on it and a small partial puncture, but nothing that would affect its function.

When folded up, they are 15" long  x 10.5" wide by 1-3/8" thick. They'd make a good sitting pad. Likewise, partially unfolded it would be good for kneeling on when doing fire prep, e.g to catch wood shavings for tinder to keep them off moist ground.

Finally, the other use for the BW mats is as an internal frame for the German surplus mountain rucksacks. The rucks are easily available in the US (e.g., at Keepshooting) but unfortunately the matching mats are not, hence my order from overseas. The slot pocket inside the ruck is designed to accept this mat, to give the pack some rigidity and keep contents from poking you in the back.

I have no connection with Varusteleka other than as a satisfied customer. They are a good source of some items of interest to preppers and bushcrafters. Shipping from Finland to the US is only $9.99, on par with most domestic suppliers.

Saturday, January 21, 2017

Silky Bigboy 360 Folding Saw

Some kind of wood processing tool is handy to have when camping and may be a necessity in a survival situation. Many woodsmen likes axes, hatchets, or large choppers, but a folding saw is a great alternative. Saws often weigh less, are more energy efficient, and safer to use.

For several years I've had a Gerber folding saw which was improved by using a saw set to increase the kerf and reduce drag when cutting. It's pocket sized and very easy to pack.

However, I wanted a longer saw that could still fit in a pack. Everything else being equal, the longer the cutting stroke the more efficient the saw. So, last month I got a Silky Bigboy 360 folding saw with large teeth. With a 360mm (14.1" blade) it's significantly longer than the Gerber. The rubber handle is easily grasped with both hands.

I finally got to try it out today on a branch I had in my firewood pile, and to trim a couple branches from a dogwood in my yard.

The branch from my firewood pile was of an unknown type of wood, possibly elm. It was well seasoned and hard. The Silky chewed through it like a hungry beaver. This took only a few strokes:


Dogwood is very hard and a good test of any blade. Although it required more effort to cut than the elm (?) branch, the Silky went through it very well. I'd like to test it on some softwood but don't have any. Based on Survival Russia's videos, I'd expect it to work damn near like a power tool.

The Gerber cuts on both the push and pull strokes. Silky saws, in contrast, cut only on the pull stroke. This allows the blade to be thinner and more flexible and doesn't really make it less efficient.

The Silky feels more robust than the Gerber. If I was in the market for a smaller folding saw I'd go with a Silky Pocketboy.


Monday, January 16, 2017

Russian Surplus Veshmeshok Pack

For some reason I recently got the hankering to try out a Russian veshmeshok ("kit bag") as a daypack. The veshmeshok is a very basic 30L (~1800 cubic inch) pack made from canvas, first adopted by the Imperial Russian army during the 19th Century. During the Inter-War period the Soviet Army adopted a more modern design, but placed the veshmeshok back into production during WW2, since it is so simple to produce. Production continued into the 90s, but I found one Russian web store which sells a "modern" version made of a Cordura-like nylon in camoflauge.

The veshmeshok is not much more than a canvas sack with a single outside pocket and four web straps that allow you to carry a rolled up greatcoat or bedroll. The top has a drawstring closure, probably made from hemp. But the single most distinguishing feature of the veshmeshok is the suspension, such as it is. There is one continuous shoulder strap which is also used as the closure for the top of the bag. The strap is 1.5" wide and lightly padded. It is attached at the bottom corners of the pack.

Lars of the Survival Russia YouTube channel uses a veshmeshok as his scouting pack and has a good video about it, here, in which he demonstrates how to rig the bag for carrying.  (Check out the rest of his videos, too. They're awesome.)

If you're in the US, veshmeshoks are easily available on eBay from sellers in the former USSR, but they're also available on Amazon Prime, which is the route I went.

My veshmeshok came neatly folded inside a surprisingly small box, complete with Soviet Surplus Smell. The date stamp inside the bag is faded but I think it says 1977. It's in unissued condition. The canvas is thinner than I thought it would be but it should be more than durable enough for my needs.

Because the veshmeshok is basically a 45cm x 67cm sack, you need to be careful loading it so that it doesn't turn into a ball, or you have things poking you in the back. So, the first thing I put in mine when I transferred the contents of my Hill People Gear Tarahumara over to the vesh was my Z-Lite seat pad. I unfolded the Z-Lite and used it as a back pad inside the pack.

Heavier items went in next, including an Esbit cookset and two Nalgene Oasis 1 quart canteens, one in a USGI cup. Then I put in my first aid kit, cordage kit, brew kit, TP with hand sanitizer and a trowel, a pair of gloves, and my BCUSA MEST poncho. Some disposable hand and toe warmers went into the outside pocket, along with a fleece beanie. My puukko got attached to one of the bedroll straps. Weight of the pack thus loaded was about 16 pounds.

I tried out the veshmeshok on a short hike yesterday. It was surprisingly comfortable with this load, since it's not much more than a string bag.


Adding a day's rations, another quart of water, and some kind of blanket or shelter would bump this up to around 25 pounds. It wouldn't be so comfortable at that weight, but the Russian Army has never been overly concerned with the comfort of its soldiers.

The short length of the shoulder straps was surprising. I am not a big guy although I have broad shoulders for my 5'4" height. With the shoulder straps set to their longest length they're just long enough for me to wear with a winter coat on. To make it a little more comfortable to carry, I added a loop of paracord at the midpoint of the strap and used that to close the sack, and put the pack into carry mode. I got that idea from this thread on BCUSA.

Additionally, the sternum strap is too short for me to make any use of it. It would need to be at least another 8" longer to be really useful. I may sew on some webbing to lengthen it.

You can fit a surprising amount of gear into a veshmeshok. For example, see this page at Operation Eastwind which shows the loadout for a Soviet reenactor.

The veshmeshok won't replace any of my modern packs but it may see use when I feel like going retro. One project I may try is pairing the veshmeshok with a Roycroft pack frame.

Tuesday, December 27, 2016

December 2016 Camping Trip Report

(I wrote this up over a week ago and forgot to post it.)

December 9th and 10th I went deer hunting in Tioga County, PA, just south of the New York State line. Temperatures while we were there topped out at about 32*F/0*C, and dropped down to about 21*F/-6*C at night. There's usually a breeze blowing as well. We slept under a pavilion with two walls built but the ends open, temporarily covered with canvas tarps. At night we had a propane-fired patio heater to take the edge off the cold. In this post I want to offer some observations on how some of our gear worked.

STOVES

Don't trust old equipment, even if it's been tested recently, unless maintenance has been performed on it. My Coleman 425 camp stove made in 1979 was tested the previous weekend but failed on this trip. A seal blew so it wouldn't hold pressure, and leaked fuel.

One of my friends used an MSR Pocket Rocket canister stove with no problems. I keep a folding Esbit stove in my daypack for brewing tea or coffee when out in the field, but it didn't see any use on this trip. I've used it on past trips, however.

The Lixada wood gasifer stove I got in November worked OK for warming water. This is primarily a twig stove that is sold under various brand names on Amazon and eBay. Like all twig stoves it needs constant feeding to keep going. I wanted to try it this weekend with charcoal briquettes, since we always keep two or three bags up at our campsite.

Using briquettes, the Lixada stove was able to get water up to near-boiling but never to a full, rolling boil. This temp was good enough for filling the canteen I put in the bottom of my sleeping bag to keep warm, but not hot enough for oatmeal or coffee. Briquettes would work if you needed to simmer something in a pot or fry something in a pan. They burned for a long time.

I also tried the Lixada stove using fire starters made by filling a cardboard egg carton with oak shavings and paraffin wax. One of these would bring my MSR kettle to a rolling boil in only a few minutes. The main downside to these is that they'll leave your pot covered in so much soot it'll be darker than Spinal Tap's Black Album. These fire starters also burn out in about five minutes.

In one of his "longhouse" videos on YouTube, Evan Hill of Hill People Gear discusses your energy envelope. This pertinent because if you're backpacking, it may actually cost you less in energy to pack in a canister stove and fuel than a twig stove that you have to gather and prepare fuel for.

On future winter trips I'll make sure to have a functional Coleman stove and bring my Kovea Spider as a backup.


KEEPING WARM

SmartWool merino wool base layers are warm, help you manage moisture, and don't itch.

Windproof pants make a huge difference in staying warm. I continue to be pleased with my ORC Industries Level 5 PCU softshell trousers. I've had these for several years and they've been one of my best purchases, always keeping my legs warm and dry in snow, when worn over insulation.

When sleeping on a cot in drafty weather you cannot have too much insulation beneath you. I used a MidwayUSA shooting mat, a blue foam pad, a Thermarest Ridge Rest, and then two military surplus wool blankets folded in half lengthwise on top of my cot. This gave me a firm but warm and comfortable bed.

The old trick of putting a hot water bottle in the bottom of your sleeping bag works. I filled a Nalgene Oasis canteen with hot water, wrapped it in a shemagh, and put it in the footbox of my sleeping bag. It warmed the bag up nicely. It was still lukewarm in the morning. Being already warm, it boiled faster when it came time for breakfast, too.

Two or three disposable hand warmers activated and tossed into you bag before bed also help. I had a package of these coming up on their expiration date so I wanted to use them up, and this was a good way to do so.

The disposable hand warmers and toe warmers came in very handy while sitting out on my deer stand. If you're moving around in the temps we experienced keeping your hands and feet warm isn't a problem but once you're sitting still, you need either more insulation or an external heat source. The disposables worked well for me.

Some guys like to use an empty Gatorade or Nalgene bottle to pee in so that they don't have to get out of their bag in the middle of the night. Frankly, I don't think I could do that without pissing all over my sleeping bag, but YMMV.

The Hill People Gear Mountain Serape is an awesome piece of gear. I used it two ways last weekend. First, after being out for a few hours hunting, I used it in greatcoat mode over my Arc'Teryx LEAF Atom SV hoodie while hanging out back at camp before bed. It allowed me to shed the hooded sweatshirt I'd been wearing under the Atom SV, and also my ORC PCU Level 5 softshell trousers. As a greatcoat, the Mountain Serape provided a warm layer of insulation and blocked the wind when out around the campfire, and inside our drafty shelter.

If I hunted out west where you can do so without wearing blaze orange, I'd pack a Mountain Serape with me to my stand and put it on while glassing/waiting for game. Not only is it warm but it also helps to break up your outline, so you don't look like a human. If HPG made one in blaze orange or blaze camo, I'd order one for sure.

Later, I used the Mountain Serape in sleeping bag mode as an overbag around the footbox of my sleeping bag.

A Snugpak poncho liner may be a viable, less expensive alternative to the HPG Mountain Serape if you're on a budget, especially if you added snaps or bungies to hold it closed around yourself.

For use around a campfire something made from natural fibers would be better than the nylon shell of the Mountain Serape or Snugpak poncho liner. E.g., a wool blanket poncho or a South American alpaca poncho. OTH, they probably aren't as windproof as the modern insulated ponchos.

If you're car camping, having a vacuum flask of hot tea or coffee filled ahead of time is a great morale booster. It's really nice being able to immediately pour yourself a hot cup of tea when you come in from the cold, instead of having to wait for it to brew.

Canteen Cup Accessories

Many hikers and preppers like the old USGI canteen cup for use as a cooking vessel. I've had this old, L-handle style cup since the '80s, and it's seen a lot of use. It's so black on the outside I should call it "Ol' Crusty."

Sentiment aside, canteen cups have two drawbacks which can be remedied with products now on the market.

Nothing like hot chocolate from your canteen cup.


First is a lid. The US military never issued one. If you're heating something by putting your canteen cup in a campfire you don't really care too much about minimizing fuel consumption, but it's nice to reduce heating time and keep debris out of your meal. Previously I've used a piece of heavy duty aluminum foil but this needs to be periodically replaced, and it's prone to blowing away. Heavy Cover, Inc. sells a nice stainless steel boil lid, shown in the above pic. HC also sells one for the Crusader cup.

I've used the Heavy Cover lid a couple times now and it definitely reduces the time to boil water for a hot drink by a few minutes. If I have any criticism is that it's heavy. It could be made from a thinner gauge of stainless steel to reduce weight. Or better yet, make it from aluminum or titanium. E.g., Four Dog Stoves sells Ti lids for a variety of pot/cups, for $4 less than the HC stainless steel lid.

Second is something to prevent burning your lips on the hot rim of the cup. Snow Peak Hotlips happen to snap right onto the USGI cup like they were made for it.  The yellow thing on the rim of my cup above is one. This is a major usability improvement when making coffee, tea, or hot chocolate.

Wednesday, November 30, 2016

Saturday, November 26, 2016

Lixada Wood Gas Stove

The other day I ordered a Lixada wood gas stove using an Amazon gift card. This stove is sold under a number of different brand names on Amazon and eBay, generally for a bit under $20. The stove is made from stainless steel and has the following components, which nest together:


  • Base with air holes.
  • Double-walled combustion chamber with holes on the inside near the top.
  • A bottom part to hold the fuel off the ground. It also has air holes in it.
  • A pot stand with folding arms.
  • A bowl which can be placed in the combustion chamber to burn liquid or gelled alcohol fuel. If inverted it can be a platform for hexamine or trioxane tablets.
Along with the stove itself a nylon mesh bag was included for storage and transport.

Since I had some time this afternoon I decided to give it a try, using some sticks from my yard. The stove did not come with any instructions but I'd read up on them online. Supposedly, they work best with the combustion chamber filled with sticks oriented vertically, burning top-down.

I used a piece of dryer lint/paraffin wax fire starter to get it going.


After a few minutes the wood gas that's released by the burning wood gets flowing through the sidewall, comes out the interior holes and ignites.


Shortly after it got going I put my Olicamp Space Saver Cup with home made lid on top. I had 12 oz. of water in the cup to make some tea.


A couple things caused my boil time to be overly long (i.e., damn near a half hour):

  • It was windy, which caused a lot of heat loss via convection. The next time I use the stove I'll use a wind screen.
  • Some of my wood was damp. Also, I waited too long to refill the stove when the fuel burned down, which made it take longer to ignite. I should have fed it small pieces of wood before the flames died out.
As long as I kept it fed so that the wood gas was being burned it was pretty much smoke free. If I let it die down and then added fuel, it was smokey.

The idea of a stove for which you can forage fuel is very attractive for camping, hiking, and bugouts. I need to play around with it a bit more to get the knack of minimizing cook times. In particular, one fuel I want to try is charcoal briquettes, which we keep up at my friend's place where we camp a few times each year. Another fuel which other owners have reported works well are wood pellets, as used in pellet stoves.

I'm planning to follow this up with a video, once I get the raw footage edited.

Friday, November 25, 2016

Revised Olicamp Lid

I wasn't satisfied with using a screw and nut to secure the handle to the DIY lid I made for my hard anodized Olicamp cup, so I ordered a Tandy Leather rivet kit earlier this week. It was delivered today. The lid now looks like this:


The stud part of the rivet was longer than I needed, so I trimmed it with dykes before setting the head.

The rivet should be more secure in the long term than the screw and nut, and easier to clean if food gets on it.

I can see the rivet kit coming in handy for future projects.

Sunday, November 20, 2016

Olicamp Hard Anodized Cup and DIY Lid

The other day I ordered an Olicamp hard anodized aluminum Space Saver cup from Amazon using some points. It arrived today and I think it'll be a good piece of gear. It's lightweight and has graduations so that you can use it for measuring water.

One thing it lacks, however, is a lid, which means that if you use it as a pot to cook or boil water in, it'll take longer and use more fuel. I've used expedient lids made from aluminum foil in the past with my GSI stainless cups and USGI canteen cup. I wanted something better for this cup.

My first try was made from aluminum flashing. I traced the lip of the cup on a piece of scrap wood to create a form, and cut a piece of flashing a bit larger around than the cup. I then secured the flashing to the form and pressed it around.

It looked like ass.

In search of a better solution I ran across this video by IA Woodsman, in which he made a lid for a stainless GSI cup from the bottom of a 12 oz. coffee can. I had an empty can so I went back out to my shop and made a similar lid.


The lip of the aluminum Olicamp cup is a little larger in diameter than the stainless GSI cups, so I cut eight small slits around the edge of the lid so I could spread it out to better fit on the cup. Instead of IA Woodsman's copper D-ring, I used a stainless steel split ring from my scrap box. Click on the picture to see the full sized version which shows how it can be set so that it doesn't flop over.

The ring is secured using a similar tab to IA Woodsman's. However, I used a stainless screw and nut instead of a rivet.

I'll probably carry the cup nested over the bottom of a 32 oz. Nalgene or 40 oz. Kleen Kanteen bottle, with the lid in the bottom of the pouch.

Sunday, September 04, 2016

Dinner on the Mountain

Yesterday Amanda and I went up to the Conrad Weiser State Forest for a few hours, and had dinner on the mountain. (It's not much of a mountain, but hey, we're in southeast Pennsylvania.)

We used my Esbit CS985HA cookset to boil the water for our noodle soup and heat up some Vienna sausages.


It's a versatile cookset. The 33.3 oz./985ml main pot has volume graduations stamped into it, which can be read from the inside. The 15.9 oz./470ml smaller pot can be used as a lid, or as shown above, as a saucepan. Both have folding rubber-covered folding stainless steel handles.

The pot stand/windscreen has four rubber feet on the bottom which would keep it slightly elevated off a table.

The set allows you to cook with either the included brass, Trangia-style alcohol burner or using Esbit hexamine fuel tablets. A small platform to put inside the pot stand when using the tablets is included. The pots, tablet platform, and pot stand are made from hard anodized aluminum.

You could burn sticks and twigs in the pot stand but it's not really designed for that. E.g., the bottom has a large opening so you'd want to sit it on a rock or cleared dirt.

For use with the alcohol burner, a simmer cap/snuffer is included. There isn't enough room in the pot stand to use it as a simmer cap but it works well to extinguish the stove. You want to use it instead of the screw-on cap for the stove. If you use the cap to put out the stove you'll damage its O-ring, which will let the stove leak if you carry it fueled and ready to go.

All the parts nest together and can be stored in an included mesh bag. I line the pot with a plastic bag before nesting everyting else inside to keep it clean. Also, if I use hexamine tablets the outside of the pot will get a coated wth soot. The plastic bag allows me to keep that off the rest of my gear.

The total weight of the Esbit cookset is 15 oz., not including fuel. I keep the brass burner filled with denatured alcohol, three or four Esbit tablets, a bandana, and a small box of matches packed in the kit.

Our campsite is not near a water source so all of our water had to be packed in. Amanda used an Osprey water bladder in her pack, while I used three one-quart canteens. One is a 1945-vintage aluminum USGI canteen that I found several years ago at a gun show.  The other two were Nalgene Oasis canteens, which have the same exterior dimensions as US military issue canteens, but which are made of a better plastic, weigh a little less, and don't impart any taste to the water.


Sunday, August 28, 2016

Further Seasoning of the Bromwell Frying Pan

I cooked breakfast in my Bromwell this morning. The bacon didn't stick but my eggs did. So, this afternoon I seasoned it more with flax seed oil (food grade linseed oil). I gave it a very light coat and heated it on the stove until it smoked, then let it cool down. Repeated this for a total of about 5 or 6 coats until I got tired of doing it.


The pan should only get better with use.

Saturday, August 27, 2016

Bromwell 7" Pressed Steel Frying Pan

Something I'd been looking for was a lightweight, pressed steel frying pan to take camping. After reading a thread on Bushcraft USA with a link to eBay, I ordered a 7" Bromwell pan last Sunday. It arrived on Wednesday for $16.95 shipped. Note that 7" is the diameter across the top, not the base. The seller also lists some 6" Bromwell pans but that's a bit on the small side for my taste.

The pan is plain pressed carbon steel with a handle similar to the old "Cold Handle" type that you can frequently find a garage sales. Whatever rust preventative Bromwell used worked well but required a lot of scrubbing and soaking to remove.

I seasoned it today by first giving it a coat of canola oil then cooking up some bacon for lunch.


Mmmm. Bacon.


It'll need more seasoning, which of course gives me an excuse to cook more bacon.

This was my first time using a skillet with this kind of handle. It stayed cooler than I'd expected but I still used a pot holder. A bandana or shemagh would work in the field.

The small size allowed a lot of splatter outside onto my stove. The next time I use it I might do so outside, perhaps over my Emberlit stove.

It's a heck of a lot lighter than a same-sized cast iron pan would be. It's definitely back-packable.