Aside from a flint and steel, they demonstrate how you can do it with a flintlock gun.
Showing posts with label fire. Show all posts
Showing posts with label fire. Show all posts
Monday, January 28, 2019
Townsends: Fire Starting: No Matches, No Lighter (Video)
This is a very good video on fire starting with flint and steel, including the use of a flintlock, from Jas. Townsend's & Son's YouTube channel:
Aside from a flint and steel, they demonstrate how you can do it with a flintlock gun.
Aside from a flint and steel, they demonstrate how you can do it with a flintlock gun.


Sunday, January 27, 2019
My First Fire with Flint and Steel
I bought this steel years ago at Dixon's Muzzleloading Shop but today was the first time I made fire with it. It was made from an old file.
I cheated a bit and used char cloth bought from an eBay vendor, but now I'm ready to make my own. The char cloth is in the Altoids tin underneath the steel, while the flint shard is laying on some unraveled jute twine from Lowe's.

I held the char cloth on top of the flint and struck it a few times with the flint. The ember took hold quickly and I quickly moved it to the bird's nest. After a little gently blowing it exploded into flame, and I hurriedly dropped it into my fire pit.

You can see where I dispose of my cigar butts and the long matches I use to light my gas grill. ;)
Now I need to make up some of my own char cloth and find some punky wood to char.
I cheated a bit and used char cloth bought from an eBay vendor, but now I'm ready to make my own. The char cloth is in the Altoids tin underneath the steel, while the flint shard is laying on some unraveled jute twine from Lowe's.

I held the char cloth on top of the flint and struck it a few times with the flint. The ember took hold quickly and I quickly moved it to the bird's nest. After a little gently blowing it exploded into flame, and I hurriedly dropped it into my fire pit.

You can see where I dispose of my cigar butts and the long matches I use to light my gas grill. ;)
Now I need to make up some of my own char cloth and find some punky wood to char.
Monday, July 11, 2016
Bike Inner Tube Fire Starter
A couple weeks ago I came home from REI with a shopping bag full of old bicycle inner tubes. The bike department's manager gave them to me for free when I told him I'd like some to make ranger bands (heavy duty rubber bands). And recently, I read on the Hill People Gear website that their preferred fire starter in the field is a 1.5" square of inner tube ignited with a lighter.
Tonight, my 12 year old daughter and I were hanging out when the idea to give the Hill brothers' method a try. So we rounded up a Bic lighter and a piece of inner tube about 1.5 to 2" square, and went out to our back patio where we have a fire pit.
I had the kiddo try it out. After a few seconds of exposure to the Bic's flame the piece of rubber ignited and burned with a hot flame for several minutes. We had no problems starting a fire with this and some small twigs.
I'm going to add a few ranger bands to my fire kit now. When cut as bands the pieces of rubber are multipurpose. They weigh next to nothing and being made from rubber are waterproof.
Scraps from an old bike inner tube may not be a bushcrafty fire starter, but they are a good addition to your emergency fire kit.
I'll have to do a video on this. Stay tuned....
Tonight, my 12 year old daughter and I were hanging out when the idea to give the Hill brothers' method a try. So we rounded up a Bic lighter and a piece of inner tube about 1.5 to 2" square, and went out to our back patio where we have a fire pit.
I had the kiddo try it out. After a few seconds of exposure to the Bic's flame the piece of rubber ignited and burned with a hot flame for several minutes. We had no problems starting a fire with this and some small twigs.
I'm going to add a few ranger bands to my fire kit now. When cut as bands the pieces of rubber are multipurpose. They weigh next to nothing and being made from rubber are waterproof.
Scraps from an old bike inner tube may not be a bushcrafty fire starter, but they are a good addition to your emergency fire kit.
I'll have to do a video on this. Stay tuned....
Monday, September 28, 2015
Wednesday, September 23, 2015
Emberlit Wood Burning Camp Stove
Earlier this month I posted about camping stoves, including the Emberlit wood burning stove which I bought last winter, but didn’t get a chance to use it until Labor Day weekend. This is a follow up.
The stainless Emberlit weighs 11.45 oz., has a footprint of about 4.5” inches square, and is 6 inches tall. The stove walls taper so that the top is a little smaller than the bottom. I think the earliest production models did not come with the cross bars for the top, which allow you to use smaller cups on it. They also add rigidity.
On the Labor Day camping trip I used it to make coffee in my percolator and fry up some Spam.

It worked to get the coffee boiling but really isn’t ideal for use with this percolator. It really needs a wider footprint for better stability. (That’s my friend’s modified Kelly Kettle in the background. Both are sitting on top of a park-type grill he has at his place in the mountains.)
On the other hand, it worked well to fry up some Spam to go with our breakfast.

Today I decided to give it another try, this time to make some Lipton chicken noodle soup.
Here’s what it looks like unpacked, ready for assembly. As you can see, it’s still has some soot on from the camping trip but the case kept it off the rest of my gear.

And put together, loaded, ready to be lit. I wasn’t sure how much fuel I’d need to get a cup of water boiling so I prepped a good amount, which turned out to be more than required. To get the sticks going I used some dried out flower stalks from my garden, lit with a match.

Until the flower stalks burned off and the sticks ignited the Emberlit gave off quite a smoke cloud. But once the flower stalks were gone it burned cleanly with little smoke.

(This picture was actually from the second burn of the day. For the second burn I moved the stove into the shade so I could get better pictures.)
I used a 750 ml Toaks titanium pot with lid and bail to make the soup. The dimensions of the pot are 3.75” in diameter at the base by 4.375” tall, not including the lid or bail.

I’ve used this Toaks pot a few times on my last couple of camping trips, and like it a lot. It weighs only 4.7 oz. and holds a decent amount of water. If you remove the lid it’ll fit over the bottom of a 32 oz. Nalgene bottle. The bail stays upright on its own and allows you to either hang it over a fire or pick it up. The handles are robust. The lid fits well and has a little loop handle on it that can be set to stand up, so you can easily grab it, yet still folds flat.
The one cup of water took only a few minutes to start boiling.

So, I added the soup mix and in a minute or so it boiled over, even though I only had one cup of water in the pot. I took the pot off for a few seconds then set it back on the stove but off to the side a little so the soup could simmer.

I used an 8.5” long Optimus titanium spoon to stir the soup and later eat it. The long spoon is also handy for eating from Mountain House pouches.

After a few more minutes the soup was done and I had lunch. Afterwards, there were a few coals leftover in the stove. It had burned the sticks very efficiently.

As I was eating lunch my daughter wandered out and asked me to make her a cup. After finishing I was able to rekindle the flame from the coals, using some more of the dried flower stalks, some sticks, and a lot of blowing on the coals.
Compared with my first time using the stove I now have a better impression of it, based on:
- Using a more suitably sized cooking vessel.
- Having an adequate supply of fuel prepped and ready to go.
However, compared with my Kovea Spider canister stove, it’s:
- Dirtier (not just the stove, but the soot left on your pot).
- Requires more attention while you’re cooking something.
- Generally less convenient.
That said, it’s a very viable option for backpacking and even for emergency use. For example, charcoal briquettes are a fuel commonly found in urban and suburban areas, and for which it’s cheap and easy to store a large amount. For use in an emergency, an Emberlit would be make more efficient use of briquettes than a typical grill. I need to give this a try.
Emberlit also sells a titanium version of this model which weighs only 5.8 oz., making it even more attractive to backpackers.
Wednesday, February 18, 2015
DIY Emergency Tarp from IA Woodsman
IA Woodsman posted this video of a DIY emergency tarp shelter made from a mylar space blanket, a couple garbage bags, duct tape, and parachute core.

DIY Emergency Shelter
Sunday, February 02, 2014
Winter Overnighter
Last night I did an overnighter with a friend and his daughter, outside of Pottstown, in SE PA.
We dragged our gear up to the camp using kid's sleds.

On the sled is my Ridge Rest foam mat, East German combat pack containing long johns, socks, and my PCU Level 5 soft shell pants, Swiss poncho, my USGI MSS, a folding camp chair, axe, H&R 20 gauge shotgun, and hunting vest. We wound up not doing any hunting, and I didn't need the extra clothes, but it was still better to have them just in case.
We built a long fire although we didn't use it to heat our shelters. It still made a nice fire to sit in front of and gave off a lot of warmth. You can see the pot and lid from my Swedish mess kit in the lower right. I used it to melt snow so we had warm water for cleaning dishes, etc.

Dinner was beans and franks cooked in a dutch oven my friend dragged up, and some hot dogs grilled on a Biolite stove belonging to another friend who couldn't sleep over. I didn't get any good pics of these.
Here's the hootch I slept in. It's a USMC field tarp over my MSS. Under the MSS I had a Big Agnes insulated air matress, Ridge Rest foam pad, a USGI casualty evacuation blanket, and snow. :) The air mattress, foam pad, and casevac blanket provided plenty of insulation from the cold ground. I used the sled to partially block off the side of the shelter near my head.

To hang the shelter I used 550 cord tied through the bungee loops that come with the USMC field tarp. This allows the tarp to give a bit if there is a gust, although I didn't have to worry about that last night. When prepping for the trip I cut a half dozen 3' pieces of 550 cord especially for this purpose. I used plastic tent stakes through bungees to secure the back of the lean-to.
Since I'm in my 40s I had to get up in the middle of the night. ;) I noticed that the underside of the tarp had a lot of condensation on it. In the morning the top side had a good coating of frost, too. It got down to about 25*F but I was warm in this setup. We didn't have much wind and it mostly came from the direction in back of the tarp.
My friend and his kid slept in this 3 season Coleman tent. Even though it's extremely well ventilated it too had a lot of condensation in the morning.

I told my friend's daughter to look like she was enjoying the zombie apocalypse this morning.

Finally, I got to try out my Kovea Spider stove under field conditions. The temp was around freezing when I took this pic.

We also used the stove to boil water for oatmeal in my friend's Kelly Kettle. To do so we had to fold the legs slightly so that the KK would fit over it, but it worked great. We'd normally use twigs like the KK is designed for, but all the wood was wet, so this made it a lot easier.
It was a fun night out and a good gear test. The USMC field tarp isn't as light as some civilian tarps, but it is very rugged. It's a good size for sheltering one person and has snaps, so you can attach more than one if you need to make a larger shelter. This was my first time trying the MSS in an open shelter and it also worked great. I wouldn't want to carry it far due to its weight but if you don't need to hump it, it's probably one of the best deals available in rugged outdoor gear.
Friday, August 16, 2013
Hobo Stove and Walmart Grease Pot Test
Over the past few years I’ve read many discussions of the Walmart IMUSA grease pot for use as an inexpensive, lightweight cooking pot while camping. I was at Walmart earlier this week and decided to pick one up to try. For about $6, why not?
(For whatever reason, I can’t find the grease pot at walmart.com, here is the same pot at Amazon.)
The wife and kids were out tonight so I stopped at the local Asian grocer and bought a few different kinds of noodles to try, including the pack of udon that I cooked tonight. Here’s the udon pack, grease pot, hobo stove, and fuel that I used.

Not shown is the strainer included with the great pot, since I didn’t use it tonight.
For fueling the hobo stove I used a firestarter that I’d made up a few weeks ago. It’s part of a cardboard egg carton stuffed with oak shavings, then saturated with melted Gulf canning wax (paraffin). Once the melted wax hardens, you get a waterproof firestarter that lights easily and will burn hot for several minutes. They are great for starting campfires, and I wanted to see how it would work in lieu of sticks in the hobo stove.
The stove is one I made a couple years ago from a 1 pound coffee can. It has several ~1/2” holes around the bottom to allow for a draft, several more around the top, and a window at the top for adding fuel in the form of sticks or split wood.
I put 1.5 cups of tap water into the grease pot and placed it on the stove, then lit the fuel. After a couple minutes it looked like this.

Remember, that’s one of these firestarters.
I didn’t hear any boiling so after about 3 minutes I removed the lid, and found that I had a rolling boil.

So I put the udon in and let it cook for about 3 minutes. The firestarter burned out about 2 to 3 minutes after I added the noodles. I figure that it burned for about 6 to 7 minutes.
Dinner.

I did end up transferring the udon to a bowl, because the grease pot is too tall to conveniently eat from.
Conclusions:
For six bucks, the IMUSA grease pot carried by Walmart is a great deal if you want a light, cheap cooking pot for camping. It’s even big enough to hold one of those small butane powered stoves. It’s made from thin aluminum, so don’t expect it to withstand much abuse, but if you keep that in mind it’s a great deal.
The IMUSA grease pot would also make a good basis for a car survival kit. It can hold some survival supplies, e.g., tea bags, bullion cubes, a cup, space blanket, matches, firestarters, Esbit tabs or Trioxane fuel bars.
I was pleased with the performance of the firestarter when used as cooking fuel. If the pot had more than 1.5 cups of water in it I would have needed more fuel, however.
One caveat about using this kind of firestarter as a fuel bar is that it leaves a lot of thick, greasy soot on your cooking pot. If you plan on using this, better carry a plastic bag to put your pot in so everything else in your pack doesn’t turn black.
Performance of the hobo stove was good. It could probably be improved with something to hold the fuel closer to the bottom of the pot, such as a metal grate or the bottom of a smaller, empty can inverted and placed inside.
This goes to show you that you don’t always need to spend a lot of money on gear if you exercise a bit of creativity.
Tuesday, October 11, 2011
Reminder About Your Carbon Monoxide and Smoke Detectors
I'm sure anyone reading this blog has both smoke detectors and carbon monoxide (CO) detectors in their home. If not, do the right thing for safety and get them installed ASAP.
While fires and smoke are easy to see and smell with your own senses, CO is invisible, tasteless, and odorless. In short, it is dangerous because it combines with the hemoglobin in your blood and interferes with oxygen transport to body tissues. More info here.
My house is a split level, so I have two of each. One of each type is installed in the downstairs hallway outside the closet in which our furnace is located. The others are located in the hallway upstairs outside our bedrooms. My house was built in 1957, so I'm using battery powered units.
More modern units may be hard wired for electrical power. You can also get detectors which have a battery backup. That would be a good idea, since if fire or a CO problem strikes your home while the power is out you need to be alerted.
Tonight when I walked in after work I was greeted with the chirp from the downstairs CO detector which indicated that the batteries were low. While I was replacing the batteries in that one I also got did the upstairs unit. CO detectors have limited lifespans. When first introduced they lasted as short as two years, but more recent units may be good for up to seven. I checked my CO detectors and they are supposed to be good for seven years, but the manufacture date on them is 2005, so I'll be replacing them shortly. I just ordered two Kidde KN-COPP-B Front Load Battery-Operated Carbon Monoxide Alarm with Digital Display units from Amazon.com (yes that's a referral link) for delivery Thursday.
While fires and smoke are easy to see and smell with your own senses, CO is invisible, tasteless, and odorless. In short, it is dangerous because it combines with the hemoglobin in your blood and interferes with oxygen transport to body tissues. More info here.
My house is a split level, so I have two of each. One of each type is installed in the downstairs hallway outside the closet in which our furnace is located. The others are located in the hallway upstairs outside our bedrooms. My house was built in 1957, so I'm using battery powered units.
More modern units may be hard wired for electrical power. You can also get detectors which have a battery backup. That would be a good idea, since if fire or a CO problem strikes your home while the power is out you need to be alerted.
Tonight when I walked in after work I was greeted with the chirp from the downstairs CO detector which indicated that the batteries were low. While I was replacing the batteries in that one I also got did the upstairs unit. CO detectors have limited lifespans. When first introduced they lasted as short as two years, but more recent units may be good for up to seven. I checked my CO detectors and they are supposed to be good for seven years, but the manufacture date on them is 2005, so I'll be replacing them shortly. I just ordered two Kidde KN-COPP-B Front Load Battery-Operated Carbon Monoxide Alarm with Digital Display
units from Amazon.com (yes that's a referral link) for delivery Thursday.Monday, October 10, 2011
Homemade Firestarters
If you were ever a Boy Scout this post is probably old hat to you. ;)
I did some testing tonight with one of the egg carton, dryer lint, and canning wax fire starters I made a couple weeks ago. To light it I put some unwaxed dryer lint on the top and lit it with sparks from a firesteel (ferrocerium rod). These will of course light readily with matches or a lighter.
Unlit fire starter:

After about a minute:

At six minutes it's going strong and giving off quite a bit of light:

At 14 minutes. As you can see the flame is getting lower.

Finally, about a minute and a half after the previous picture, it finally went out. There were still embers of cardboard glowing now that all the wax was burned off. This pic was taken after 16 minutes:

It burned pretty hot and since the flame lasts long it would be very good at lighting wet sticks. I haven't tried it myself but I have read of guys using one of these with an Esbit stove to boil water for tea or soup.
The cost for one of these is minimal, really all you need to buy is the canning wax, and you could substitute wax from candles that you can often buy for pennies at yard sales. I recommend using dryer lint from loads with mostly cotton clothing or towels.
Be very careful when melting wax. Use a double boiler and it's safest to do it outside, just in case it ignites.
Saturday, June 11, 2011
Homemade Firestarters
If you go to any store catering to campers you'll see a large selection of firestarters designed to help you get your campfire going. Many of these work well, e.g., Lightning Nuggets, but it's simple to make your own firestarters for much less money. I made some today from cardboard, jute twine, and paraffin wax from the canning section at the supermarket.
To get the cardboard I cut the flaps from an empty beer case, then cut each flap into sections about six inches long. I then rolled up each piece and secured it with several wraps of jute twine, tied off with a square knot. Then I soaked each bundle for a few minutes in paraffin canning wax in an old pot on my charcoal grill. After a few minutes I took each firestarter out with a pair of pliers and set it in the bottom of the beer case to harden.
I tested one firestarter by lighting it with a match. It burned for several minutes with a good, high flame. It would work well to help get your campfire going if you had to contend with wet wood. Note that these won't light directly from a spark but are pretty easily lit with a match or lighter.
Be very careful when melting paraffin. The safest way to do so is in a double boiler. It's also a good idea to do this outside in case you have too much heat and the wax ignites.
Aside from rolls of cardboard you can use other household items to make firestarters. One of the best ways is to take the bottom of a cardboard egg carton and fill each pocket with sawdust or dryer lint. Use lint containing mostly cotton fibers, such as lint from drying a load of towels. Then, melt some wax and pour it into the egg carton. You then cut apart each pocket, leaving you with 12 to 18 firestarters that will burn for several minutes. Depending on how much help you need getting your fire started, you can even cut each of the firestarters into smaller sections.
Making your own camping gear is fun and can save you some money. Give it a try.
To get the cardboard I cut the flaps from an empty beer case, then cut each flap into sections about six inches long. I then rolled up each piece and secured it with several wraps of jute twine, tied off with a square knot. Then I soaked each bundle for a few minutes in paraffin canning wax in an old pot on my charcoal grill. After a few minutes I took each firestarter out with a pair of pliers and set it in the bottom of the beer case to harden.
I tested one firestarter by lighting it with a match. It burned for several minutes with a good, high flame. It would work well to help get your campfire going if you had to contend with wet wood. Note that these won't light directly from a spark but are pretty easily lit with a match or lighter.
Be very careful when melting paraffin. The safest way to do so is in a double boiler. It's also a good idea to do this outside in case you have too much heat and the wax ignites.
Aside from rolls of cardboard you can use other household items to make firestarters. One of the best ways is to take the bottom of a cardboard egg carton and fill each pocket with sawdust or dryer lint. Use lint containing mostly cotton fibers, such as lint from drying a load of towels. Then, melt some wax and pour it into the egg carton. You then cut apart each pocket, leaving you with 12 to 18 firestarters that will burn for several minutes. Depending on how much help you need getting your fire started, you can even cut each of the firestarters into smaller sections.
Making your own camping gear is fun and can save you some money. Give it a try.
Friday, December 24, 2010
Fire Starting With A Firesteel and Wood Shavings
I just got a Kodak Playsport pocket sized camcorder and made my first video.
Hope you find it informative.
Hope you find it informative.
Sunday, March 09, 2008
New Toys With My REI Dividend
REI dividends are out and this year I managed to rack up $47 worth. I also had a 20% off one item coupon. Today I went over to the local store and spent it (and then some). Anyway, I bought:
I haven't tried the Mountain House meals yet, and I got the Space Pen just because I thought it was neat.
- A Gerber Gator folding saw
- An Open Country Explorer Grid 12" x 6" folding grill
- A box of Lightning Nugget fire starters
- A pack of REI Storm Proof matches
- A Fisher Space Pen (telescoping model)
- A couple Mountain House freezed dried meals
I've used the Storm Proof matches for awhile. They burn like mini-flares and will not go out even if you drop them into snow. I once tested this by dropping a lit one into about a foot of snow. It melted its way down to the ground without going out.
The Lightning Nugget fire starters appear to be pine chips that are soaked in paraffin, then formed into hemispheres. The manufacturer claims they'll burn for up to 15 minutes. To use, the instructions on the box tell you to place one on the ground, round side down. Then light it with a match and wait until its going well before placing your kindling on it. I used a bit of Coughlin's tinder (wax-impregnated cotton) ignited with a fire steel to light it. It worked well, and I plan to add two or three Nuggets to my kit, each one wrapped in some aluminum foil to protect them in storage and shield them from damp ground in use.
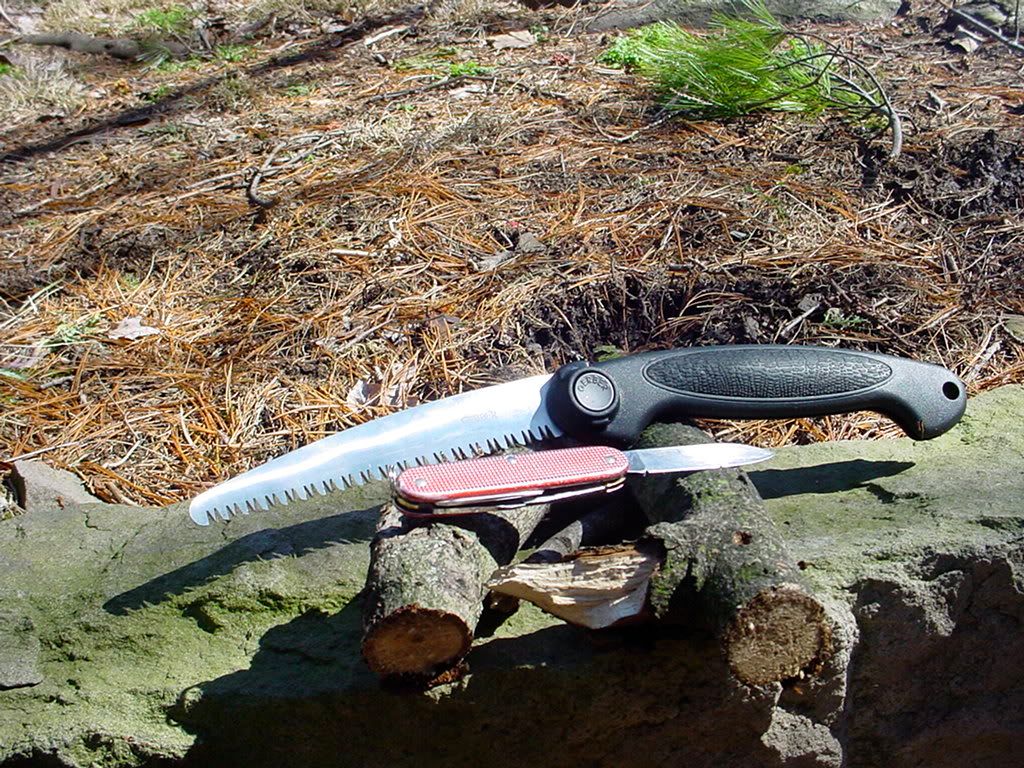
I've wanted to try one of the Gerber Gator folding saws for awhile now, having read many favorable reviews. (HERE is a pic I took, along with my Victorinox Pioneer for scale.) The blade is fairly thin, which when combined with the plastic handle, makes it very light weight. The teeth are pretty aggressive and designed to cut on the pull stroke. Some reviews I saw on REI's web page reported people breaking the saw. I think what may have happened was that those users tried to cut on the push stroke, bending the blade and wrecking the hinge. However, if used as designed, it looks like it should be fine.
In my brief testing, the Gator cut both hard and soft wood well, requiring less effort to do so than using a large knife would. Using a saw is also a bit safer than hacking away with a big knife. As one part of a modern "Nessmuk trio," one of these makes a lot of sense, in my opinion. Finally, at $15.95, the Gerber is cheaper than most large knives.
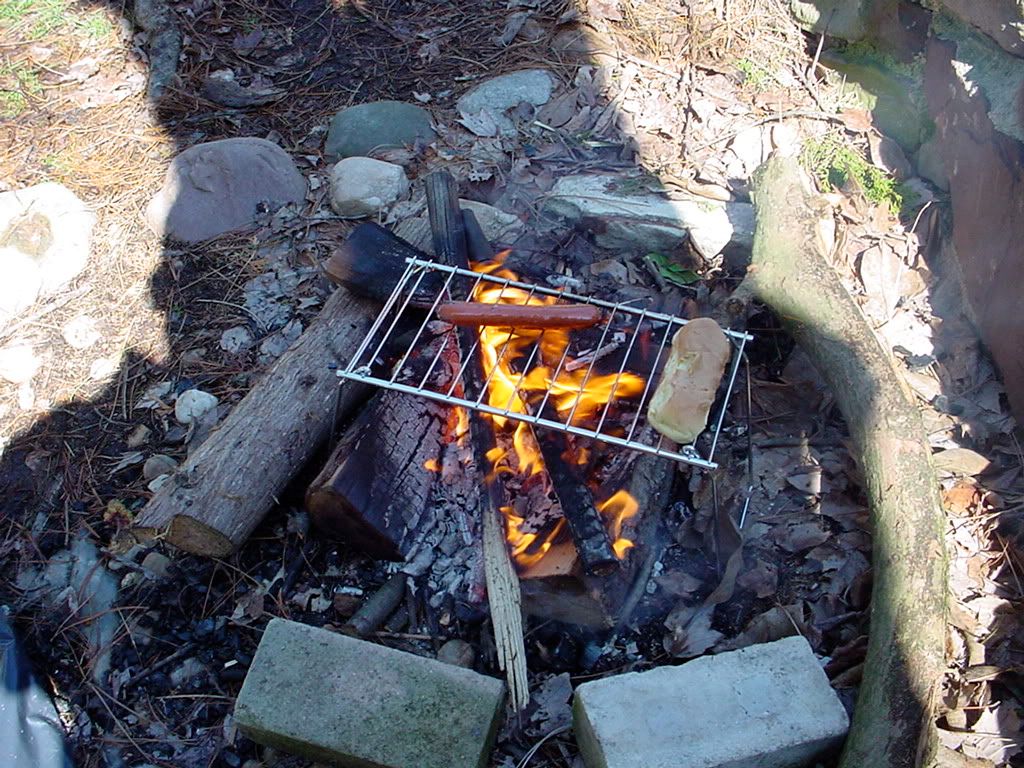
Another item which I've had my eye on for a little while is the Open Country folding grill (PIC). Even though it's small, it's easier to cook over an open fire by using a grill than by impaling the food on sticks or putting a vessel right in the fire. The OC Explorer Grid seems well made for the price (about $11) and strong enough to hold a kettle or small pan. It didn't come with any kind of a case, so I'm going to make something up with some scrap denim or muslin. A leg from an old pair of jeans might be big enough. That way, anything it gets packed with after being used will stay clean.
I haven't tried the Mountain House meals yet, and I got the Space Pen just because I thought it was neat.
Sunday, November 25, 2007
Hobo Stove, Part 2
Today I revised the design of the hobo stove that I made yesterday from a coffee can. I flipped the can back over and made a top for it from some 1/2" mesh hardware cloth I picked up today at Lowe's. ("Cloth" is a bit of a misnomer. It's made from galvanized steel mesh.)
Before lighting, I loaded the stove with some crumpled paper, a couple pieces of fatwood, some twigs, and a wad of dryer lint. The dryer lint ignited with one strike from my fire steel. I quickly added more twigs and a pine cone, and placed the hardware cloth top on the stove.
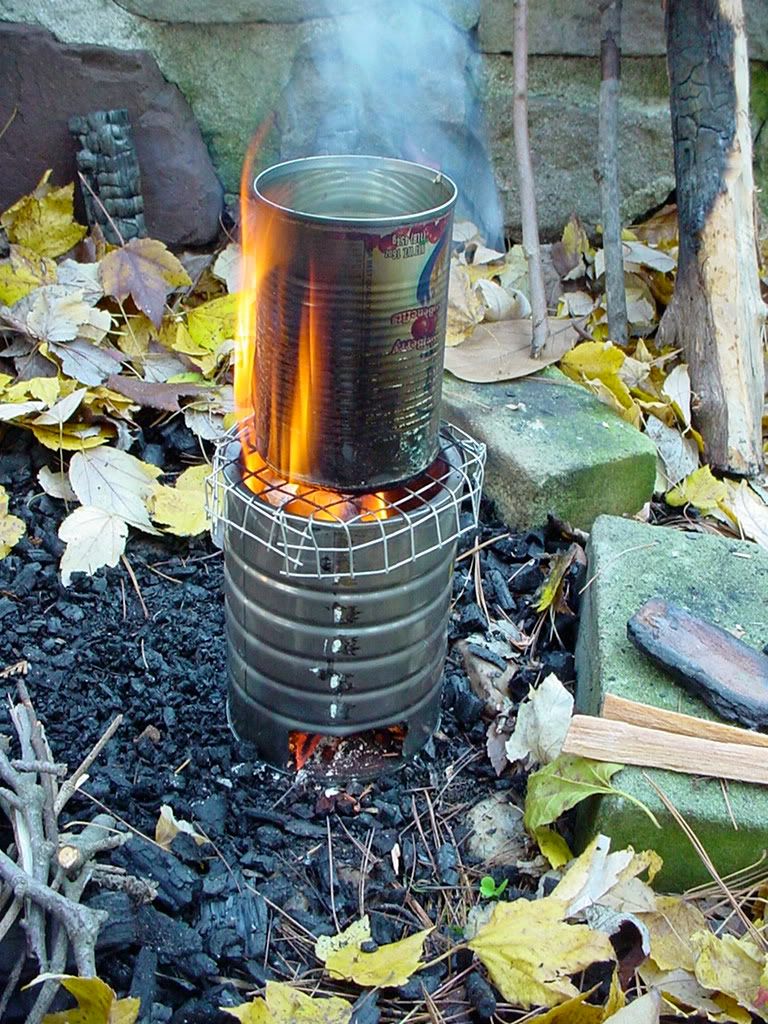
The first shot here shows the front of the stove with the new top, after lighting.

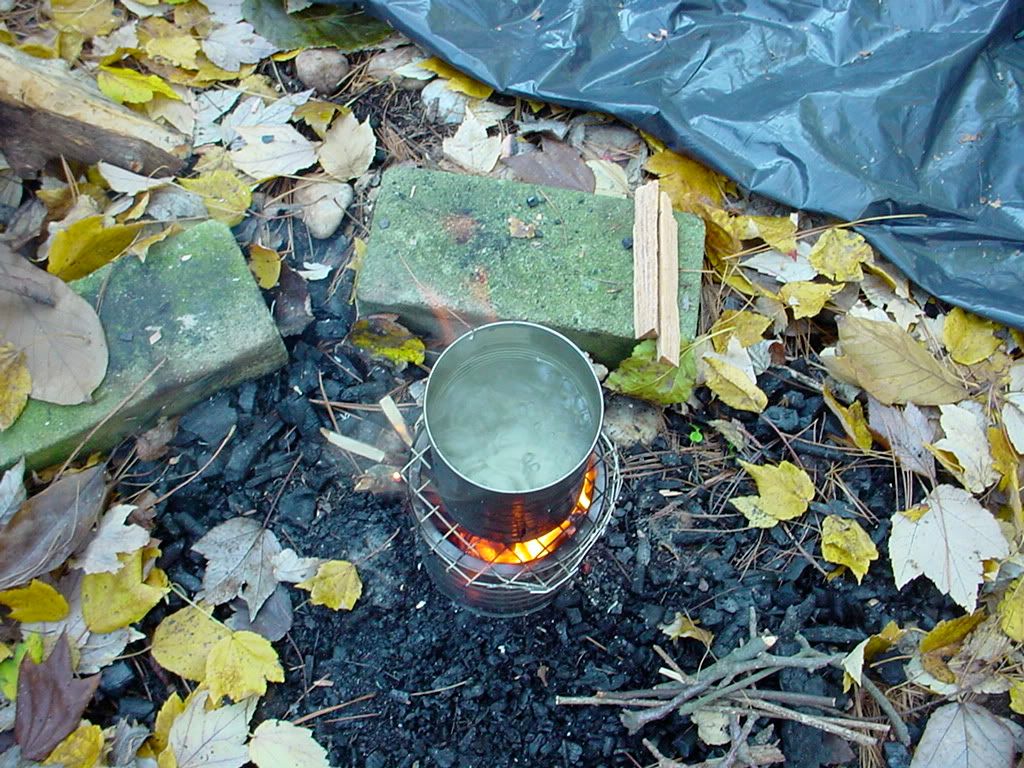
Next, we can see that today, I was actually able to get water to boil.

Finally, I decided that since it was a little chilly and I had my possibles bag outside with me, I'd make up a cup of chicken boullion. The cup is an Olicamp Space Saver, which fits over the bottom of a 32 oz. Nalgene bottle.

So, this is definitely an improvement over yesterday's attempt. It'll burn pretty much anything you can fit inside. Due to the size, you have to feed fuel in frequently, but it seems to burn fuel pretty completely and not leave much ash behind. I'm very interested to see how it performs with charcoal briquets. Assuming it works well with them it would make a good little emergency stove for home owners or apartment dwellers with patios, since it should be more efficient than a charcoal grill for boiling water.
The stove's exhaust vent is large enough to feed fuel into, but I think I'll enlarge the bottom front vent, to let in more air, and to allow me to shove sticks into the bottom of the fire. (This time I'll use snips or my Dremel, to save the edge on my knife.)
Before lighting, I loaded the stove with some crumpled paper, a couple pieces of fatwood, some twigs, and a wad of dryer lint. The dryer lint ignited with one strike from my fire steel. I quickly added more twigs and a pine cone, and placed the hardware cloth top on the stove.
The first shot here shows the front of the stove with the new top, after lighting.
Next, we can see that today, I was actually able to get water to boil.
Finally, I decided that since it was a little chilly and I had my possibles bag outside with me, I'd make up a cup of chicken boullion. The cup is an Olicamp Space Saver, which fits over the bottom of a 32 oz. Nalgene bottle.
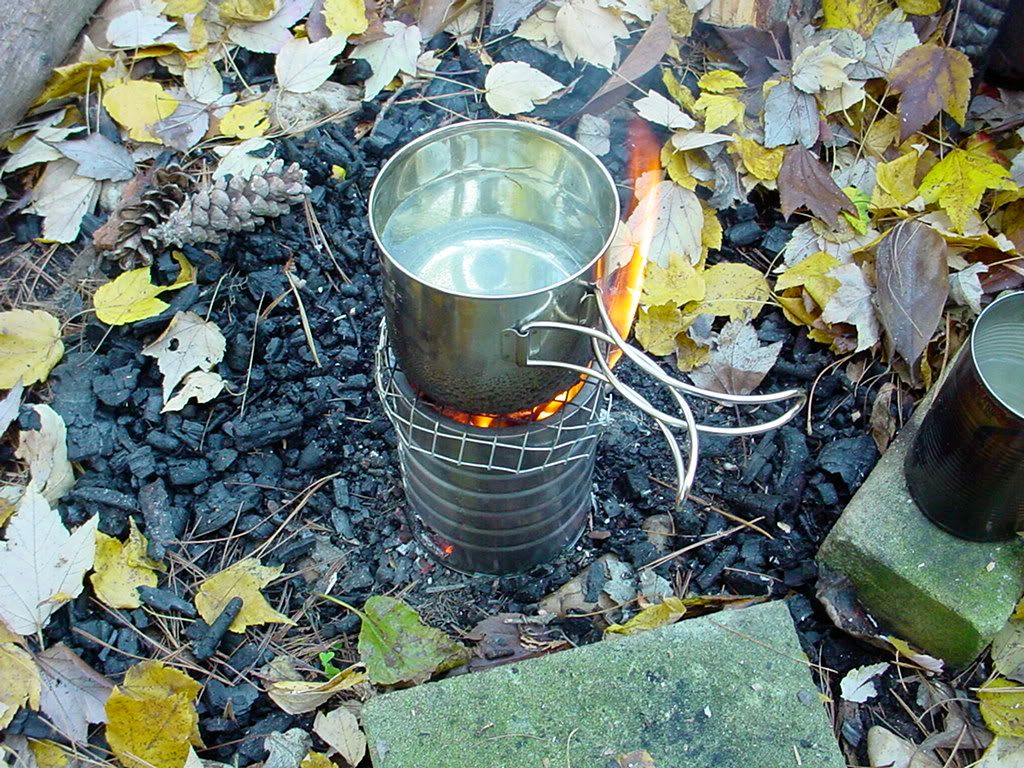
So, this is definitely an improvement over yesterday's attempt. It'll burn pretty much anything you can fit inside. Due to the size, you have to feed fuel in frequently, but it seems to burn fuel pretty completely and not leave much ash behind. I'm very interested to see how it performs with charcoal briquets. Assuming it works well with them it would make a good little emergency stove for home owners or apartment dwellers with patios, since it should be more efficient than a charcoal grill for boiling water.
The stove's exhaust vent is large enough to feed fuel into, but I think I'll enlarge the bottom front vent, to let in more air, and to allow me to shove sticks into the bottom of the fire. (This time I'll use snips or my Dremel, to save the edge on my knife.)
Saturday, November 24, 2007
Hobo Stove, Part I
Today's post may be more properly titled, "How Not to Make a Hobo Stove."
If enter the term "hobo stove" into Google, you get about 257,000 hits. Even leaving out the irrelevant results, that leaves a lot of pertinent info available online about them. Before making the stove below, I did look at some of these pages.
Anyway, my goal for this was to see, using nothing more than an empty coffee can and a Swiss Army Knife, if I could make a functional hobo stove for cooking either while camping or in an emergency. An important feature is the ability to use any flammable solid that you can put into the stove as fuel. E.g., twigs, bark, pine cones, cardboard, etc.
First, here are pictures of the front of the stove, with an air intake and fuel feeding window at the bottom (what was the top of the can), and then an exhaust vent/fuel feeding window at the top (formerly the bottom of the can).

As you can see above, I did not cut through the rim of the can. I left the rim on so the stove would be more rigid.

To cut out the windows, I punched out the corners of each window with the reamer on my Victorinox Farmer Swiss Army Knife. Then, I cut between the holes using the knife blade. The knife cut the can OK but was dulled quite a bit by doing so. If you're going to try this, you'll be better off using tin snips or a cutoff wheel in a Dremel. Watch out for sharp edges on the can.
Our next picture is of the tinder pile I made to get it started. I used my Victorinox Pioneer to make a pile of fatwood scrapings and some splinters onto a piece of cardboard, then used the reamer as a striker on the ferrocerium rod.

Once the tinder was going -- which took only a few strikes on the ferro rod -- I added a few twigs, then placed the stove over the burning pile and starting feeding more twigs in through the exhaust vent. The lower vent was facing the prevailing wind, so each time a breeze picked up it fanned the flames.
Note my high-tech pot, a cranberry sauce can left over from Thanksgiving. ;)

Finally, here's a shot of some flames coming out the back exhaust vent.

OK, so why is this, "How Not to Make a Hobo Stove?" Simply put, this layout doesn't allow you to build and keep going a hot enough fire, at least with scrounged fuel. It works only with rather small pieces of wood or pinecones. Despite my best efforts, the water in the cranberry sauce can never boiled. It did warm up and start giving off water vapor but never came to a good boil. A bit of water spilled on the top of the stove did sizzle off, but the two layers of metal between the fire and water kept it from getting hot enough to boil in the can. It might work better with charcoal briquets.
Having tried this setup, I'm going to play with it a bit more. I'll probably try charcoal briquets. Also, I'll flip the coffee can back over and make a pot support for the top using either wire hangers or some hard cloth/chicken wire. I may also make what was the exhaust hole a bit larger so I can feed larger pieces of fuel into it.
Stay tuned for part two.
If enter the term "hobo stove" into Google, you get about 257,000 hits. Even leaving out the irrelevant results, that leaves a lot of pertinent info available online about them. Before making the stove below, I did look at some of these pages.
Anyway, my goal for this was to see, using nothing more than an empty coffee can and a Swiss Army Knife, if I could make a functional hobo stove for cooking either while camping or in an emergency. An important feature is the ability to use any flammable solid that you can put into the stove as fuel. E.g., twigs, bark, pine cones, cardboard, etc.
First, here are pictures of the front of the stove, with an air intake and fuel feeding window at the bottom (what was the top of the can), and then an exhaust vent/fuel feeding window at the top (formerly the bottom of the can).

As you can see above, I did not cut through the rim of the can. I left the rim on so the stove would be more rigid.

To cut out the windows, I punched out the corners of each window with the reamer on my Victorinox Farmer Swiss Army Knife. Then, I cut between the holes using the knife blade. The knife cut the can OK but was dulled quite a bit by doing so. If you're going to try this, you'll be better off using tin snips or a cutoff wheel in a Dremel. Watch out for sharp edges on the can.
Our next picture is of the tinder pile I made to get it started. I used my Victorinox Pioneer to make a pile of fatwood scrapings and some splinters onto a piece of cardboard, then used the reamer as a striker on the ferrocerium rod.

Once the tinder was going -- which took only a few strikes on the ferro rod -- I added a few twigs, then placed the stove over the burning pile and starting feeding more twigs in through the exhaust vent. The lower vent was facing the prevailing wind, so each time a breeze picked up it fanned the flames.
Note my high-tech pot, a cranberry sauce can left over from Thanksgiving. ;)

Finally, here's a shot of some flames coming out the back exhaust vent.

OK, so why is this, "How Not to Make a Hobo Stove?" Simply put, this layout doesn't allow you to build and keep going a hot enough fire, at least with scrounged fuel. It works only with rather small pieces of wood or pinecones. Despite my best efforts, the water in the cranberry sauce can never boiled. It did warm up and start giving off water vapor but never came to a good boil. A bit of water spilled on the top of the stove did sizzle off, but the two layers of metal between the fire and water kept it from getting hot enough to boil in the can. It might work better with charcoal briquets.
Having tried this setup, I'm going to play with it a bit more. I'll probably try charcoal briquets. Also, I'll flip the coffee can back over and make a pot support for the top using either wire hangers or some hard cloth/chicken wire. I may also make what was the exhaust hole a bit larger so I can feed larger pieces of fuel into it.
Stay tuned for part two.
Sunday, November 04, 2007
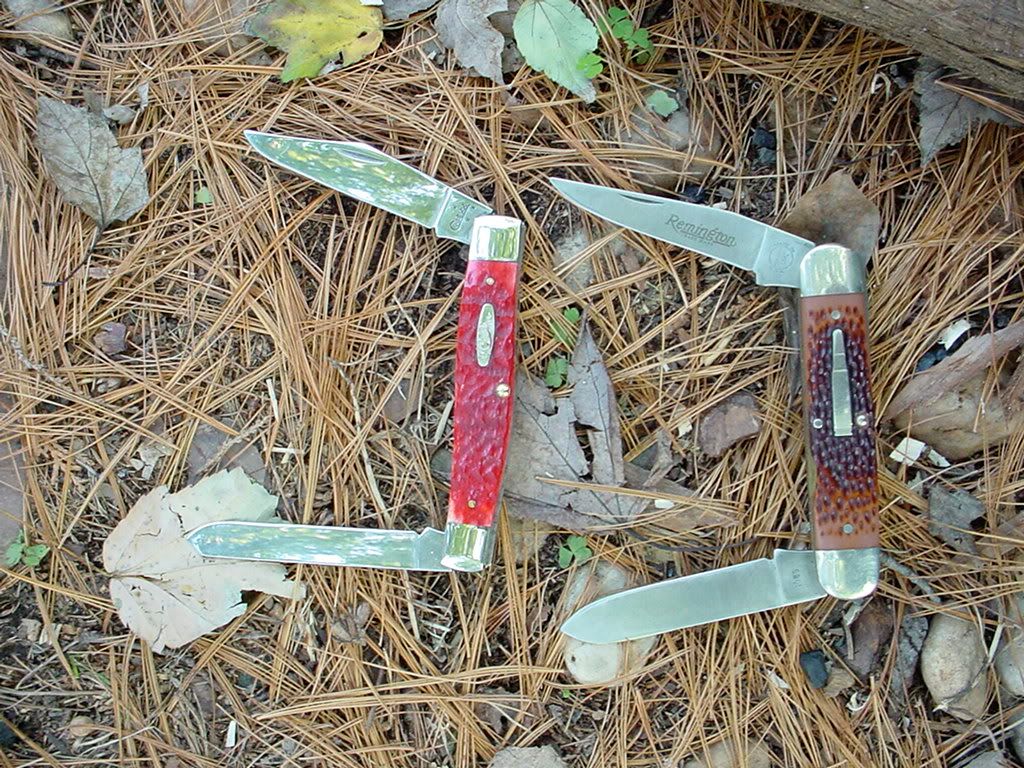
Case Moose Follow Up
I got the chance to go out back this afternoon and play with the Case Moose I got Friday. Here it is next to my Remington Woodsman:

The next picture shows it next to a fire lay and my Cold Steel Trail Hawk:

You can't see it in the pic, but there is a wad of unraveled jute twine in the middle of the fire lay. Between the jute, the fuzz sticks, and one match, I had a good fire going in about 20 seconds.
As an aside, I am reevaluating my opinion of the CS Trail Hawk. I wasn't too impressed with it when I first got it. For chopping branches and stuff it's a bit small. However, it worked very well for splitting up some small logs and chopping splinters off the sides for use in making up the fire lay shown.
The next picture shows it next to a fire lay and my Cold Steel Trail Hawk:
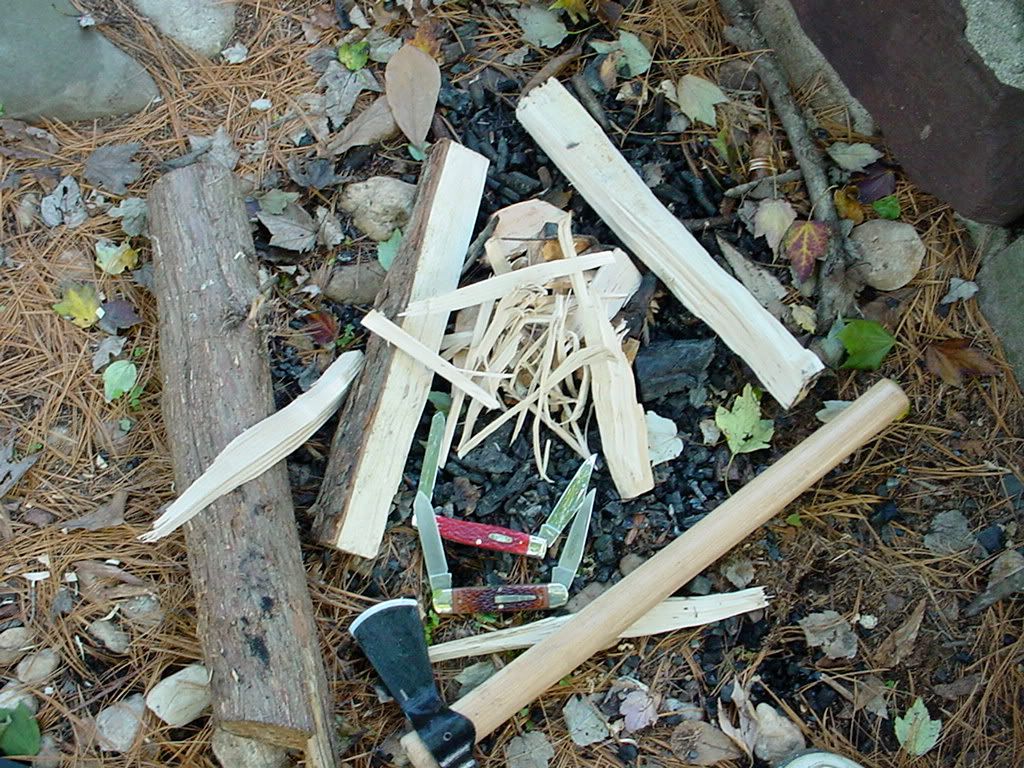
You can't see it in the pic, but there is a wad of unraveled jute twine in the middle of the fire lay. Between the jute, the fuzz sticks, and one match, I had a good fire going in about 20 seconds.
As an aside, I am reevaluating my opinion of the CS Trail Hawk. I wasn't too impressed with it when I first got it. For chopping branches and stuff it's a bit small. However, it worked very well for splitting up some small logs and chopping splinters off the sides for use in making up the fire lay shown.
Saturday, October 27, 2007
More Fire Starting in the Dark and Wet
Last month, I wrote about trying to start fires when it's dark and wet. I did a bit more experimentation along those lines last night, although with less success. Actually, no success. The last time I tried it, my wood was wet but it wasn't raining much. Last night, the rain was coming down harder.
My choice of tinder last night was some fatwood. I bought a box of this the other night at Lowe's, where it's stocked near the barbecue and fireplace stuff. I've read about fatwood in several postings on the BladeForums Wilderness & Survival Skills forum, and wanted to try it out.
Fatwood is pine with a higher than normal resin or pitch content. Pine pitch is very flammable. The reason fatwood has a higher pitch content is that it's from a tree that died violently, whether from a lightning strike or being cut down. Until the roots die, they'll continue to pump pitch up into the stump, saturating it with the flammable resin.
Fatwood is water resistant, cheap, and burns extremely well. When shaved into a fuzz with a knife, it ignites easily with sparks from a ferrocerium rod. At least long as it isn't soaking wet.
Before trying to get a fire going in the rain, I made a small pile of fatwood fuzz immediately outside my front door, where it was sheltered from the rain. After a few strokes on the ferro rod it ignited and burned for about 30 seconds. If I had dry secondary tinder and fuel to work with, I would easily have been able to start a fire.
A little while later I went out back with a couple pieces of fatwood, my golok, and my Victorinox Farmer to which is attached a Countycomm Peanut lighter and a Photon Microlight II. I also put in my pockets a ferro rod, a box of REI Stormproof matches, and a tealight.
I started by splitting slivers of wood from a piece of dry firewood taken out of my shed. I gathered these on a garbage bag to keep them off the wet ground and tried to shield them from the rain with my body. Next I made up a pile of fatwood fuzz.
As quickly as possible I made a fire lay with the fuzz sitting on top of a dry piece of bark, surrounded by the dry wood slivers.
Unfortunately, the whole fire lay quickly got wet. Also, the ferro rod would no longer throw sparks once wet. I tired the Peanut lighter but as soon as a raindrop hit the top it went out and was too wet to start until I later took it in and dried it out. The one reliable spark source I had were the REI matches. But by this time all my once dry tinder and kindling was sopping wet. Not to mention I was soaked.
Another problem I had was that as I tried to get sparks from the ferro rod after it got wet, a couple times I disturbed my fire lay, getting it wetter.
Since the fatwood worked when it wasn't too wet I do plan to add a couple pieces to my possibles bag to complement the 35mm film canister of Vaseline cotton balls and hexamine Esbit fuel.
So far, the one method I've tried which will get a fire started when it's raining is a magnesium road flare. When I was in a Civil Air Patrol ground search and rescue squadron from 1985 - 90, I carried one in my butt pack. Flares burn very hot and for 15 or 30 minutes, so they are able to dry out and ignite wet wood. Today, I carry a few in the back of my truck, for both their intended use and in case I get stuck somewhere and need to start a fire. Note that flares have a shelf life so they should be replaced every few years.
Upcoming tests will use hexamine, trioxane, and fire starters made from dyer lint and/or wood shavings in cardboard egg cartons, soaked in wax.
For now, I'm thinking that unless one has a flare when all potential fuel is wet and it's raining, concentrating one's efforts on constructing some shelter first to get out of the rain makes more sense than trying to get a fire going. After that, then think about starting a fire, because you'll be able to setup you fire lay where it won't get rained on and swamped before you really get it going.
My choice of tinder last night was some fatwood. I bought a box of this the other night at Lowe's, where it's stocked near the barbecue and fireplace stuff. I've read about fatwood in several postings on the BladeForums Wilderness & Survival Skills forum, and wanted to try it out.
Fatwood is pine with a higher than normal resin or pitch content. Pine pitch is very flammable. The reason fatwood has a higher pitch content is that it's from a tree that died violently, whether from a lightning strike or being cut down. Until the roots die, they'll continue to pump pitch up into the stump, saturating it with the flammable resin.
Fatwood is water resistant, cheap, and burns extremely well. When shaved into a fuzz with a knife, it ignites easily with sparks from a ferrocerium rod. At least long as it isn't soaking wet.
Before trying to get a fire going in the rain, I made a small pile of fatwood fuzz immediately outside my front door, where it was sheltered from the rain. After a few strokes on the ferro rod it ignited and burned for about 30 seconds. If I had dry secondary tinder and fuel to work with, I would easily have been able to start a fire.
A little while later I went out back with a couple pieces of fatwood, my golok, and my Victorinox Farmer to which is attached a Countycomm Peanut lighter and a Photon Microlight II. I also put in my pockets a ferro rod, a box of REI Stormproof matches, and a tealight.
I started by splitting slivers of wood from a piece of dry firewood taken out of my shed. I gathered these on a garbage bag to keep them off the wet ground and tried to shield them from the rain with my body. Next I made up a pile of fatwood fuzz.
As quickly as possible I made a fire lay with the fuzz sitting on top of a dry piece of bark, surrounded by the dry wood slivers.
Unfortunately, the whole fire lay quickly got wet. Also, the ferro rod would no longer throw sparks once wet. I tired the Peanut lighter but as soon as a raindrop hit the top it went out and was too wet to start until I later took it in and dried it out. The one reliable spark source I had were the REI matches. But by this time all my once dry tinder and kindling was sopping wet. Not to mention I was soaked.
Another problem I had was that as I tried to get sparks from the ferro rod after it got wet, a couple times I disturbed my fire lay, getting it wetter.
Since the fatwood worked when it wasn't too wet I do plan to add a couple pieces to my possibles bag to complement the 35mm film canister of Vaseline cotton balls and hexamine Esbit fuel.
So far, the one method I've tried which will get a fire started when it's raining is a magnesium road flare. When I was in a Civil Air Patrol ground search and rescue squadron from 1985 - 90, I carried one in my butt pack. Flares burn very hot and for 15 or 30 minutes, so they are able to dry out and ignite wet wood. Today, I carry a few in the back of my truck, for both their intended use and in case I get stuck somewhere and need to start a fire. Note that flares have a shelf life so they should be replaced every few years.
Upcoming tests will use hexamine, trioxane, and fire starters made from dyer lint and/or wood shavings in cardboard egg cartons, soaked in wax.
For now, I'm thinking that unless one has a flare when all potential fuel is wet and it's raining, concentrating one's efforts on constructing some shelter first to get out of the rain makes more sense than trying to get a fire going. After that, then think about starting a fire, because you'll be able to setup you fire lay where it won't get rained on and swamped before you really get it going.
Sunday, October 21, 2007
Doan Magnesium Fire Starter Review
Today I practiced making fire, this time using a Doan magnesium fire starter. This is a piece of USGI gear consisting of rectangular bar of magnesium, to which a ferrocerrium rod is glued on one of the long sides. It also has a hole towards one end through which a beaded chain is threaded, and which can be used to secure it to your kit or to keep a striker handy.
The magnesium fire starters are waterproof and don't burn when solid. To use, you scrape the exposed long side of the bar to make a pile of magnesium shavings, which do burn. Once you've got a good pile, which takes some work, you flip the bar over and use a striker to scrape sparks off the ferrocerium rod into the pile. This will then flare up and light your secondary tinder and kindling.
A hacksaw blade snapped in half works fairly well for making the magnesium shavings and for making sparks. However, I used the reamer on my Victorinox Farmer Swiss Army Knife. It's easier to hold and works well.
While the magnesium shavings burn very hot, they don't burn for very long. Thus, it's critical that you make a big enough pile and have enough dry tinder, twigs, and kindling to keep the fire burning once the magnesium shavings burn out in short order.
My secondary tinder was wood shavings sliced off one of the firewood logs I picked up last weekend at Lowe's. The logs were my fuel, as well. They were supposed to be seasoned but still had a fair moisture content, as I discovered once I got the fire going.
I first created a pile of wood shavings then made a small pile of magnesium shavings next to and surrounded by the wood. The magnesium shavings lit after a few strikes from the ferrocerium but I was unable to get a sustained fire going.
Since my daughters were outside with my and wanted to get one with roasting some hot dogs, I switched over to a Bic lighter. However, I wasn't able to get a sustained fire going until I broke out a Coughlin's tinder wad (a wax impregnated cotton ball) and placed it among the coals left over from the burning wood shavings. That and blowing on the fire finally got it going.
Once the fire was going I saw and heard moisture bubbling out the end of the firewood, so it wasn't seasoned enough. It burned with a lot of smoke, too.
I'm not real impressed with the magnesium fire starter. It takes too long and requires too much effort to create a pile of shavings for your stage one tinder. Also, the shavings are so lightweight that the slightest bit of wind blows them around. Finally, the striker rod on the one side of the bar is thin compared to a Swedish Fire Steel, so it throws fewer sparks.
If I was stuck in the wilderness, would I take a Doan magnesium fire starter over a primitive fire starting method, such as a fire drill? You bet. It's easily pocketable, light, and does contain both a spark source and tinder in one waterproof package. However, I think there are better alternatives. For example, a ferrocerium rod (e.g., Swedish Fire Steel) and a 35mm film canister filled with cotton balls soaked in petroleum jelly take up little additional room but work much better. The PJ cotton balls burn hot AND long enough to get your secondary tinder going. Of course, one could carry the Doan fire starter and the PJ cotton balls, using the Doan's ferrocerium rod to ignite them.
I was also reminded of the utility of a large knife, machete, or axe when making woods shavings or splitting kindling from large pieces of wood. Today I relied on my Mora Swedish Army Knife, (#760MG) which is a great small fixed blade. They are inexpensive, take and retain a sharp edge, and have comfortable handles. However, they are short and light which means it takes significantly more effort to make a pile of wood shavings or split logs. If I'd been able to split more kindling the fire would have gotten going a lot more easily. This could be critical in a survival situation where you need a fire RFN, such as if you need to dry off in cold weather.
Once again, I'm glad I tried this out in my back yard, instead of out in the woods in a serious situation.
The magnesium fire starters are waterproof and don't burn when solid. To use, you scrape the exposed long side of the bar to make a pile of magnesium shavings, which do burn. Once you've got a good pile, which takes some work, you flip the bar over and use a striker to scrape sparks off the ferrocerium rod into the pile. This will then flare up and light your secondary tinder and kindling.
A hacksaw blade snapped in half works fairly well for making the magnesium shavings and for making sparks. However, I used the reamer on my Victorinox Farmer Swiss Army Knife. It's easier to hold and works well.
While the magnesium shavings burn very hot, they don't burn for very long. Thus, it's critical that you make a big enough pile and have enough dry tinder, twigs, and kindling to keep the fire burning once the magnesium shavings burn out in short order.
My secondary tinder was wood shavings sliced off one of the firewood logs I picked up last weekend at Lowe's. The logs were my fuel, as well. They were supposed to be seasoned but still had a fair moisture content, as I discovered once I got the fire going.
I first created a pile of wood shavings then made a small pile of magnesium shavings next to and surrounded by the wood. The magnesium shavings lit after a few strikes from the ferrocerium but I was unable to get a sustained fire going.
Since my daughters were outside with my and wanted to get one with roasting some hot dogs, I switched over to a Bic lighter. However, I wasn't able to get a sustained fire going until I broke out a Coughlin's tinder wad (a wax impregnated cotton ball) and placed it among the coals left over from the burning wood shavings. That and blowing on the fire finally got it going.
Once the fire was going I saw and heard moisture bubbling out the end of the firewood, so it wasn't seasoned enough. It burned with a lot of smoke, too.
I'm not real impressed with the magnesium fire starter. It takes too long and requires too much effort to create a pile of shavings for your stage one tinder. Also, the shavings are so lightweight that the slightest bit of wind blows them around. Finally, the striker rod on the one side of the bar is thin compared to a Swedish Fire Steel, so it throws fewer sparks.
If I was stuck in the wilderness, would I take a Doan magnesium fire starter over a primitive fire starting method, such as a fire drill? You bet. It's easily pocketable, light, and does contain both a spark source and tinder in one waterproof package. However, I think there are better alternatives. For example, a ferrocerium rod (e.g., Swedish Fire Steel) and a 35mm film canister filled with cotton balls soaked in petroleum jelly take up little additional room but work much better. The PJ cotton balls burn hot AND long enough to get your secondary tinder going. Of course, one could carry the Doan fire starter and the PJ cotton balls, using the Doan's ferrocerium rod to ignite them.
I was also reminded of the utility of a large knife, machete, or axe when making woods shavings or splitting kindling from large pieces of wood. Today I relied on my Mora Swedish Army Knife, (#760MG) which is a great small fixed blade. They are inexpensive, take and retain a sharp edge, and have comfortable handles. However, they are short and light which means it takes significantly more effort to make a pile of wood shavings or split logs. If I'd been able to split more kindling the fire would have gotten going a lot more easily. This could be critical in a survival situation where you need a fire RFN, such as if you need to dry off in cold weather.
Once again, I'm glad I tried this out in my back yard, instead of out in the woods in a serious situation.
Tuesday, September 11, 2007
Fire Starting in the Dark and Wet
In my Sunday post I described how I did some backyard experimenting with fire starting. Since my goal was to see if a Ballistol-soaked cleaning patch would catch the sparks from a fire steel and act as tinder, the nice weather on Sunday was a bonus.
However, when you're out in the woods, whether by design or bad fortune, odds are that weather conditions won't always cooperate. Your fuel sources may be wet and it may be actually raining. Just as bad, it may be dark. (For some perverse reason, it seemed that every time my CAP squadron went on an FTX, we didn't pitch camp until it was dark and raining.)
So, tonight I went out back again for more practice. It rained last night and earlier today, so everything was wet. Before heading outside I gathered several items:
1. A Swiss surplus rain poncho, mainly for use as a mat to sit on. I also used it to collect wood shavings.
2. My Becker Combat/Utility 7 knife, along with matches and tinder in a small Altoids tin in the sheath pouch.
3. A Rayovac LED headlamp.
4. My Victorinox Pioneer Swiss Army Knife, to which is attached a County Comm Peanut Lighter. If I step out of the house, this combo is in my pocket.
5. 1L Nalgene bottle of water to douse the fire when I was finished.
I wanted to see if I could get a fire going using just a match and tinder gathered from my yard. I gathered some small dead branches from a tree in my yard. These felt pretty dry. I broken them up and set them aside.
I took a small branch which didn't seem soaked from my wood pile, peeled off the bark, and made a pile of shavings from the dry wood within.
Rather than placing my pile of shavings directly on damp ground, I first made a platform of dry sticks. Doing so keeps your tinder from getting damp.
The first hitch I ran into was that I could not get my strike anywhere matches to light, even using a dry rock as the striker. I don't have a striker from a match box in the fire starting kit in the Becker Sheath, something I must remedy.
I decided to light the match with the Peanut Lighter then try to light the pile of shavings. What I discovered was that whatever wood this was would ignite, flame, then cool down to a coal and then go out before getting any real flame going. Discouraging to say the least.
In exasperation, I took half of a petroleum jelly cotton ball out of the fire starting kit and placed it in the middle of the pile of shavings, then lit it with the Peanut Lighter. The cotton ball with PJ burned hot and long enough to ignite the wood shavings and sticks that I added. Shortly thereafter I had a small blaze going.
After dousing the fire and coming inside I took another match and tried to light it using the grout in my slate floor in my office. This has worked in the past, but tonight, no dice. I got one spark but the tip of the match wore away before igniting. I put the match in the flame of a lighter and it did ignite, so it may be that it's too humid for the strike anywhere matches to light without a matchbox striker or external help. Not something I'd want to discover in an emergency.
Lessons learned:
1. Lighting a fire when stuff is wet takes a lot of work.
2. Carry good tinder with you. Don't depend on being able to find natural tinder when you need it. Cotton balls soaked in petroleum jelly can be made at home, are cheap, and work wonderfully.
3. As a corrollary to #2, if you do find good tinder while roaming the woods, gather some for later use.
4. Even if your matches are strike anywheres, carry the striker from a matchbox with you.
5. Have at least one backup means of making fire. E.g., a lighter. I wholeheartedly recommend the Peanut Lighters from Countycomm.com. They are inexpensive, small, carry easily in a pocket, and don't leak. Mine has not been refilled in at least two weeks. I also like ferrocerrium rods which can be struck to generate a shower of hot sparks. They last a long time and work when wet.
6. A large knife will make it easier for you to make fire. It's much easier to make wood shavings with a good sized belt knife than with a pocket knife. You can also use a large knife to split open wet branches to get at the dry wood within.
7. Aside from keeping you dry, a poncho can be used to collect wood shavings you make and keep them off damp ground.
8. LED headlamps rock. It would have been a lot harder to work in the dark if I had to hold a flashlight in one hand.
9. Setting things on fire is fun.
However, when you're out in the woods, whether by design or bad fortune, odds are that weather conditions won't always cooperate. Your fuel sources may be wet and it may be actually raining. Just as bad, it may be dark. (For some perverse reason, it seemed that every time my CAP squadron went on an FTX, we didn't pitch camp until it was dark and raining.)
So, tonight I went out back again for more practice. It rained last night and earlier today, so everything was wet. Before heading outside I gathered several items:
1. A Swiss surplus rain poncho, mainly for use as a mat to sit on. I also used it to collect wood shavings.
2. My Becker Combat/Utility 7 knife, along with matches and tinder in a small Altoids tin in the sheath pouch.
3. A Rayovac LED headlamp.
4. My Victorinox Pioneer Swiss Army Knife, to which is attached a County Comm Peanut Lighter. If I step out of the house, this combo is in my pocket.
5. 1L Nalgene bottle of water to douse the fire when I was finished.
I wanted to see if I could get a fire going using just a match and tinder gathered from my yard. I gathered some small dead branches from a tree in my yard. These felt pretty dry. I broken them up and set them aside.
I took a small branch which didn't seem soaked from my wood pile, peeled off the bark, and made a pile of shavings from the dry wood within.
Rather than placing my pile of shavings directly on damp ground, I first made a platform of dry sticks. Doing so keeps your tinder from getting damp.
The first hitch I ran into was that I could not get my strike anywhere matches to light, even using a dry rock as the striker. I don't have a striker from a match box in the fire starting kit in the Becker Sheath, something I must remedy.
I decided to light the match with the Peanut Lighter then try to light the pile of shavings. What I discovered was that whatever wood this was would ignite, flame, then cool down to a coal and then go out before getting any real flame going. Discouraging to say the least.
In exasperation, I took half of a petroleum jelly cotton ball out of the fire starting kit and placed it in the middle of the pile of shavings, then lit it with the Peanut Lighter. The cotton ball with PJ burned hot and long enough to ignite the wood shavings and sticks that I added. Shortly thereafter I had a small blaze going.
After dousing the fire and coming inside I took another match and tried to light it using the grout in my slate floor in my office. This has worked in the past, but tonight, no dice. I got one spark but the tip of the match wore away before igniting. I put the match in the flame of a lighter and it did ignite, so it may be that it's too humid for the strike anywhere matches to light without a matchbox striker or external help. Not something I'd want to discover in an emergency.
Lessons learned:
1. Lighting a fire when stuff is wet takes a lot of work.
2. Carry good tinder with you. Don't depend on being able to find natural tinder when you need it. Cotton balls soaked in petroleum jelly can be made at home, are cheap, and work wonderfully.
3. As a corrollary to #2, if you do find good tinder while roaming the woods, gather some for later use.
4. Even if your matches are strike anywheres, carry the striker from a matchbox with you.
5. Have at least one backup means of making fire. E.g., a lighter. I wholeheartedly recommend the Peanut Lighters from Countycomm.com. They are inexpensive, small, carry easily in a pocket, and don't leak. Mine has not been refilled in at least two weeks. I also like ferrocerrium rods which can be struck to generate a shower of hot sparks. They last a long time and work when wet.
6. A large knife will make it easier for you to make fire. It's much easier to make wood shavings with a good sized belt knife than with a pocket knife. You can also use a large knife to split open wet branches to get at the dry wood within.
7. Aside from keeping you dry, a poncho can be used to collect wood shavings you make and keep them off damp ground.
8. LED headlamps rock. It would have been a lot harder to work in the dark if I had to hold a flashlight in one hand.
9. Setting things on fire is fun.
Sunday, September 09, 2007
Practiced some fire starting today
Fire making is a skill that you need to learn and then practice. Although I've started plenty of camp fires, every so often I like to try something a little different to see if it's something I can use. For example, my Marlin 336 has an Eagle Industries Stock Pack on the butt, inside of which I carry a small cleaning kit, a 35mm film canister filled with cotton balls soaked in petroleum jelly for use as tinder, and a Swedish Fire Steel. The latter is a ferrocerium rod and steel striker, which can be used to throw a shower of sparks. Someone recently suggested that the Ballistol in my cleaning kit might work as a fire starter, something I wanted to try out.
Here's what I gathered in my backyard to do a little experimenting:

On the left are some large sticks to use as fuel. Then my Becker Combat/Utility 7 knife, tomahawk, Ziploc containing the cleaning kit, tinder and fire steel, then some small sticks for use as kindling. I wound up not needing the tomahawk. The Becker worked well to shave down a bunch of fuzz from the large sticks, and to split them so the inner dry wood was exposed.
Here's the pile of wood shavings ready to go. The white thing in the middle is a cleaning patch wet with Ballistol.

My hope was to use sparks from the fire steel to ignite the Ballistol-soaked patch, which in turn would ignite the shavings. No dice. It simply would not light. This demonstrates that while something might seem like a good idea in theory, it won't necessarily work in practice, and one should have a backup plan.
My backup plan is the fire starting kit kept in the pouch on the Becker's sheath. It's a small Altoids tin with some strike anywhere matches, and some PJ-soaked cotton balls. The wood shavings were thin and dry enough so that I didn't need to use a cotton ball. One match was all it took to get the shavings burning nicely. I then added sticks about as big around as a pencil, and once they were burning I added thicker wood. Here's my fire after it was burning for a little while:

As you can see, I filled the Spaghettios can with water to see how long it would take to boil. Only a few minutes, as it turns out.
While I was experimenting out back, my four and a half year old daughter Alexandra came out, so I was able to teach her about camp fires. We even put the fire out with water, then rebuilt it using one of the PJ-soaked cotton balls as tinder.
It was a fun way to spend a couple of hours.
Here's what I gathered in my backyard to do a little experimenting:
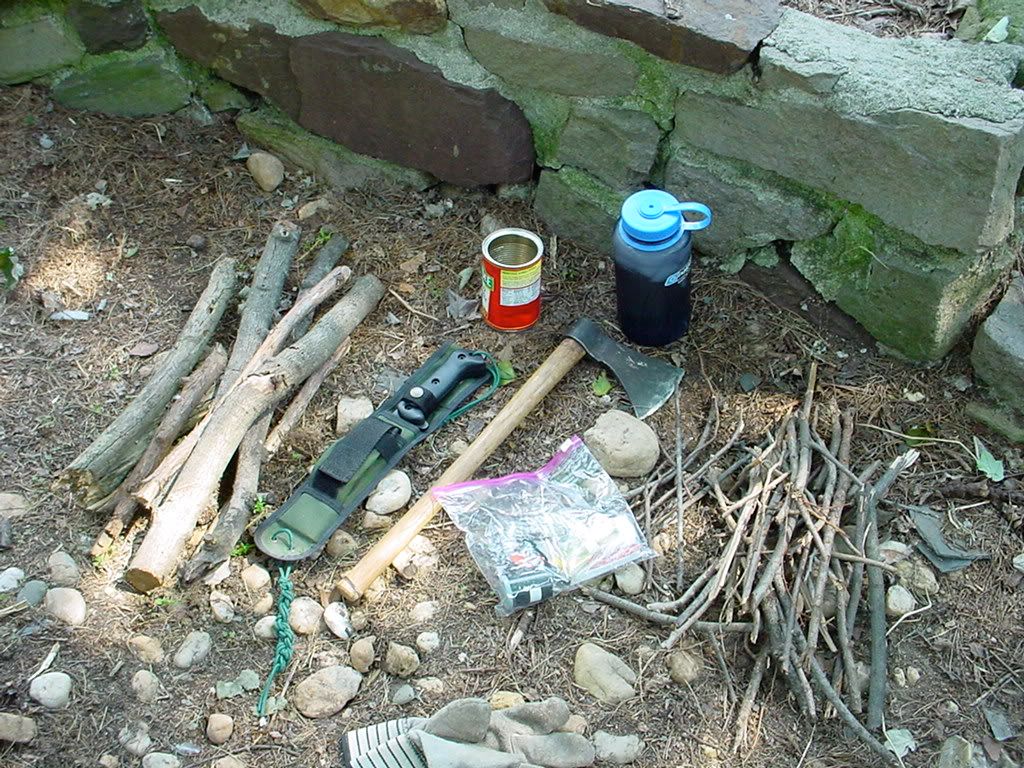
On the left are some large sticks to use as fuel. Then my Becker Combat/Utility 7 knife, tomahawk, Ziploc containing the cleaning kit, tinder and fire steel, then some small sticks for use as kindling. I wound up not needing the tomahawk. The Becker worked well to shave down a bunch of fuzz from the large sticks, and to split them so the inner dry wood was exposed.
Here's the pile of wood shavings ready to go. The white thing in the middle is a cleaning patch wet with Ballistol.
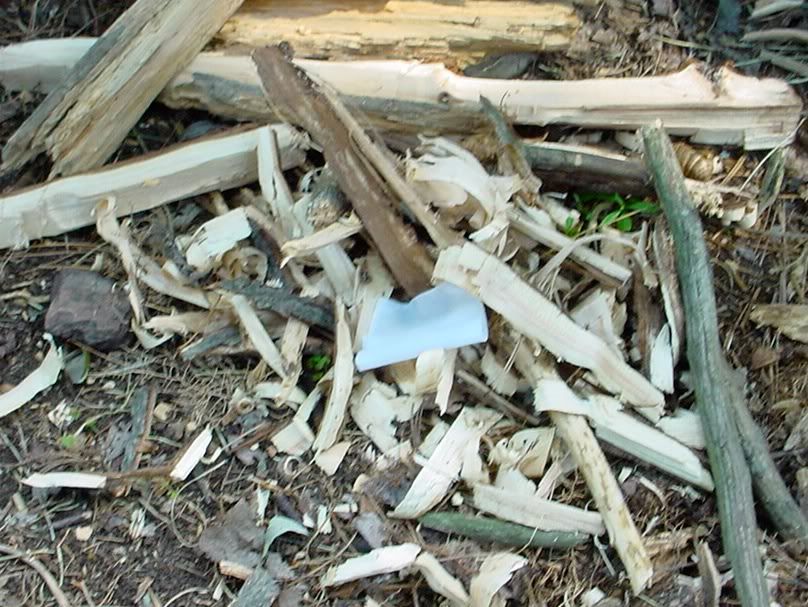
My hope was to use sparks from the fire steel to ignite the Ballistol-soaked patch, which in turn would ignite the shavings. No dice. It simply would not light. This demonstrates that while something might seem like a good idea in theory, it won't necessarily work in practice, and one should have a backup plan.
My backup plan is the fire starting kit kept in the pouch on the Becker's sheath. It's a small Altoids tin with some strike anywhere matches, and some PJ-soaked cotton balls. The wood shavings were thin and dry enough so that I didn't need to use a cotton ball. One match was all it took to get the shavings burning nicely. I then added sticks about as big around as a pencil, and once they were burning I added thicker wood. Here's my fire after it was burning for a little while:
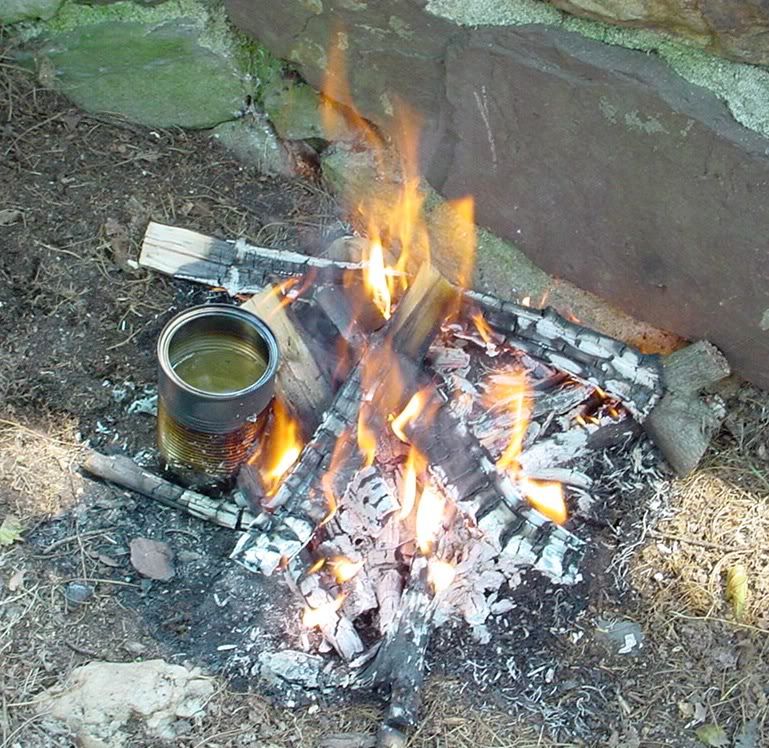
As you can see, I filled the Spaghettios can with water to see how long it would take to boil. Only a few minutes, as it turns out.
While I was experimenting out back, my four and a half year old daughter Alexandra came out, so I was able to teach her about camp fires. We even put the fire out with water, then rebuilt it using one of the PJ-soaked cotton balls as tinder.
It was a fun way to spend a couple of hours.
Subscribe to:
Posts (Atom)

 Posts
Posts