Sunday, June 30, 2024

Revolver Chamber Brushes from Brownells

Cleaning the charge holes is an important part of maintaining a revolver. If you shoot .38 Specials in a .357 Magnum it's especially important to do so to knock back the crud ring that results. However, even using a bore brush this is a fair amount of work.

Brownells sells revolver chamber brushes for .38/.357 and .44/45. They are larger in diameter and longer than pistol bore brushes. This morning I used one when cleaning my S&W Model 64-2 snub .38.


(Yes, my workbench is cluttered.)

Note how much longer the chamber brush is than a bore brush. Also note that it's longer than the frame opening for the cylnder. Do not put the chamber brush down the bore because getting it back out is going to be extremely difficutl.

I ran the chamber brush dry through each charge hole once in each direction. It got rid of a lot of crud from the .38 Special 158 grain LSWC loads I fired yesterday.

Incidentally, after I finished cleaning the gun I replaced the wood grips and grip adapter with the set of Pachmayr Compacs it had when I got it. The Magnas with grip adapter were comfortable when dry firing but really whacked the inside of my left thumb when shooting the gun.

From last weekend:


The rubber grips are still pretty small so the piece should still conceal easily under a jacket or vest when Fall rolls around. This is a 6 shot K-Frame so it's not like I'm going to be stuffing this in my pants pocket, anyway.

Saturday, May 18, 2024

S&W Model 640 Range Report

I'm pleased to note that the gunsmithing I did on my S&W Model 640 I did this morning worked out. I took it to the range tonigh and put 50 rounds of my handloads through it. The loads were a 148 grain button nose, bevel base wadcutter from Matt's Bullets, 3.3 grains of Alliant Bullseye Powder, and CCI primers in Winchester wadcutter brass. The gun functioned perfectly.

Something to mention is that of the major American primer brands, CCIs have the hardest cups. So, if the gun runs well with them it should work fine with Federal (the softest), Remington, or Winchester primers.


Note that the reason I needed to work on it earlier today was because I'd installed an Apex Duty/Carry kit in it, which has a reduced power hammer spring and extended firing pin. (The kit also includes a reduced power rebound spring but I managed to launch that into the ether so my gun has the OEM rebound spring.) Even without the lighter rebound slide spring it's much easier to shoot well than as it came from the factory.

This is 50 shots at 7 yards. All of my shots were on the target.


This gun will definitely be carried.

Replacing the Hand Spring in a Smith & Wesson Revolver

If you need to replace a hand spring in a Smith & Wesson revolver this video shows how:


In the video he used a dental tool to push the spring forward so that it's in the correct position relative to the hand. I found that a spring bar tool as used for changing watch bands worked perfectly. I used one that was included in this inexpensive kit.


Sunday, May 12, 2024

Cast Bullets Using the Lee TL358-158SWC Mold

Over the past month I've done a couple bullet casting sessions, mostly making 158 grain (nominally) lead semiwadcutters in a 2-cavity Lee TL358-158SWC mold. I also cast a couple hundred .490 round balls for my .50 caliber muzzleloading rifles.

Bullets cast from this Lee mold have a nice reputation for accuracy in .38 Special and mild .357 Magnum loads. I also like that the design incorporates a wide meplat that will perform well if I shoot anything besides paper or steel with it.

This image swiped borrowed from the Lee Precision website shows was they look like:


Aside from that wide meplat, the tumble lube design makes for easy casting and prep. I cast them from soft alloy since I'll be keeping them under 950 FPS. I used pure lead with some old, unneeded cast bullets added to the mix to add some tin for better mold fill-out and stretch the melt a little. I can still scratch the bullets with a thumbnail, however.

To lube, I put a batch in a small container and then dribble some Lee Liquid Alox on, then mix them all up until the lube is evenly distributed over all the bullets. LLA comes out of the bottle brown but you only need a very light coating, such that the bullets are still mostly silver colored.

You can also thin the LLA with some mineral spirits to stretch it out and speed drying.

White Label Lube's Liquid Xlox is a substitute for LLA and may be more cost effective than LLA, but I haven't tried it.

The wet bullets are then set on a sheet of wax paper to dry. They're good to go in about 12 hours.


Tumble lube designs are also good for powder coating if that's your thing.

Lee sells several other tumble lube designs, and I've read on forums devoted to cast bullet shooting that others get good results tumble lubing conventional designs as well.

I don't size the bullets before loading. Instead, I make sure that my case mouths are adequately flared. I seat them, then in a separate operation I run the loaded rounds through a Lee Factory Carbide Crimp Die, which also sizes the case down to factory dimensions. Thus, if the bullets are a bit oversized and caused a bulged case, it gets sized back down to the correct dimensions.

Yesterday I put 50 of the Lee bullets through a 3" Model 64, loaded on top of 4.1 grains of HP-38 in mixed brass, with CCI small pistol primers. In a 4" barrel and depending on barrel/cylinder gap, this load should run around 850 FPS +/-. It's probably closer to 800 from a 3" tube.

There was very minimal leading, if any. The lube leaves a bit of soot on the gun and is smokey. Many peopple don't like either but to me it's a part of shooting a revolver. The soot wipes right off with a rag anyway.

My late father's favorite .38 Special handload was a 158 grain LSWC, usually Remington swaged bullets, on top of 4.3 grains of HP-38 in mixed brass and usually with Winchester small pistol primers. It's very accurate but when I got the S&W Model 15 that he shot a lot of these through I had to remove quite a bit of leading. The front edges of the cylinder were actually covered in lead deposits. He shot a lot and got lazy with cleaning in his later years, what can I say?

The next batch of these I load will probably be a bit slower, with either 3.9 grains of HP-38, 3.5 grains of Bullseye, or some other charge. The paper or steel targets I shoot won't know the difference and recoil will be a little less, which is good for my hands.

I've recently acquired a pound each of Accurate No.2, Hodgdon Titegroup, and Winchester 244, none of which I've previously used. The No.2 and Titegroup should good for light target loads while the 244 is closer to Unique and may be good for heavier loads suitable for woods carry.

IMHO, bullet casting is not only fun but it's a good prep. Yes, it's time consuming but it helps insulate you from component shortages that happen every election cycle or artificially generated panic. Cast bullets are old fashioned but remain effective projectiles.

Sunday, May 05, 2024

FN PS90

One of the guns I've had an interest in for several years is the FN PS90. This is the semiauto-only civilian version of the P90 submachine gun/personal defense weapon that FN created for NATO use back in 1989 - 90. 

Last summer I picked up a PSA Rock 5.7 so I already had some experience with the 5.7x28 cartridge. 

A couple weeks ago I turned the proceeds of consigning three guns into a PS90. I added a Primary Arms SLx Advanced Push Button Micro Red Dot Sight - Gen II red dot sight, along with a sling from Urban ERT. The PS90 came with a single 50 round magazine so I bought three more from Grabagun.com, who had the lowest price on them.

One final accessory that I highly recommend is a spent cartridge collector AKA brass catcher. FN offers one but the price is ridiculous. Instead, I got one from jemachinetech.us that works well. It is large enough to hold 50 spent cases.


My initial impressions are as follows:

  • The gun is totally ambidextrous. The charging handles and magazine catch are symmetrical and easily operated with either hand. There is no last round bolt hold-open. Spent cartridges eject out the bottom of the gun.
  • It's very small but heavier than you think it would be. Since it's a straight blowback design the bolt is heavy.
  • Even though it's fitted with a 16" barrel to prevent it from classed a short barreled rifle under the National Firearms Act, it's very compact. If you filed a Form 1 and SBRed it, it would be about the same length as a computer keyboard.
  • The length of pull is a bit short. Since I'm short this isn't a problem for me but if you're tall it might be. I think there are extended butt pads available.
  • Takedown for field stripping is stupid simple. The mechanism appears to be quite simple.
  • The magazine design is genius.
  • The trigger pull sucks. It's heavy and spongy. OK in a combat gun and the risk of an inadvertent discharge is low but it would be nicer to shoot if it was several pounds lighter.
  • I like the horizontal rocker safety.
  • The charging handles don't provide a lot of purchase. I may install an extended handle at least on the right side.

Today I put 190 rounds through the PS90:

  • 100 x FN SS197SR 40 grain Hornady VMAX (made by Fiocchi USA)
  • 40 x Fiocchi Range Dymanics 40 grain FMJ
  • 50 x AAC 40 grain FMJ

The AAC ammunition felt very consistent. In contrast, the ammo made Fiocchi had a few rounds which felt like they were loaded a bit light.

The SS197SR and FRD ammo gave me a few malfunctions where the bolt didn't seem to reciprocate far enough back to recock the hammer and strip a new round into the chamber. However, they may have been related to my #2 magazine so I'll keep an eye on that one.

The PS90 performed perfectly with the AAC ammo.


Recoil was a little more than I expected though not by any means unpleasant. This is due to the heavy mass of the reciprocating parts.

The Primary Arms red dot sight is a good fit for the PS90 (or any other close-in gun, for that matter). The 2MOA dot is large enough to see easily but small enough to be precise. Even with my astigmatism the dot was defined enough to use, albeit not perfectly sharp.

I got it zeroed easily so that point of aim = point of impact at 50 yards. Due to the high sight line over the bore, I plan to shoot the gun at both closer and longer distances to see how POI is affected. E.g., I'm expecting it to shoot low at close range.

After zeroing the rifle I spent some time banging gongs at 50 yards. Two of these are about 8" wide while one is about 12" wide x 18" high, and there's also a 12" - 16" plate. Finally, there's an old bowling pin hanging in the bunker setup to catch splatter from the steel plates.

It's very easy with the PS90 to hit the small plates doing drills from low ready, either single shots or double taps.

From the bench it grouped into about 1.5" to 2" at 50 yards.

Especially from the PS90's longer barrel, the 5.7x28's ballistics should make it suitable for close range self defense. It's an easy gun to quickly get hits on face-sized targets out to 50 yards at least. Recoil is very mild and the noise and blast are much less than 5.56 NATO. It's not a replacement for an AR15 or AK. It's not an infantry rifle. It's a PDW.

I could see where a PS90 would be useful on a farm or ranch as a tractor gun to take care of varmints up to the size of coyote or even a bit bigger. It's super compact and carries a lot of rounds on board.

Yom HaShoah 2024

Yom HaShoah / Yom HaZikaron laShoah ve-laG'vurah, known in English as Holocaust and Heroism Remembrance Day begins tonight at sundown and runs until Monday evening.

For my entire life I've heard the rallying cry, "Never Again!" But it's happening again.

It is now over six months since the pogrom of October 7, 2023. This was the greatest loss of Jewish lives since the Holocaust. Many of the men, women, and children taken as hostages by Hamas and their allies in Gaza still languish in captivity, among them several American citizens.

Indeed, the Hamas founding charter explicitly calls for the destruction of Israel and the slaughter of Jews. You can read an English translation of the 1988 charter here

In other words, Hamas is not too far different from Nazism regarding Jews.

Since October 7th, I have seen more antisemitism in the United States than I did in my previous 55 years COMBINED. The level of open hatred on display in "progressive" media and on university campuses should shock the conscience of every upstanding American.

Much of this hate that we're now seeing domestically is the direct result of allowing mass quantities of people from traditionally antisemitic cultures into the county, and allowing donations to American universities from places like Qatar (which is one of the biggest supporters of Hamas).

What can we as Jewish Americans do?

  • Jewish business owners should blacklist from any kind of financial support any university that allows the pro-Palestinian protests to continue. Peaceful protest is our right as Americans but these immediately went far beyond peaceful to harassing and intimidating Jewish students and faculty.
  • The "protestors" on American college campuses are providing material aid to terrorist organizations and should be treated as such.
  • Identify organizations and companies that provide support to the Palestinian protesters, and boycott them. Make them infamous for their support of Nazi ideology.
  • Demand that foreign countries be barred from donating to American universities.
  • Demand the explusion and deportation of any foreign students who participated in these protests.
  • Demand that immigration from places like Gaza is shut down.

But all of these will take time and in the interim Jewish Americans are seeing increased levels of harassment. Most of us are of Ashkenazic ancestry and in one way or another are infected with the Shtetl Mentality. For our survival that needs to be discarded.

As I have said many times, Jewish Americans need to embrace their Second Amendment right to keep and bear arms. As Americans we have the nearly unique ability to arm ourselves for self- and the common defense.

For "Never Again!" to mean anything it must be backed up with more than words. It needs to be backed up with the ability to immediately and decisively respond to violence with force. Without that, the slogan may as well be, "Never Forget."

Nobody will protect us, but us. And this is something we as individuals must take to heart. Even in Israel the government not only failed miserably to protect its citizens, it actively prevented them from defending themselves because most Jews in Israel are disarmed.

I have decades of experience with firearms so back in November 2023, I published the first version of an ebook, "Guns for Jews." It's a primer especially intended for American Jews who are looking into buying a gun for self preservation. In it I include some justifications for doing so under Jewish law, some general recommendations, and some specific recommendations.

Last week I uploaded v3.0 of "Guns for Jews" as a PDF that you can download here: 

https://drive.google.com/file/d/1WgjlXp2sDGPYTpjNdskWqYQVwF380SlG/view?usp=sharing

Note that in the document I am not trying to sell anything. This is a brain dump to benefit my fellow Jewish Americans. I also encourage sharing the link or the file in the hopes of spreading knowledge.


Tuesday, April 30, 2024

Major Updates to "Guns For Jews"

Today I posted a major revision with many updates to my ebook, "Guns For Jews." It's now hosted as a PDF on my Google Drive. Direct link:

https://drive.google.com/file/d/1WgjlXp2sDGPYTpjNdskWqYQVwF380SlG/view?usp=sharing

It's my hope that this will be shared with as many of my fellow Members of the Tribe as possible.


Monday, March 11, 2024

World War Supply Canvas M3 Tanker Holster

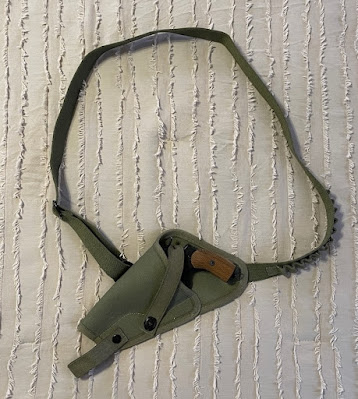
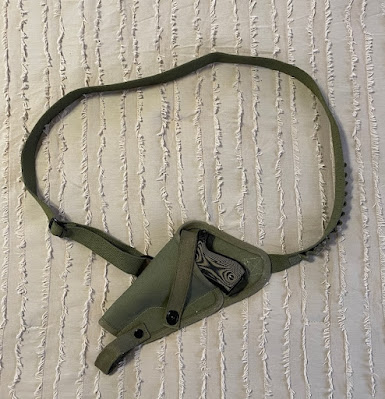
Last year I posted about the virtues of the M3 Tanker Holster. I have copies of those made for the M1911 and the S&W Victory Model, and a really nice version from El Paso Saddlery for my S&W Model 28 N-Frame. Today I received a canvas version of the Victory Model holster by World War Supply. I bought it from Amazon to take advantage of points I have, but it's also available directly from WWS.

Aside from 4" K-Frames, it fits a variety of other guns:

Russian M-1895 Nagant:


High Standard Sentinel .22:


Ruger Speed Six:


And even the Beretta Model 81 .32 ACP autoloader fits comfortably:


Note that I have the Beretta in there cocked and locked with the retention strap between the hammer and firing pin, just in case the safety gets nudged off by accident.

The Beretta Model 84 in .380 is externally identical to the Model 81 so it'll work as well.

During WW2 the Victory Model holsters were also used for Colt Commando revolvers, so it should work for an Army Special or Official Police with a 4" or shorter barrel.

I didn't try it in this one but my leather Victory Model holster works well with a Webley Mk.IV in .38/200. 

The 12 cartridge loops on the strap are intended for .38 Special rounds but appear snug enough for .32 S&W Long. They should be fine for 7.62x38R Nagant ammo or .32-20.

World War Supply also has a canvas version of the holster for the M-1911.

The canvas fabric appears to be of good quality and the stitching is done well. These holsters cost $34.99 and at this price point appear to be a great deal with a lot of versatility. As a southpaw I appreciate it that WWS sells left handed versions of this design at the same price as the right handed holsters.

If you prefer leather those versions are only a few dollars more.

Monday, February 26, 2024

Check the Thumb Piece Nut on Your Revolvers

If you rely on a double action revolver something that's easily overlooked is whether the thumbpiece nut or screw is tight. If it loosens and falls off it could lead to losing the thumb piece, thus making the gun a lot harder to load and unload.

The thumb piece nut is part number 20 in this diagram of the Smith & Wesson Model 10, with the thumb piece itself being number 21.


(Schematic borrowed from Numrich.)

Taurus revolvers use a similar design. At least on the two sample I own an actual screw is used, that screws into the cylinder latch. On the S&Ws there's a threaded stud that protrudes through the frame onto which the nut threads.

I recommend removing the nut or screw, cleaning the threads with rubbing alcohol, and then reinstalling after putting some blue Loctite on the threads.

It wouldn't be a bad idea to pick up a couple extras along with other spare parts. Something else I recommend for older Smith & Wessons is a spare hammer nose and rivet (parts 48 and 51 in the diagram). Numrich is a great source for a vast amount of gun parts.

When working on guns always make sure that you use properly fitting, hollow ground screwdrivers. I mostly use the screwdriver bits found in this set from Weaver, which includes a good mallet, pin punches, and bench block, all of which are very useful.

Sunday, January 21, 2024

A Few Nice Pieces of Cold Weather Clothing

I've recently picked up a couple nice pieces of  clothing that I can recommend for layering in cold weather.

First, is a French quarter-zip fleece top in CCE camo. I got it from Varusteleka but it's available at many surplus suppliers. As with any military surplus clothing, size choices are limited. It's a very simple light fleece shirt but it's surprisingly warm especially for its weight, which is only about 270 grams. If you can find one in your size grab it while they are available.

Second, is a Rothco copy of the old USGI 5-button or "Jeep" sweater (eBay link). I've had the real deal in the past but I put on weight so I gave them away. Genuine GI sweaters are still available but mostly in small sizes. They were made in wool knit or acrylic knit variants. Wool is warmer but the acrylic sweaters are still pretty warm. (The above is an eBay link. Here's an Amazon affiliate link.)

Note that by design these are snug-fitting and were often worn over a base layer but underneath a shirt, especially the old M-1951 wool field shirt or a BDU shirt.

Third is a Sarma TST L1 merino wool balaclava, also from Varusteleka. This appears to be made from the same material as their L1 merino wool t-shirt. In other words, it's really thin and packs up very small, to about the size of a pack of cigarettes. I got the L/XL size. For reference my hat size is 7-3/8 or 58/58cm.

Yesterday I took a half hour walk in 20*F weather. On top I wore a long sleeve Hill People Gear synthetic t-shirt, the Rothco sweater, my Arc'Teryx Atom SV jacket, topped with a German surplus flecktarn parka to provide a windproof outer layer that covered the top half of my thighs, and the Sarma balaclava. About halfway through the walk I started overheating and had to drop the hood and unzip a little.

I was very impressed by the Sarma balaclava. Despite its thickness (or lack thereof) it made a noticeable difference. It can also be rolled down for use as a neck tube/gaiter, or rolled up for use as a beanie. It's stretchy enough to pull down and expose your mouth. I'll be interested to see how it does in warmer weather. 


Friday, January 19, 2024

An Ultralight 5' x 7' Survival Shelter

 This video from WayPoint Survival came up in my YouTube feed today:


This is pretty darn clever, IMO. One thing I'd change would be to put a bowline knot on one end of the ridgeline and then use a marlin spike hitch to fasten that end around a tree, instead of using a carabiner. I.e., run the end of the ridge line around the tree, pull a bight (loop) through the bowline's loop, and then put a stick into the loop to secure it in place.

Thursday, January 18, 2024

Corporal's Corner: The DIY Water Machine

Here's an excellent demonstration from Shawn Kelly of how to melt snow and ice for water during the Winter:


Friday, January 12, 2024

Got a Spider for my Minilathe

A couple weeks ago I ordered a spider for my 7x14 minilathe, something I should have bought years ago. Little Machine Shop had it as their weekly special so I finally pulled the trigger on it.

Link to minilathe spider: https://littlemachineshop.com/products/product_view.php?ProductID=1136

The spider threads onto the end of the spindle and provides additional support to long workpieces, to prevent them from whipping around.


To install the spider you remove the gear cover on the end of the headstock and simply thread it onto the end of the spindle.


I used it today while drilling and tapping the flared end of the factory ramrod that came with my Investarm Gemmer Hawken. Even though I bought an unbreakable Delrin rod for it from Track of the Wolf, which is threaded on both ends, I want to keep the OEM wood rod as a spare.

This shows the ramrod mounted through the spindle bore.


And here I was using the lathe as a tapping guide to keep the 10-32 tap straight. I did not do this under power. Instead, I used the chuck key as a handle and rotated the chuck manually. Power to the lathe was off when I did this.


Aside from drilling and tapping the end of the OEM ramrod to accept 10-32 accessories like cleaning jags, worms, and bullet pullers, both ends of both rods got drilled and cross-pinned. To drill the holes I used my minimill.

Always cross-pin your ramrod tips! Failing to do so can result in the ends pulling off the rod if you get a jag stuck or need to pull a ball. It's simple to do so:

  1. Drill a hole through the rod crossways. I used a #40 drill because for my pin I used some brass rod 0.098" in diameter.
  2. Chamfer both ends of the hole.
  3. Drive the rod through the hole and cut it off. I used side cutters.
  4. Using a hammer, peen over both ends on a metal surface. I used the anvil on my bench vise.
  5. File the ends of the pin smooth.
One end of the Delrin rod from Track is tapped 10-32 and the other is 8-32. I will use 10-32 jags, etc. and have an aluminum T-handle with an 8-32 stud on the end. I have qualms about using it for cleaning or ball pulling.

Just another example of how my small, tabletop machines help me out with gunsmithing tasks.

Monday, January 01, 2024

Making Pemmican Part 3 - Taste Test

Last week a friend and I went to his camp in Tioga County for Pennsylvania's late flintlock deer season. While we did not get any deer, we did get a chance to try the pemmican I made earlier in the week, as described previously on this blog.

To prepare the pemmican for a meal, we made a rubaboo, AKA stew with it. Along with three of the pemmican pucks, we used dried, mixed vegetables from Turkey Foot Trading and Forge, a can of diced tomatoes, garlic, salt, and black pepper.

Cooking it up on the wood stove:


And ready to eat:


(Styrofoam bowls reduce the dishes we need to wash in a completely off-grid, no-running water camp site.)

The verdict: As a meal for someone who has been out in the cold all day it's pretty good. It was very filling and although we each had three bowls about half was leftover, which I brought home in a Ziploc back and reheated for dinner last night.

I may try making pemmican again but I'll try to get the jerky ground more finely.

There's a package with two pucks left in my freezer so I'll have to come up with another way to try it, maybe a rechaud.


Monday, December 25, 2023

Making Pemmican - 2

Today I finished up my first batch of pemmican. I let the dehydrator run overnight at around 115 degrees. Nowadays, it's generally recommended to make jerky at around 170 degrees but this will destroy more nutrients. I figure that a bit lower and slower will be safe. Jerky was originally made by drying for a few days in the wind over a low, smoky fire.


Then I shredded it in my food processor.


I probably would have gotten better results if I did it in smaller batches rather than all at once. I didn't get it as fine as I wanted.

Next I melted some beef tallow over a low heat, poured it into the bowl and mixed it thoroughly. After that I spooned it into the muffin tin to make pucks.


The tallow was fully melted in the pic. When it's melted it's a clear, slightly amber liquid.


In preparation for sealing the pucks I took them out of the muffin papers. They are pretty soft. I think I could have used a little less tallow.


Vacuum sealing:


And all done, ready for the freezer:


I decided to put two pucks in three of the packs to reduce waste.

Later this week I'll be heading upstate for Pennsylvania's late flintlock season. We'll try making a stew or rubaboo with one of the packages. I'll post a review after I get home.

Sunday, December 24, 2023

Making Pemmican - 1

A survival food I've wanted to try is pemmican. I've watched several videos about it on YouTube and decided to give it a whirl. Wikipedia provides a good overview of what it is:

Pemmican (also pemican in older sources[1][2]) is a mixture of tallow, dried meat, and sometimes dried berries. A calorie-rich food, it can be used as a key component in prepared meals or eaten raw. Historically, it was an important part of indigenous cuisine in certain parts of North America and it is still prepared today.[3][4] The word comes from the Cree word ᐱᒦᐦᑳᓐ (pimîhkân), which is derived from the word ᐱᒥᕀ (pimî), "fat, grease".[5] The Lakota (or Sioux) word is wasná, originally meaning "grease derived from marrow bones", with the wa- creating a noun, and sná referring to small pieces that adhere to something.[6][7] It was invented by the Indigenous peoples of North America.[8][9]

Pemmican was widely adopted as a high-energy food by Europeans involved in the fur trade and later by Arctic and Antarctic explorers, such as Captain Robert Bartlett, Ernest Shackleton, Richard E. Byrd, Fridtjof Nansen, Robert Falcon Scott, George W. DeLong, and Roald Amundsen.

Link.

I'm using the simplest recipe possible: meat and fat. I bought a couple packages of thinly sliced top round steaks and a couple jars of Epic beef tallow at my local supermarket.

The first step is to turn the beef into jerky:


I'm using my Nesco FD-75A dehydrator.

After the meat is dried to the point where I can crumble it with my fingers, I'll put it in a food processor to powder it.

Once the dried meat is powdered it will be combined with melted tallow, poured or scooped into a container, and allowed to set up.

Finally, I plan to vacuum seal each brick or puck of pemmican using my Foodsaver vacuum sealer. Thus prepared the pemmican should last for years if not decades, especially if I put the sealed packages in my freezer.

I will post follow-ups tomorrow showing the next steps.


Sunday, December 17, 2023

A Little Gunsmithing With My Table Top Mill

Back in October I picked up a Northwest Trade Gun put together from Caywood parts by Arizona gunsmith Mike Roby. The NWTG was one of the most important firearms in North American history, being made by the tens of thousands from the mid-18th to late 19th Centuries. It's basically a single barrel shotgun that was wildly popular with Indians and to a lesser extent, whites.

As a smoothbore, it's very versatile in that you can load it with shot for small game and birds, buckshot for larger animals or defense, or a single ball for large game.

The Caywood/Roby NTWG is a lefty, which made it impossible to resist.


It's a 20 gauge which translates to about .62 caliber.  My goal for it is to develop a round ball load that will allow me to hunt whitetail deer out to about 50 yards. That means I need to keep my shots on a paper dinner plate at that distance.

The first time I shot the gun I was getting pretty good groups at around 25 yards but they were about 10" low and a foot left. I decided the best way to correct this would be to add a rear sight, since as it came it only hand a front sight.

Last week I dismounted the barrel from the stock and used my Grizzly G8689 mill to cut a shallow dovetail.


The rear sight as it currently appears. After I settle on a load and get it zeroed, I'll narrow the blade to match the barrel.


I took it to the range yesterday and tried several different ball/patch combinations but failed to get what I consider an acceptable group, so more experimentation is necessary. One thing I'm going to try is 2Fg powder instead of 3Fg.

ASSuming I'm able to develop a good load it'll become a deer gun for me. It's under 8 lbs. and has a nice sling, making it nice to carry. Recoil is not bad at all with a hunting load. The large balls should drop deer nicely.

Many machinists turn their nose up at these small Chinese machines. Would I like to have a Bridgeport mill? Of course! But I don't have anywhere for it. This mill and my 7x14 lathe are quite capable of doing useful work as long as you confine yourself to their working environments. For making small parts or even modifying bigger ones, they've found a place in my toolkit.

Saturday, November 18, 2023

A Couple Winter Preps

Today I took care of a couple things that were overdue.

First, I test ran my generator using propane and a new regulator that I bought after I ran it last. That time, I couldn't get it running on propane, only on gasoline. While gas is more energy dense, propane is easier and safer to store in a suburban environment. I'm pleased to say that it fired right up and I ran it for about 15 minutes so that the battery would recharge. After I was done I disconnected the regulator and stored it inside a gallon Ziploc bag to keep it clean.

Second, I got my snow blower running again. We haven't needed one in a few years and it had been neglected. The engine froze at one point because I forgot to run it one year. I pulled the spark plug and hosed down the inside of the cylinder with Kroil and let it sit.

Today it turned over using the electric start but wouldn't run. I wound up changing the oil and replacing the spark plug. While changing the oil I actually drained it, refilled it with oil, drained it again, and then filled with 5W30. It then started up and ran with around a cup of Seafoam in the tank. I let it run dry.

After finishing up I ordered a new recoil starter assembly, shear pins, and a spark plug directly from Troy-Bilt, plus a new cover from Amazon.

The long range forecasts are calling for snow this winter so I really want the blower functional.

November 2023 Telecom Crash in Australia

I didn't see coverage of this in the US media. Instead, I saw it linked from Tactical Wisdom's X feed.

https://tactical-wisdom.com/2023/11/08/telecom-crash-in-australia/

Read the whole thing, it has an excellent discussion of immediate effects along with secondary and tertiary effects of a major Internet/telecom outage.

Among the things that we take for granted that won't work if communication lines are down include:

  • Bank withdrawals or deposits, whether in-person or via an ATM.
  • Purchasing groceries, gas, or basically anything if the store's point of sale system requires a functional connection.
  • Cell phones, landlines, and Internet, obviously.
  • Uber / Lyft / GrubHub / Door Dash, etc.
  • Stuff that uses the Internet to augment other services. E.g., Google Maps or Waze, which use your phone's Internet to download maps in real time to work with its built-in GPS.
  • Government services including 911.
Now think of how much everything you do everyday is dependent on that telco/ISP connection.

Long-term readers may recall that I work for a very large ISP/telco. I started out supporting our optical transport network then transitioned into operations for our product development labs. This stuff is very complicated with a million spinning, intertwined parts. I've seen outages caused by things ranging from Bubba shooting up exposed cable nodes with a shotgun to router configuration foul ups.

Aside from all that much of the physical infrastructure (fiber lines, coaxial lines, etc.) is by necessity running through publicly accessible areas.

There's been a lot of speculating in the past couple of years that we'll eventually get into a war with China, or that if we attack Iran they would asymmetric attacks against targets in CONUS. IMO, they'd be foolish not to if either conflict went hot.

Cyber attacks are a real threat against all the large providers and something they deal with constantly. In the event of a shooting war they'd ramp up immeasurably. These would include range from physical attacks to hacking and denial of service.

Go read the article I linked above and do some prepping so you can weather at least a short term interruption of Internet and telco services.

Friday, November 17, 2023

Work Sharp Guided Field Sharpener

Something that puzzles me is otherwise-capable outdoorsmen who can't sharpen a knife. Granted, sharpening a knife freehand can be challenging, especially if it's large, but being able to sharpen one's pocket knife should be considered a core skill.

There are a million different tools and gadgets for knife sharpening. One that I've used for several years and highly recommend is the Work Sharp Guided Field Sharpener. It includes several useful features:

  • A coarse diamond plate (220 grit)
  • A fine diamond plate (600 grit)
  • A ceramic rod with grooves that can be used to sharped knives or fish hooks
  • A small ceramic rod for sharpening serrations
  • A leather strop
It weighs 5.6 oz. and is 6.75" long.

Side view, showing the fine diamond plate:


Top view, showing the ceramic rods:


And the bottom-mounted leather strop:


Ideally, you'll touch up the edge on your knife before it gets too dull, so that you only need to use the ceramic rod and then remove the burr using the strop.

Unfortunately, Work Sharp does not include a case with the unit. I bought the case separately. I don't see the specific one I bought but here's an assortment of cases that are currently available.

You'll also need to get some stropping compound for the leather. I am using some green stropping compound from Eastwood, or pick one of these.

For the past year my EDC pocketknife most days has been a Spyderco Endura 4 with a pretty hard VG-10 blade. It has excellent edge retention but if you let it get too dull can be a bitch to resharpen. It needed attention because while it still cut well it no longer was shaving sharp. After about 5 minutes of work on the ceramic rod and strop it was back to shaving sharp.

If you don't know how learn to sharpen a knife and get sharpening tools you like. I'm a big fan of the Work Sharp Guided Field Sharpener.